February 06, 2007
Super Bowl Cooking
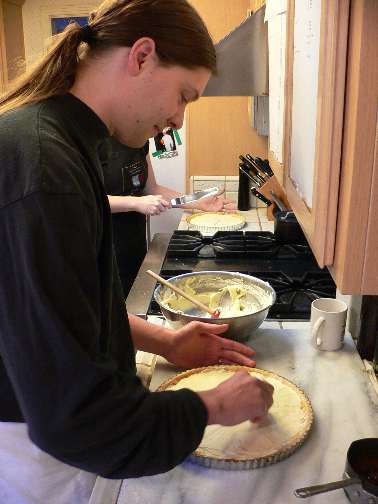
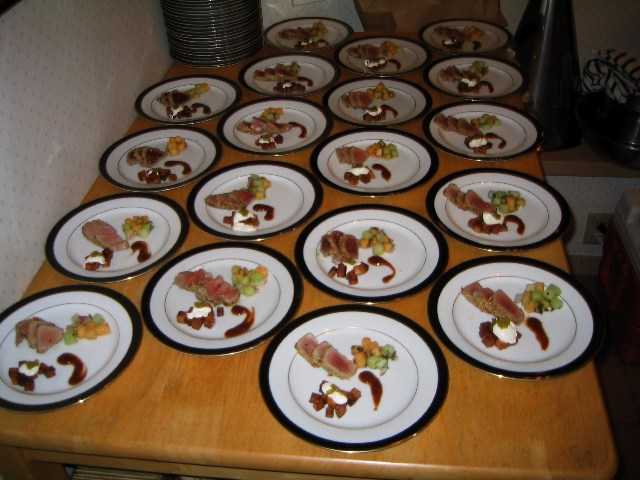
Over the weekend we had a Super Bowl party. There were multiple people and a TV larger than 55 inches -- that's apparently actually illegal. But being the non-sporting people that we are, the entertainment during the second half was some experiments with molecular gastronomy.
I've been told it isn't hip to call it that. But whatever. We made a peanut butter "dirt" using Tapioca Maltodextrin and two kinds of "caviar" via droppers. These are both very simple first steps with this type of "cooking". An easy (although expensive if you start doing lots of it) source for the chemicals is willpowder.net. The other thing you are likely to need is a very accurate scale -- one that can weigh in tenths of a gram.
anne posted some pictures. Here's an especially nice looking one of the coffee caviar.
January 01, 2007
Shaved Foie Gras Salad
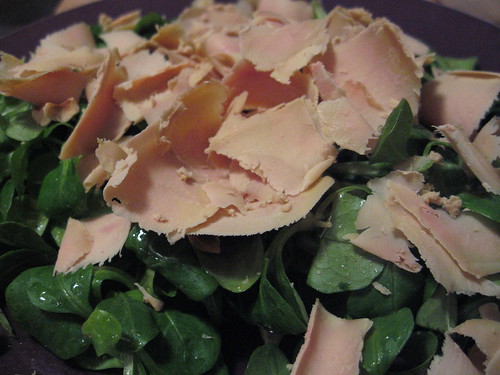
Here's a great and simple salad. At least, it's simple once you have everything assembled. It's also incredibly rich and decedent. Originally from Alice Waters. anne and I had this for two dinners over the holidays.
- mache or other nice but mild lettuce. Trader Joe's here in California sells 4 oz bags, which will make two very large salads, or 4 salads for more normal people.
- hazelnuts (optional), toasted and chopped. I think that these add a nice surprise crunch and flavor.
- basic vinaigrette, made with olive oil, white wine vinegar, mashed garlic, salt and pepper.
- foie gras torchon
To make the torchon: clean about 1/3 of a lb of whole raw foie gras. We got a 1 and a 1/3 foie from a local French importer. We were going to use the main portion of the liver for seared foie, so the "scraps" went into the torchon. After cleaning, salt the pieces, place the foie into a cheesecloth and roll into a log, about 1.5-2 inches in diameter. Squeeze the log as needed to form it up into a firm mass, and twist the ends, tying each with string. Place the log into the smallest container that will fit and surround/bury completely with kosher salt. Place into the fridge for 3-4 days. In all honesty, I'm not sure what the point of the salt is, but I guess it does allow a certain amount of air to circulate around the foie while it is curing.
About an hour prior to the meal, remove the foie from the salt and cheesecloth, wrap in plastic wrap, and place the foie into the freezer. You want to get the foie quite cold, but not frozen solid. An hour seems about enough time, after which you can transfer the foie back into the fridge.
Toss the mache with the vinaigrette and arrange flat onto a large plate (we used platter sized plated, but as I pointed out, we also used an entire package of mache for just two people). Scatter the top with the hazelnuts.
Wrap one end of the foie log in plastic wrap, and then again with a paper towel or clean kitchen towel (you need the towel both for grip and to insulate the foie from the heat of your hand). Using a vegetable peeler, begin shaving the end of the log. Move over the top of each salad plate, completely covering the surface. Because the slices are thin, this will look like quite a bit of foie. In reality, 1/3 of a lb of torchon will cover 5-6 large plates such as we used. Serve right away. Any slices of foie that hit the surface of the plate (rather than the mache) will melt just from the room temperature of the plate -- that's how thin the slices end up.
Any leftover torchon can be wrapped tightly in plastic and kept in the fridge for up to a week. It can be used again (after another hour in the freezer) for other salads, or simply sliced and eaten as one would a terrine.
May 05, 2006
Best Ride at Disney
anne and I went to Walt Disney World. On the way back, we were discussing which ride was our favorite. I think for me it was Mission: Space. Lots of fun, and I'm not sure what all of the fuss is about -- I'm prone to motion sickness, but didn't feel even remotely light-headed. It was overall a neat ride, even though we only rode it once. Everest was also fun, but not worth the heat and humidity of Animal Kingdom to get there.

Okay, so that isn't at Disney. It's Bern's Steak House in Tampa. We went there the day after we got back from Disney. Bern's is an old-school place. Sort of what someone might have thought was "fancy dining" back in the 1950s. Viewed this way, it's just this side of tacky. But if you get yourself into the right mindset, the interior is then fun, the extra food doesn't bother (just don't eat all of the soup or salad), and the separate booths for desert and after dinner drinks are charming.
However, you shouldn't be there for any of the above. Bern's is really about two things: steak, and wine. The steak is a selection of cuts from the strip sub-primal (filet, strip steaks, porterhouse, and other related cuts). They offer both aged and non-aged versions, and have an exact cooking chart with many exacting degrees of doneness. More importantly, their grill guys have been doing this so long that they can actual pull off the precision. anne and I both got aged 10 ounce Chateaubriands, with hers having a cool center and mine a slightly warm center. And that's exactly how the steaks were cooked. Oh yeah, they also have a wine cellar.
It's hand-down the largest wine list I've ever seen. It must be the largest in the States. I can't imagine any larger in the world, but I suppose it's possible. I've been told that they have 5 warehouses in the Tampa area to hold the back-catalog for the list. While it's fun to go through the list yourself, this one is really so large that that's hard to get your own head around. Time to call on the wine guy!
We gave him a country: France. A grape: cab-based. An age: "something with age on it." And a price range: well, never you mind. It was expensive, but was not the most expensive wine I've ever bought, nor was it out of line for what we ended up with. A 1926 Chateau Gruaud-Larose-Sarget. This is a "super second" growth that Bern's managed to buy up a whole bunch of about 30 years ago. Did I mention that the cellar also has lots of old wine? 1926! Holy Cow! We would have never in a million years thought to try to get wine that old. That's older than me and anne put together!
What's drinking an old wine like that like? It's hard to describe. It was in very good shape, with red only slightly tinged towards brown. The flavor had cedar or other aromatic wood notes, and as the wine started to open up, there was actually fruit like cherry, and even a bit of tanins left. I'll never again in my life probably drink wine that old -- but it sure was a neat ride even once.
January 05, 2006
Chocolates
Mignardise are small little sweets that you get at the end of a fancy meal. They are often an assortment that contains not only chocolates, but also other candies or cookies. This year I just made three quick chocolate based mignardise, and we passed them around with coffee.
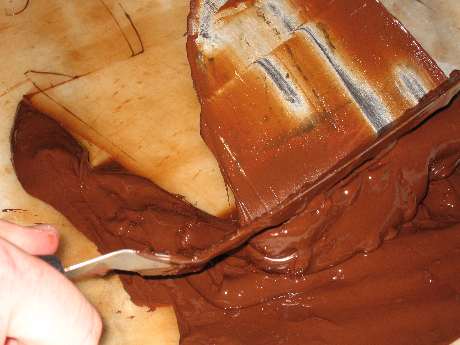
Tempering Chocolate via the "tabling" method
There's really only one trick to chocolates, and that's tempering the chocolate itself. It's certainly an odd process, and the first 3 or 4 times you do it, you really think it's not going to work. I like to use the "tabling" method pictured above, because the chocolate comes into temper very quickly, and remains smooth. If you don't have a flat surface (I have a marble board) you really can't table chocolate. It's also pretty messy no matter how careful you are. It's not very clear in the above picture, but I use a combination of an offset spatula and a drywall knife when I table the chocolate.
The most important thing, however, is to check that the chocolate actually is in temper by dipping something like the back of a spoon into it. If the chocolate is in temper, the spoon will set up very quickly (less than 5 minutes). If after 5 minutes, the chocolate is soft, you haven't lowered the temperature of your chocolate enough. For dark chocolate, anything above 88 degrees isn't yet in temper (85 for milk and 83 for white).
The first chocolate (not pictured) was white chocolate "bark" with finely diced nuts and dried fruit. It's pretty easy to make normally, you just thinly spread the tempered chocolate onto a Silpat, and then sprinkle the topping. You can score the chocolate once it starts to set, or you can simply break it into irregular shapes when completely cool.
I say "normally" because I was lazy and did not check the temper on my first batch. Of course, it was too hot and did not set properly. $8 of white chocolate into the trash because it already had fruit bits in it.
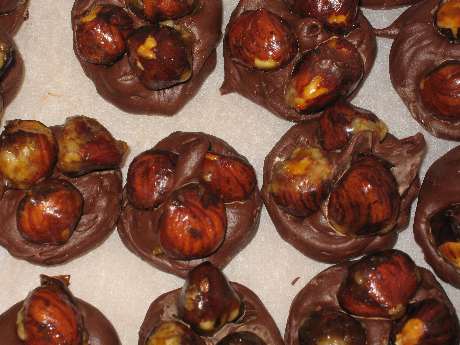
A Hazelnut Candy known as "Three Brothers"
This candy is easy to make if you can find ready made bars of gianduja (which I was able to). If you cannot, you have to grind the hazelnuts and chocolate together in a food processor. This isn't difficult, but it is quite hard on the food processors. At school we broke several because of the strain you put on the motor.
Once you have tabled the gianduja, you pipe it into rounds and top each with three hazelnuts that have been "draggeed" with sugar to both toast them and make them shiny.
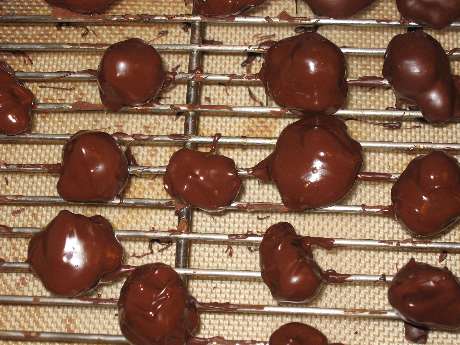
Truffles with a Coffee Flavored Center
Truffle centers are formed via a basic hard ganache, then dipped twice in tempered chocolate in order to form a nice hard shell. The first "dip" is actually easier to do with latex glove coated hands, and you really just need a "sealer coat". The 2nd actually does need to be properly dipped in order to look reasonably nice.
Lots of recipes will have you cool the centers in the fridge, but I was taught instead to table the center chocolate until it starts to set up, and then pipe the resulting mixture to make the truffles. This is messier, but much faster overall -- it takes two hours to cool the centers in the fridge.
I'll be the first to admit that I'm not the best chocolate maker when it comes to the final look. I really can't get my truffles into any kind of round shape even after rolling them in my hands. I just tell myself that they are supposed to look like the mushrooms anyway.
January 04, 2006
Dobos Tort
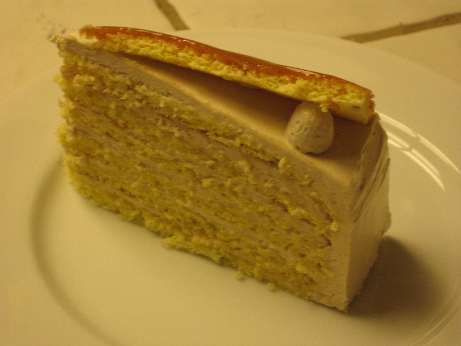
Dobos Slice
Dobos Tort is a nice cake. But it is a fair amount of work. It's a basic sponge cake with 6 layers, butter cream between each one, and a final layer on top that is coated with caramel prior to being cut into wedges and then afixed to the top with a dot of butter cream. Like with many cakes, the layers are moistened with a simple sugar during assembly. We used a bourbon flavored syrup this time, as it goes nice with the coffee in the buttercream.
The most interesting part of the Dobos Tort is how the sponge is made. It's a basic normal sponge made via the separated foam method (which means yolks and whites are processsed separately). However, the batter is spread directly into 7 circles, 10 inches each. This gets you nice and even layers, and you don't need to slice the cakes afterwards. It does, however, mean you need 7 half sized sheet pans for each cake, or you need to do them in two batches. My oven can just barely hold 4 pans at a time via some creative positioning.
The eggs attempted to escape
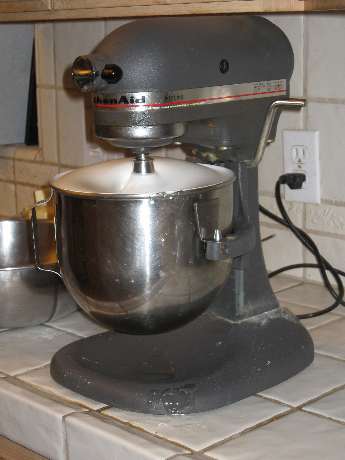
I make butter cream via the "swiss" method, which basically means making a meringue. The egg whites are whipped to soft peaks and then hot (242 degrees F) sugar syrup is poured in. The whites continue to whip until completely cool. Note that the quantity I was using just barely fit into my Kitchenaid.
Nope, it didn't go over the edge.
However, the butter needed to be whipped in via two batches. Then the resulting buttercream needed to be stirred together, and finally the coffee flavor (visible next to the butter below) added. This all would have been easier if I had a 12 quart Hobart. But no home cook in their right mind normally makes 5 pound batches of buttercream.
Coffee flavor is made by boiling down coffee and sugar until a very very thick syrup results. The sugar actually carmelizes, which is part of the flavor. You want very little water to remain so that you don't break the structure of the buttercream once you add it.
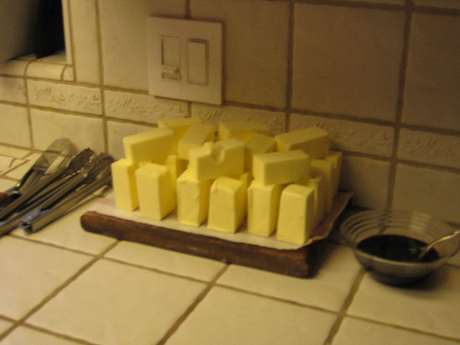
Butter-henge
3 pounds of butter. William. "Should I cut this up so it softens faster?" "Sure, that would be great."
Never leave your cooks alone without explict instructions, or you too shall have a stonehenge formed from butter. I think every single person with a camera photographed this. It was just too great not to.
January 03, 2006
Clafouti
Yet another great party idea. Clafouti are basically a baked souflee-like batter-based dessert. It's a fairly loose batter poured into a pan and then baked in a fairly hot oven. The result comes out not unlike "Dutch Baby" pancakes (sort of puffed up and brown). Usually some form of fruit is put into the pan before the batter. We made two kinds, a sour cherry (using jars of Morellos from Trader Joe's) and prunes re-hydrated in congac. Prunes are usually used in a very similar desert is known as a "far".
In addition to being quick to make when the time comes, it's a fairly unusual dessert for most Americans. It's always fun to serve something people haven't had a million times before.
I just did a google for a recipe for this one, and here's what we used as a base. As typical, we simplified this a bit, and just tossed all of the mis into the blender and whapped it up when the time came. We also used basic powdered sugar for the final dusting, which we placed into a little cheesecloth "bag" as part of our prep.
Clafouti/Far (9 inch pie pan, probably need to double for each)1/4 cup plus 1 tablespoon sugar
3/4 pound Italian prune plums, halved and pitted
3/4 cup milk
3/4 cup light cream
3/4 cup flour
2 eggs
1 egg yolk
1/8 teaspoon salt
1 teaspoon vanilla
Vanilla sugar, for sprinklingPreheat oven to 400 degrees and butter the pie plate well.
Sprinkle the pie plate with the 1 tablespoon sugar and distribute the plum halves
over the sugar, skin side down. In a blender blend the milk, light cream, flour,
eggs, egg yolk and salt for 2 minutes. Add the 1/4 cup sugar and the vanilla, blend
the mixture for a few seconds and pour it over the plums. Bake the clafouti in the
middle of the oven for about 30 minutes or until puffed and golden. Dust the clafouti
with vanilla sugar and serve at once.
January 02, 2006
Fruit Tarts
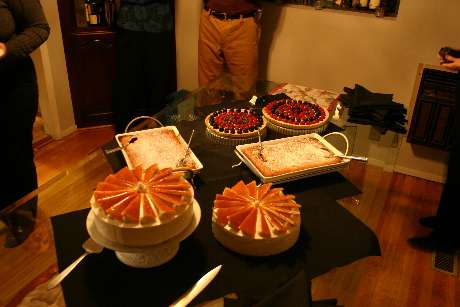
Fruit Tarts, Clafouti, Dobos Tort (back to front)
I almost alway serve fruit tarts at these parties. They are easy to make, look great, and I'm partial to this sort of dessert myself after a heavy meal.
I tried out a new method of blind baking the crusts, which is to let the dough hang over the edges, bake without any extra pie weights, cool, and then trim the top with a knife. It works well, provided the dough isn't too soft, the tart pans not too high at the rim, and that you leave plenty of dough hanging over the edges. The cooked scraps also make a nice snack.
This was sort of a silly experiment to do on the day of the party, because had the crusts come out badly I would have needed to run up another batch of dough. But the dessert work was done early in the day, and crusts are pretty much second nature at this point.
Derrick and meriko filling tarts
While pastry cream is common as a filling for fruit tarts, I often find it to be too heavy. I cut it 50/50 with whipped cream to provide a lighter texture and less of a pasty mouth feel. Technically this is known as "diplomat cream". Before applying the cream, a thin layer of apricot glaze is put down to help seal the bottom. This keeps the pastry cream mixture from causing the crust to become mushy.
December 31, 2005
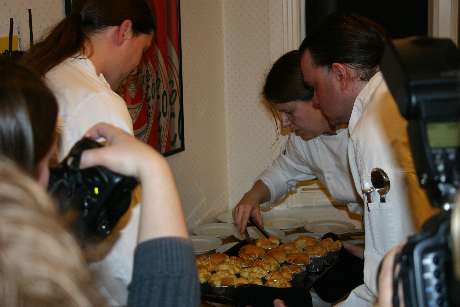
Before we get to dessert
Did we really do all that?
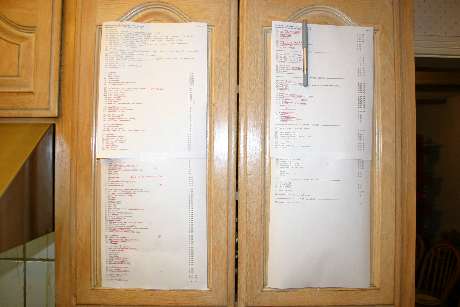
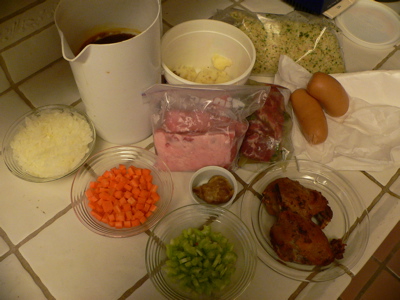
Here's one of the secrets to how we do this dinner. 4 pages of prep lists. Each task has a code number for which dish (the list of dishes and numbers is at the top of the prep list for reference), a brief line about what needs done, and an approximate time when that task should start. As the day goes on, we simply work down the list, task by task, crossing items off, until everything is ready to go. The above picture was taken right before the guests began to arrive, or maybe just after the souflees were served.
Some items like "10) pull from fridge" take 30 seconds to complete. Others, such as "17) make dobos sponge" which involve the separating of 30 eggs and baking the sponges in 4 batches in the oven can take over an hour to finish. I put lots of little things that I know I'll forget, such as "12) LIGHT FIRE". Since we started using this method, there have been very few things forgotten, even in the heat of battle.
If for some crazy reason you want to see all of the prep lists, they are in the full entry. Oh, and "MEP" is shorthand for "Mis en Place" which means to gather together everything you need.
1) gougères
2) foie gras, pain de mie, watercress salad, truffle oil
3) butternut squash soup, pumpkin seed oil
4) stout, sharp cheddar, onion souflee with fuzzy salad, basic vinegarette + shallots
5) mussel souflee with meyer lemon, saffron, chardonay cream sauce
6) strawberry salad with jicama, spinach, cukes, light vinegarette w/ lime
7) lobster rolls with sauce americaine
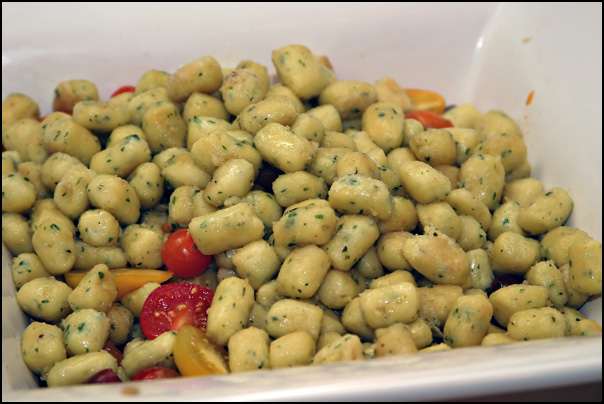
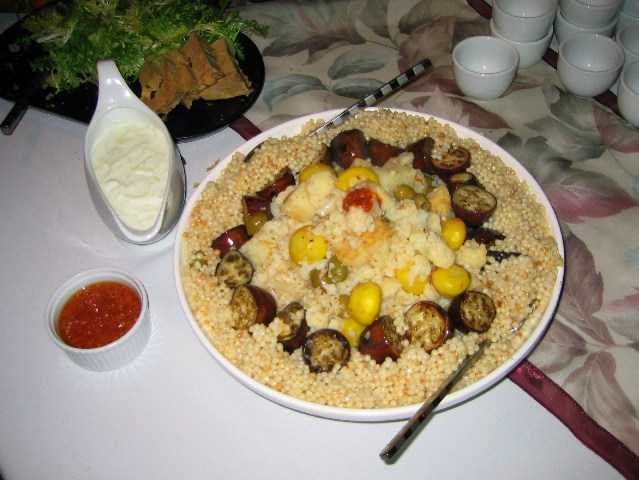
8) veg gnochi, summer squash, zuk, red onion, small tomatoes, basil chiffinade
9) mahi mahi with lime ginger cream
10) curried cauliflower gratain
11) sorbet
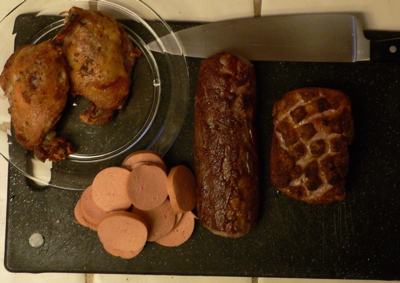
12) stuffed grilled quail (sliced proshutto, bread cubes, porchini, brun. MP, lemon zest),
asparagas, sauce foyot
13) artichokes and mushrooms in white wine sauce
14) wild mushroom cassoulet
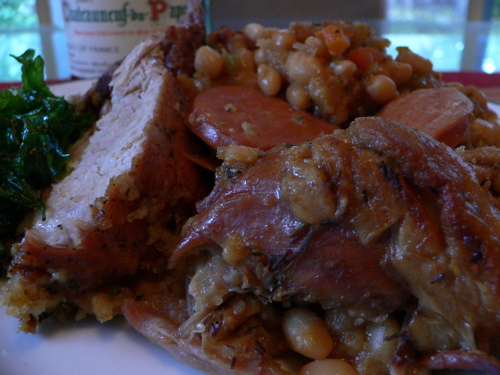
15) racks of lamb with mustard spatzle, winter vegetables, and reduced red wine sauce
16) green beans with hazelnut beurre blanc
17) dobos tort X 2
18) fruit tart X 2
19) Clafouti/far X 2 (cherry/prune)
20) chocolates X 3
2) make foie THURS
3) make soup THURS
8) make gnocci THURS
11) make sorbet THURS
20) 3 brothers THURS
20) white chocolate fruit bark THURS
20) coffee truffles THURS
11) sorbet into sake cups, into freezer FRI
14) smoke red bell peppers FRI
14) make brown sauce FRI
15) prep lamb racks FRI
17) make dobos sponge FRI
18) pate brisee FRI
18) pastry cream FRI
14) soak beans FRI PM
10) make and put into pan day before FRI PM
17) make butter cream AM
17) make carmel and pinwheels AM
17) assemble torts AM
18) pre-bake shells AM
18) apricot jam AM
18) diplomat cream, fill tarts AM
18) fruit and glaze tarts AM
19) drain cherries AM
19) soak prunes AM
19) MEP batter X 2 AM
19) MEP powdered sugar into cheesecloth AM
0) shallots AM
0) clairified butter AM
2) make pain de mie AM
1) MEP all ingredients AM
6) cut veg for salad AM
6) make vin AM
7) prep lobster AM
7) soak morels AM
12) re-hyrdate porchini AM
12) make stuffing AM
12) stuff quail, pick AM
13) prep artichokes AM
13) cook artichokes, cool, slice AM
13) 1/4 mushrooms AM
13) MEP white wine, herbs, light veg AM
14) cook beans AM
16) prep beans AM
12) set up fire noon
7) chervil noon
7) defrost lobs stock & reduce noon
8) defrost gnocchi noon
12) MEP sauce foyot noon
12) prep asparagas, foil for cooking 2 PM
8) check gnocci (defrosted and non-sticking) 2 PM
8) cut veg, assemble entire MEP 2 PM
5) cook/clean mussles, chop 2 PM
5) MEP base 2 PM
4) MEP base 2 PM
4) separate eggs 2 PM
5) separate eggs 2 PM
9) prep fish 2 PM
9) prep veg 2 PM
9) prep seasame seeds & cornstarch 2 PM
9) MEP sauce 2 PM
9) MEP soy, butter for veg 2 PM
9) MEP garnish 2 PM
14) prep & sautee mushrooms 2 PM
14) prep & sautee MP 2 PM
14) bread crumbs 2 PM
15) defrost stock and reduce w/ wine 2 PM
16) MEP beurre blanc 2 PM
15) prep veg, blanch and shock 2 PM
7) asparagas ends, sliced, blanch and shock 2 PM
16) blanch and shock beans 2 PM
15) make spatzle, shock, oil, hold 2 PM
14) assemble 3 PM
10) pull from fridge 3 PM
7) make rolls, oil well and hold 3 PM
12) S&P quail, butter 3 PM
15) S&P lamb 3 PM
14) 1st bake 4 PM
1) make pate a choux & into bag 4 PM
2) cut pain de mie 4 PM
2) clean salad 4 PM
4) make base 4 PM
5) make base 4 PM
4) prep souflee dishes 4 PM
5) prep souflee dishes 4 PM
4) MEP salad, vinegratte 4 PM
5) MEP/reduce sauce base 4 PM
1) pipe onto parchment 5 PM
1) oven to 425 5 PM
9) reduce sauce & hold 5 PM
2) toast pain de mie 5:30 PM
3) re-heat soup 5:30 PM
1) bake 15 mins/serve 5:45 PM
1) kir royal glasses and cassis 5:45 PM
2) toss salad w/ truffle oil 5:45 PM
2) cut/plate/serve 5:45 PM
2) cheese out 5:45 PM
3) cream soup 5:45 PM
16) make beurre blanc & thermos 6 PM
3) serve soup w/ pumpkin oil drizzle 6 PM
6) toss and serve 6 PM
10) cheese topping 6 PM
======================= 6 PM APS OUT ===================
4) egg whites, toss, bake 6:15 PM
5) egg whites, toss, bake 6:15 PM
4) 400->375 for 15-20 mins 6:15 PM
5) 400->375 for 15-20 mins 6:15 PM
5) reheat & cream sauce 6:15 PM
4) toss salad 6:30 PM
4) plates out, salad down 6:30 PM
5) plates out, ready for sauce 6:30 PM
4) serve 6:30 PM
5) sauce and serve 6:30 PM
======================= 6:30 PM SOUFLEE SERVICE ===================
10) oven to 450 6:30 PM
7) 450 degrees, 10-15 mins 6:30 PM
7) heat stock, cream, reduce mount with butter and lobs butter 6:30 PM
8) cook veg 6:30 PM
8) cook gnocci 6:30 PM
12) LIGHT FIRE 6:30 PM
7) plate and serve 6:45 PM
8) toss into plate, basil chiffinade 6:45 PM
8) serve 6:45 PM
9) mount sauce w/ butter & hold 6:45 PM
9) cook veg 6:45 PM
9) cook fish (6-8 mins total) 6:45 PM
10) bake 15 mins 6:45 PM
10) broil 5 mins 6:55 PM
9) plate and serve 7 PM
10) serve 7 PM
12) grill/cook quail 7 PM
14) top crumbs & 2nd bake 7 PM
15) oven to 375 7 PM
======================= 7 PM ALL FISH OUT ===================
11) serve sorbet, platter, spoons 7:15 PM
12) make sauce foyot 7:15 PM
12) asparagas on grill 7:15 PM
13) sautee mushrooms, add artichokes 7:15 PM
13) sauce and reduce 7:15 PM
12) plate and serve 7:30 PM
13) serve 7:30 PM
15) brown lamb, 5 mins, into oven 7:30 PM
15) 15 mins 7:30 PM
15) rest and slice lamb 7:45 PM
15) sautee veg 7:45 PM
15) re-heat spatzle in butter 7:45 PM
15) reheat/adjust sauce 7:45 PM
16) cook beans w/ shallots 7:45 PM
14) serve 8 PM
15) plate and serve 8 PM
16) serve 8 PM
======================= 8 PM ALL MEAT OUT ===================
19) oven to 400 8 PM
19) blend batter 8 PM
20) make coffee 8 PM
19) bake 30 mins 8:30 PM
19) powder sugar on top and serve 9 PM
======================= 9 PM ALL DESERT OUT ===================
20) serve chocolates & coffee 9:30
December 30, 2005
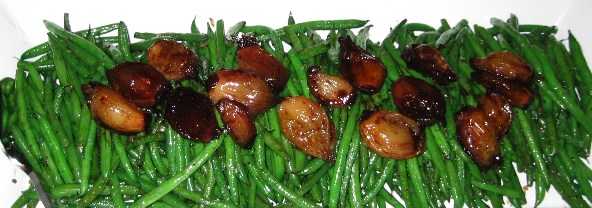
Green Beans with Hazelnut Beurre Blanc
How to make a dish and not get any pictures.
1) Obtain 6 pounds of wonderful small French green beans. Have your mother cut the tops off them.
2) Prepare the beans correctly. Apparently, "Green Beans Done Correctly" is now Derrick and Melissa's description.
3) Make a beurre blanc and use some hazelnuts to provide color and flavor.
4) Plate beans, top with beurre blanc and serve.
Outcome: Entire plate eaten, no photographic evidence, even with 5 cameras at the party! I will admit, they were pretty darn good, at least the one bean that I got to eat.
I shouldn't feel bad because here's someone who didn't get any beans. Mark comes and works prep nearly every year, patiently taking on some of the more precise and exacting of tasks. He also almost always needs to leave due to prior commitments before he can taste any of the dishes!
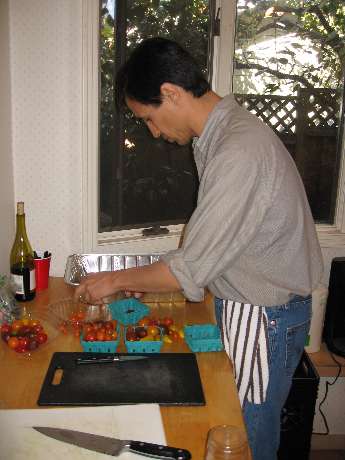
Mark carefully slices the cherry tomatoes
December 29, 2005
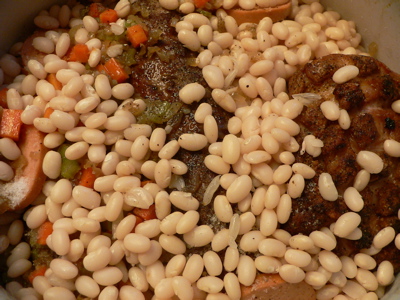
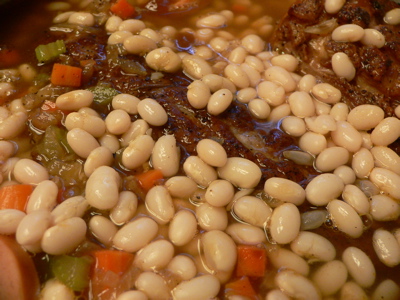
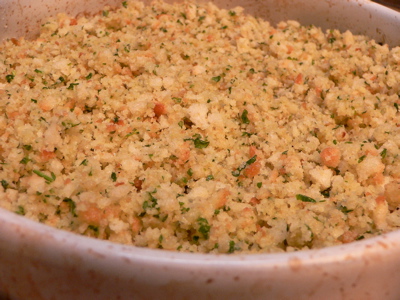
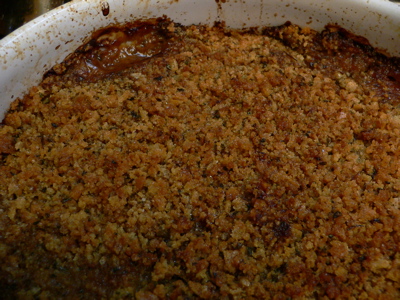
Mushroom Cassoulet
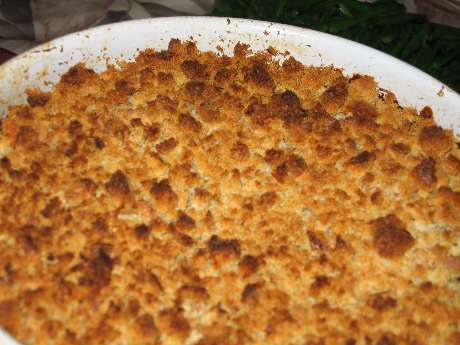
What lies under this crust?
I lost count of how many times I've made this dish for parties. I think it showed up at 3 or 4 of the winter feeds alone. I'm sort of proud of it because it's all mine, and it really does have that hearty and warming quality of a cassoulet, while at the same time being vegetarian. Most non-vegetarians like it, and people often accuse me of hiding meat in it. I'd never do that, and nope, the trick is all in the mushroom demiglace.
Finally, if you want to see what a more traditional meat based Cassoulet is, I wrote about that for an IMBB entry.
December 28, 2005
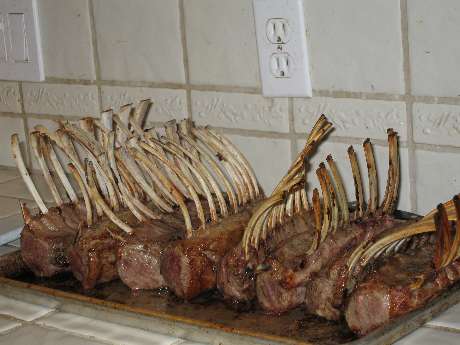
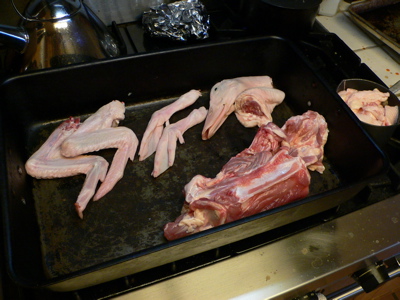
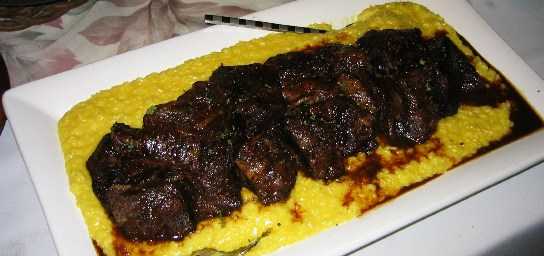
Lamb with Winter Vegetables
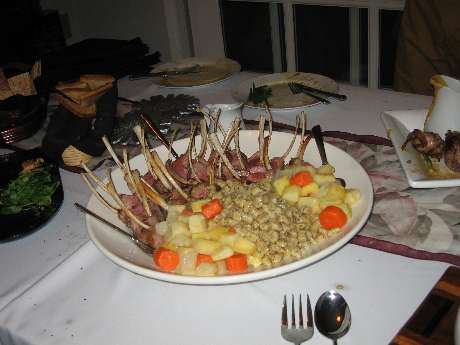
Completed Lamb Plating
The original idea for lamb, vegetables, and mustard spaetzle came from Charlie Trotter. I've made this so many times at this point that I think of it as one of "my dishes" however.
William, like every year before, took for himself the task of cleaning the lamb. He is an expert at it, and has (justifiably) great pride in how clean the bones come out. The trim from the lamb with more meat than fat is browned, and then reduced with red wine (we used an entire bottle of Pinot this year) and oxtail stock. If you have oxtail glace (which I do), add that to the stock as well to make it nice and thick. You can clean the lamb and make the sauce the day before (like we did).
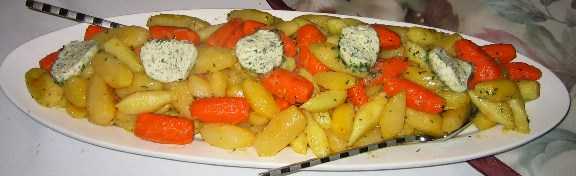
For the vegetables, cut up whatever winter vegetables into whatever shapes you like. I think this year it was: turnips, rutabega, parsnips, celery root, and carrots. Blanch each vegetable separately in salted water until just shy of done. Shock in ice water and hold for service. If you do them from white to yellow to orange, you can use the same water.
The mustard spaetzle is any spaetzle recipe you like with the addition of whole grain mustard. Boil the spatzle (this year we formed them by piping out of a bag with cutting with a knife, but in the past we've done it with a pie tin with holes poked in it) and then cool on an oiled sheet pan. Again, hold for service.
Resting the lamb before service
To cook the lamb, salt and pepper each rack. Cook on the stovetop a few minutes on each side for color. Roast in a 375 oven for 15-20 minutes or until desired level of doneness is reached. Allow racks to rest for at least ten minutes, and then slice into individual chops for service.
We used a large roasting pan because there were 8 racks of lamb. For more normal sized dinners I usually just move the sautee pan directly into the oven and cook them there.
meriko prepares the lamb sides
While the lamb is resting, re-heat and taste the sauce. It should be quite strong and heavy. If not, reduce more. The vegetables get a final cooking in butter, salt, and pepper. In another pan, the spaetzle are reheated in still more butter (please keep in mind who's blog you are reading here). Check out the airtime meriko is getting on that spaetzle! And all that without a special pan.
December 27, 2005
Mushrooms and Artichokes
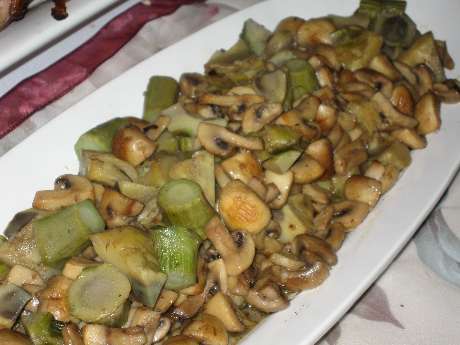
Mushrooms and Artichokes
This dish is, I think, a pure creation of mine. It follows a common pattern of mine, things shaped the same way. I used this concept in "Vegetables Pointy and Round".
- Artichokes
- Mushrooms
- Sage (rubbed)
- White wine
- Light vegetable stock or light chicken stock
Clean the artichokes and pare down to the hearts. Keep in lemon/water to prevent browning. Simmer in salted water until just tender. Shock in ice bath to cool, then cut into "wedges" about the size and shape of a quartered mushroom. You can also use frozen artichoke hearts for this, but the shape isn't quite the same. Still tastes good, though, and avoids an hour of painful knifework.
Quarter mushrooms. The clever chef leaves this task for himself and assigns the artichoke duty to others. Hi, Tim and Derrick!
For service, sautee the mushrooms in clairified butter until brown, add artichoke parts and re-heat. Add salt, pepper, sage. Add white wine, reduce a bit, then add stock, and reduce again. You want a light glaze/coating of sauce rather than pools of it.
December 26, 2005
Grilled Quail
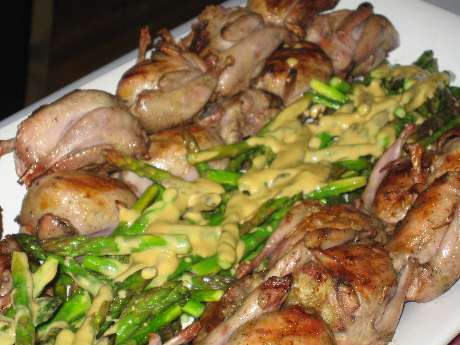
Quail, Asparagas, Sauce Foyot
As we move the party from the fish courses into the meats, I like to start out with "lighter." Okay, so maybe stuffed quails served with a heavy egg based sauce doesn't sound like everyone's idea of "light", but stick with me here.
The stuffing for the quails was:
- small cubes of bread, dried
- fine dice mir poix
- sliced porchini mushrooms
- sliced (and then cut into strips) prosciutto
- lemon zest
- poultry seasonings
The vegetables were sauteed, and then along with all of the other ingredients tossed in a bowl. The mass was then moistened with the re-hydrating liquid from the porchinis, and a bit of white wine, and chicken stock. The stuffing was prepared the previous day, but kept away from the quails.
To stuff the quail, you place the stuffing within the quail body. The wings are then tucked to the sides, and a toothpick is run through the tips of the legs. This compresses the quail into a neat package for grilling, with the wings "caught" under the legs. You can see on the grill how well they kept under control.
While the quail were resting and the toothpicks being removed, the fire was used to quickly heat the asparagas, which we placed on foil so that it would not fall between the grates. Again, using the fire we already had is a trick we like to make use of at the party. This way the stove was available for other uses.
Sauce Foyot is a favorite of mine. Basically a lemon hollandaise with meat reduction added. I've written how to make it before so I won't go into all of the deails here. However, this sauce does appear to be one task that my kitchen help is more than happy to leave to me. It's okay, because I love making it, and it really only takes a few minutes to make once you have done it a few times.
Oh yeah, the lemon zest in the stuffing? Ment to parallel the lemon in the sauce. I had one person comment "Is there lemon zest in the stuffing?" Pretty good palette there, John!
December 25, 2005
Rosemary Raspberry Sorbet
Sorbet served in the middle of a meal is kind of an old workhorse at this point. But it's not something I've ever done, and certainly comes as a surprise, especially when it isn't on the menu. I wanted something different, and had a rosemary infused sorbet a few weeks prior to the dinner, so that was the basic launching point.
I started this with a google search to get some basic formula ideas. I managed to find someone who I used to work with!
Another issue for a party is how to serve something tiny like this. You can't ask people to serve themselves, as this defeats the purpose of a surprise cleansing course such as this. I ended up finding sake cups on line for 70 cents each! They were just the right size, and cheap enough that buying 50 was no real issue. I'm sure I'll be able to use them again for other parties, so it worked out very well.
After that, it was just a matter of portioning the sorbet the day before, re-freezing until service, and finding a pretty silver platter for walking around. Oh yeah, don't forget the spoons, because up until this point the guests probably haven't been grabbing them. I actually put "spoons" on my prep list so that we wouldn't forget.
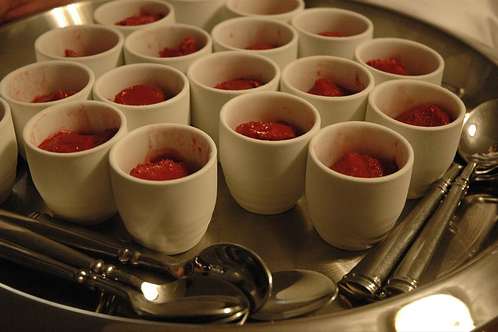
Sorbets ready for passing
- 4 stalks fresh rosemary
- 1 C water
- 2/3 C sugar
- 2 C individually quick frozen black raspberries
1) Cook rosemary, water, and sugar over medium low (should simmer, but not boil) for about 5 minutes, or until you obviously smell the herb. Remove rosemary at this point via tongs.
2) add raspberries, cook another two minutes, or until they are begining to soften
3) blend mixture well, strain through course strainer to remove all seeds
4) Refrigerate overnight
5) Freeze in ice cream machine per manufacturer's instructions
December 24, 2005
Curry Cauliflower Gratin
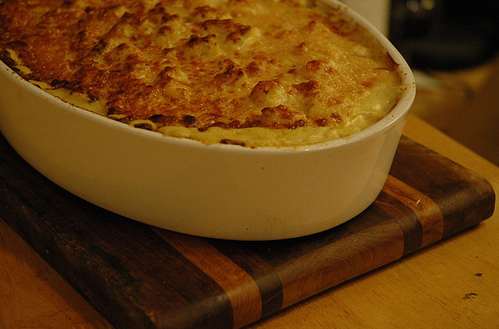
Finished dish
I got the idea for this dish from a vegetarian Indian restaurant that we go to at lunch. One day the side dish was a creamy curry cauliflower. It had great flavor and the offsetting flavors of the cream and hot curry really worked well together. I knew, however, that I didn't want a loose cream, but instead something that could more easily be dished and eaten. A gratin is a pretty obvious answer here.
A quick google turned up a Thomas Keller (good grief! not again!) recipe from Bouchon. I made some simplifications and modifications to it in order to incorporate more curry flavor and remove what I felt were some unneeded steps. The basic idea is the same, however, which is using the stem portions of the cauliflower as part of the thickener for the cream sauce.
Another great dish for a party. The entire making was done the day ahead, and on the day of the party it needed only 20 minutes of oven time.
- 2 cauliflower
- 1 T butter
- 4 T minced shallots
- 2 C heavy cream
- 1.5 T curry powder
- grated pamasagn cheese
1) cut cauliflower into small florettes (fork sized). Chop stems into small bits
2) cook stems in butter and shallots until begining to soften, add water if needed to keep from browning
3) Add cream and heat through
4) blend mixture until very smooth, season with salt and pepper, and hold
5) blanch florettes in large pot of boiling water (add salt and vinegar to water to prevent discoloring) until just tender (about two minutes). Drain and place into final cooking pan.
6) Pour blended mixture over florettes.
7) Sprinkle with cheese. Cover and hold (in fridge) until next day
8) Bake in 450 oven for 15 minutes (or until clearly bubbling and hot).
9) Place under broiler for an additional 5 minutes to brown top
December 23, 2005
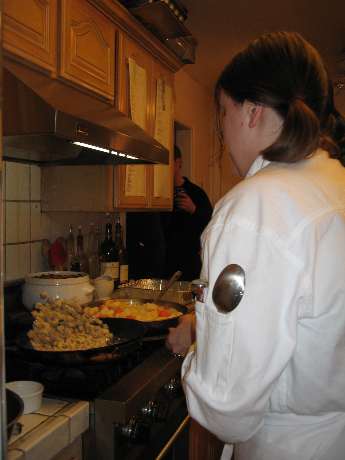
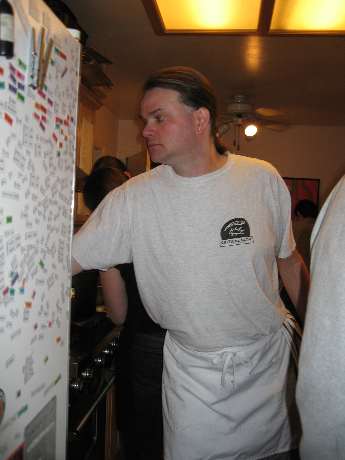
Seasame Crusted Fish with Ginger Lime Cream
Every year I have one of my sous chefs prepare a "guest chef" dish. This means they are responsible for the idea, the recipe, getting me a list of ingredients they need, and making sure all prep and cooking takes place. We usually get together beforehand to try out the dish, and that lets me make any suggestions, and know the list of steps so that I can make sure our prep lists have ample time for the work that needs to be done.
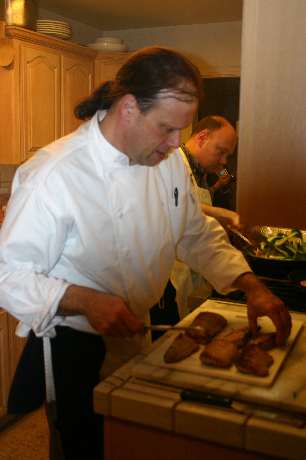
Cooking the Fish Dish
Tim enlists William's help with the fish, while he's on sauce and veg duty. This is a pretty typical scene during the middle of service, as the various chefs step up to do cooking, plating, or even the dreaded dish washing. At times like this, I just stand off and watch. Or more often, visit with the guests and "test" the wine quality.
Final Fish Presentation
This is a nice fish presentation because the sauce is light and brightly flavored because of the lime and garlic. The butter and soy that the vegetables are tossed in sort of combines with the flavors of the cream sauce while you are eating it as well.
We used mahi mahi here, but in our original tests used large filets of black sea bass. Both work well, although the mahi mahi cooks quicker due to the thinner filets. You could you any firm fleshed white fish that holds up well to the sautee.
December 22, 2005
Herb Gnocci
Recipe/idea pretty much lifted directly from Thomas Keller's Bouchon cookbook. I'll be honest and say that this is a book maybe better for ideas than actual recipes (at least for me). He provides a dizzying list of specific steps. It's much in the style of Julia Child's work. This certainly helps you if you need exact procedures, but for those of us who just need the outline, the paragraphs of reading can become maddening.
These "Gnocci" are actually a French variant on the traditional Italian Dish. Instead of potato, they are made from a Pate a Choux. The flavorings are some fresh herbs, mustard, and cheese. The pate a choux is then piped out into boiling water, with each gnocci being sliced off with a knife.
This procedure is a bit difficult to do, pretty much impossible unless you have a helper. anne lended a hand, and we were able to tear through 480 gnocci (more or less) very quickly. It certainly is much faster than forming each by hand and pressing against the back of a fork (as one does with Italian Gnocci).
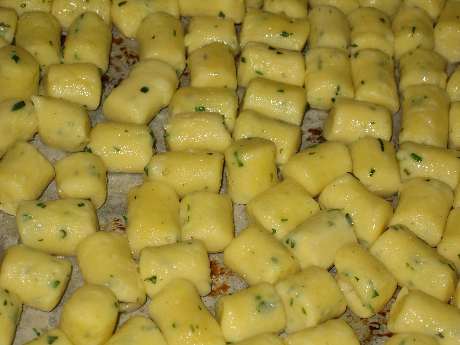
Cooked and Cooled Gnocci
Once the gnocci have been boiled until just done, they are placed on a sheet pan to cool and tossed with a bit of oil to avoid sticking. The sheet pan is placed into the freezer, and finally the completely frozen gnocci are put into zip to bags.
We ended up with two entire half-sheet pans, which when frozen ended up filling two gallon zip-top bags. Remember: we're feeding 40 people here.
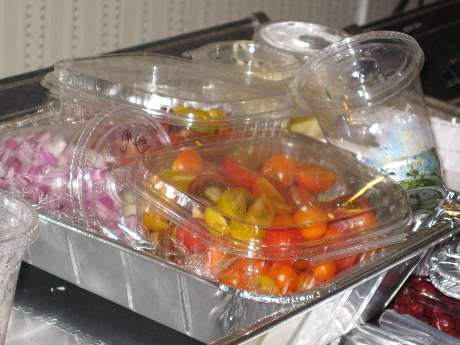
Mis en Place for Gnocci
Preparation for the party involved thawing the gnocci in full sized hotel pans. The additional prep was some summer squash, red onion, and mini heirloom tomatoes. Final garnish was some thin sliced fresh basil. Once again, fully made ready well in advance of service.
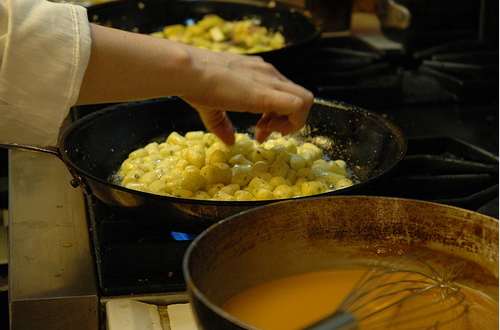
Re-heating Gnocci for Service
Here you see the gnocci being re-heated (by an off camera meriko) in clarified butter, just until they beging to re-puff and take on a bit of color. The summer squash and onion likewise get a quick sautee, but the remaining ingredients just need to be tossed together with the hot pasta.
Also in the foreground is the Sauce Americaine for the Lobster Rolls, waiting to go out along with the gnocci (we generally try to take out two dishes at a time).
Final Dish, ready for Basil Garnish
December 21, 2005
Lobster Rolls
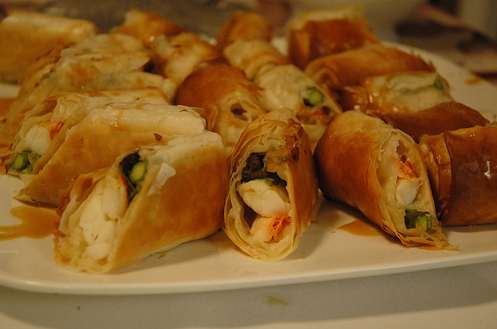
Finished Lobster Rolls
For the rolls (per each roll):
- 2 sheets filo dough
- clairified butter
- 1/4 lobster tail (cooked until slightly underdone, cut lengthwise)
- 1 stalk trimmed asparagas
- 2 morel mushrooms, halved
- sprig chervil
- 1/4 tsp chopped shallots
Brush filo sheet with butter, place 2nd sheet on top, brush half with butter, fold over (final will be 4 sheets of filo with butter between each). Place remaining ingredients together in a single line at buttom of filo sheet. Fold 1 inch filo up and over filling. Brush filo again with butter. Fold both edges in, then roll filo (as when making a burrito). Place into tray, brush with butter and hold.
To bake: 400 degree oven for approximately 15 minutes, or until golden brown. Slice on bias and serve with Sauce Americaine.
For the sauce:
- 2 C lobster stock
- 1 C heavy cream
- 1 lb lobster butter
- 1/2 lb butter
Reduce stock until quite strong. Add cream, reduce to desired consistancy, or slightly more runny. Whisk in lobster butter and regular butter over low or no heat as when making a beurre blanc. Do not return to additional heat or sauce will break.
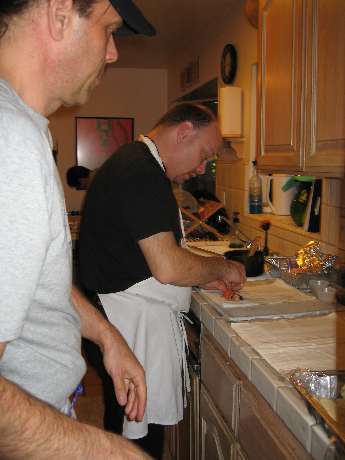
Tim crafts the rolls as William awaits the next sheet
This is a dish inspired by my time at the CIA. When I was there, we made quite a few dishes that involved filo dough, rolled, or folded into squares or triangles. I was inspired by late spring or early summer ingredients for these "summer rolls" as I usually call them.
Two people (in this case Tim and William) made rapid work of this repetative task (we made 24 of these). These rolls are an excellent make-ahead dish because while they take time during prep, they are then all ready to go during service. Notice as well their workstation, with all ingredients in place, and a final pan ready to receive the completed rolls.
December 20, 2005
Dueling Souffles
Every year there is at least once insane thing we decide to do. This year it was individual plated souffles. Of course, just doing one wouldn't be crazy enough, so we did two different models: 1) Mussel Souffle with Saffron Chardonnay Sauce, and 2) Stout and Cheese Souffle with Frisee Salad.
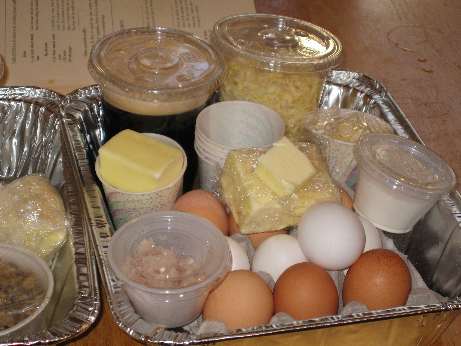
Mis en Place for One of Two Souffles
This is a pretty good shot of how we organize all of the dishes. Each dish has prep that goes into it, and everything that needs to be measured out is placed into its own container. When needed, the parts are labelled as well. When it comes time to cook, everything is there. By the end of prep, the pantry is completely full of half and full sized disposable hotel pans holding all of the parts for every single dish. Once the party starts, there really is no more chopping or cutting that needs to happen, except when finished meats need slicing.
Savory souffles aren't very difficult, and certainly not as hard as most people make them out to be. Here's the base recipe (for 1 6-8 cup souffle dish, or about 12 3 oz ramikens, we doubled this for each kind, and made a total of 50 3 oz souffles):
- 1/2 stick butter
- 5 Tb flour
- 1 C liquid
- 4 egg yolks
- salt, pepper, seasoning
- 1/2 C solids
- 5 egg whites
1) melt butter, add flour to form roux. Add liquid, bring to boil and thicken (will be quite thick).
2) Remove from heat. Add seasonings, allow to cool a bit
3) Whisk in egg yolks, making sure not to cook them.
4) Whisk/blend in the solids.
5) Cover and hold until service time (can be several hours)
6) Butter well your souffle mold or ramikens
7) Heat oven to 375
8) Whip egg whites to medium peaks
9) Fold in egg whites to base mixture
10) Spoon into molds, bake for 20-30 minutes or until the centers are well set.
11) Serve right away.
Out they come!
For the mussel souffle, we used the cooking broth from the mussels for the liquid, and well chopped mussel meat for the solids. The sauce was reduced saffron, lemon juice, and Chardonnay. Some heavy cream was added and then additionally reduced. The sauce was drizzled over the top of the souffles via a squirt bottle.
For the stout souffle, we used Guiness as the liquid, and sharp cheddar cheese as the solids. We also added some shallots to the base for additional flavoring. Frisee was dressed simply with a mustard vinaigrette, and a small amount placed on each plate.
We used disposable foil ramikens this year. They are cheap, easy to throw away when done, and have nice vertical sides. The downside is that they don't look as nice, and do not hold heat, so the souffles will deflate quite rapidly.
We cooked the souffles in two batches, with half of each kind in each batch, starting them about 10 minutes apart. In this way, we could bring out the courses quickly, and then make another pass through with more souffles for people who missed out, or maybe even wanted a 2nd one of the other kind.
Also, you may notice that while plating we had three cameras taking pictures, and two of them were pretty high powered!
December 19, 2005
Strawberry Salad
This is a repeat of a popular salad we had served two years ago. This year's party features both new and popular past dishes. It was, after all, a celebration of the ten years we had been doing this.
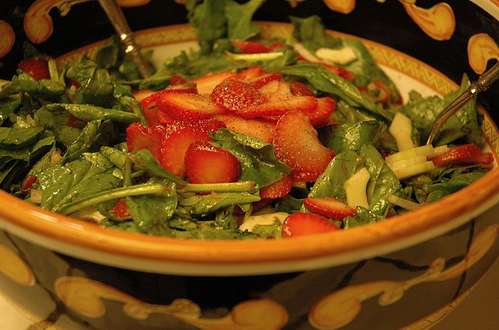
This dish was inspired by the fact that winter strawberries are often not the sweetest and as such have a slight "cucumber" taste to them:
- baby spinach
- strawberries, hulled and sliced vertically
- English cucumbers, peeled, seeded, sliced into quarter rounds
- jicama, peeled, cut into matchsticks
The dressing is a simple vinaigrette made with some lime for the acid and olive oil. Salt and pepper.
December 18, 2005
Butternut Squash Soup
We miss a picture of something every year. This year the soup had already been gotten into by the time a picture was taken. So I have only this action shot to show you:
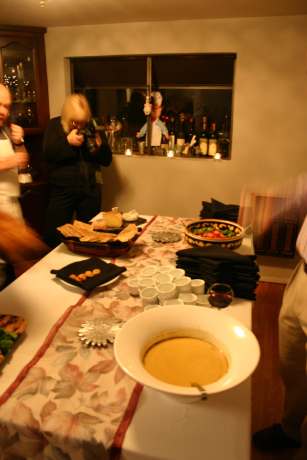
I'm a huge fan of soups, especially at parties. Soups can be mostly (or even sometimes completely) made ahead of time. People like soup, especially in the winter. Soup isn't served as often as it probably should be. And finally, it's a nice help-yourself, slow-arrival kind of dish as people gather.
For around a gallon of soup:
- 3 butternut squash
- 6 leeks
- 6 carrots
- 6 celery stalks
- 4 cobs of corn (either with or without corn on them)
- 1 C white wine
- thyme
Cut squash in half. Place on pan in 350 degree oven and roast until tender (about an hour and a half). Clean and slice leeks, cut carrots and celery into medium dice. Sweat in olive oil. Add wine, thyme, and water to cover. Add in corn cobs. Simmer while squash finishes cooking. Remove squash from oven and using a spoon, scoop out flesh. Throw away seeds, and skin. Add squash flesh to pot. Add additional water as needed to cover. Cook until all vegetables are soft. Remove corn cobs. Blend mixture a bit at a time until completely smooth, then pass through a coarse mesh strainer to remove any strings or large bits of pulp. At this stage, the soup freezes very well, or can be placed in the fridge for up to three days.
For service, thaw or re-heat the soup. Reduce liquid as needed to desired consistency. Add salt, pepper, and a splash of some kind of acid (we used wine vinegar, I'm pretty sure, but lemon also works). Notice that there was no seasoning when cooking above, so you really need to salt it properly. The acid is helpful to brighten the flavor -- long cooked vegetables often need this. Add a pint of heavy cream (I use Manufacturing Cream which has no stabilizers and a higher butterfat content, but any kind of cream works), re-heat until fully warm and re-taste for seasoning. We also floated some roasted pumpkin seed oil on top, which has both a nice flavor and a pretty dark greenish tinge.
Another funny trick we use for the party: the frozen blocks of soup can be put into a cooler and used to store vegetables that won't fit into your fridge. Chances are the soup will still be frozen rock solid even after a day, and you have freed up valuable space for more imortant things.
December 17, 2005
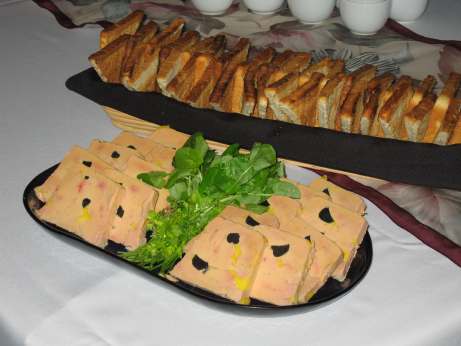
Foie Gras
Every year at my party one dish appears. And that's a basic terrine of Foie Gras (served either with thin toast made from pain de mie, or small brioche, this year it was the former).
The reason why I always serve this dish is that it was the original reason for my birthday bash. When I turned 30 I was asked if there was something that I wanted to do, and my response was that I wanted to try making foie gras and maybe have some folks over to share it with. Of course, you really can't just serve foie gras, and so things started to get a bit out of hand, and before too long the party as it stands today was created.
I don't think that I've ever shared how I actually make the terrine, however, so here goes:
First, you clean two whole Grade A foie gras livers (that ends up being about 3 pounds worth, depending upon the ducks that year). Cleaning basically involves "breaking" apart the livers and following any connective tissue and blood vessels. These are edible, but make the presentation less than attractive (in fact, you can see that I missed one large one this year). This is the most time consuming and (at first) scary bit. Foie is unusual to work with and in the back of your head you keep thinking about how much money you are handling. I wear latex gloves for this process, for two reasons. It helps you avoid slipping when cleaning the foie, and also you don't contaminate the livers (because this does get cooked very little).
After cleaning, slice any still very thick pieces into "planks" no more than 1/2 an inch thick. You proably won't have too many like this. Toss all of the cleaned parts into a large work bowl and toss around with some salt, pepper, and a splash of cognac. Allow to rest in the fridge while the oven heats to 250.
Layer the prepared foie into a terrine mold. Mine is about 10" x 3" x 3", and the two foie lobes will fill it just to the top. Between the layers, you can nestle wedges of black truffle (I used two lines of truffle this year). If using truffles from jars (which are all you can get most of the time and what I normally end up using) add any packing liquid to the foie in the bowl as well.
Place the mold into a pan filled with boiling water, you want to come up the sides about half to 3/4 of the way. Place entire pan into the oven and let cook for around 20 minutes. I usually check at around 15 and I think this year ran for about 25. You want to see pooling of the fat on the top of the terrine, but don't want to actually end up cooking the foie for very long, or you will have nothing left.
While the foie is cooking, gather up any scraps or bits from the cleaning (including any blood stained bits of foie you removed) and place into a small pot. If you have any really large pieces, you can save them for something like a seared foie dish. However, as I mentioned, two lobes basically fill my particular terrine pan. Heat over medium low heat until you have rendered out all of the fat possible. Strain this fat into a clear glass vessel (so you can see any bits that end up at the bottom). Reserve.
When the foie is done, remove pan from oven, and remove terrine mold from the water bath. Allow to sit 5 to 10 minutes to cool slightly.
Place the terrine mold in some other metal pan that you will be able to fit into your fridge (I use disposable half hotel pans for this). Loosely cover the terrine mold with two layers of plastic wrap, and place some kind of flat pressing device on top of the foie (I use a 1/2 inch thick board cut to fit inside of my terrine mold that I then wrapped in many layers of foil). Bring the sides of the plastic up over the pressing device, and place some heavy object(s) on top. I use two large cans of tomato sauce most of the time. You will notice/be horrified as huge amounts of fat flood out of the terrine mold and over the side. This is OK. Press down on the top (more fat! oh no!) until you are certain that the foie has been compressed well.
Place the entire mess (pan, terrine, plastic, board, and your weights) into the fridge. Leave for about an hour, or until you are certain that the fat has completely set up. At this point, remove the terrine mold from the under-pan, scraping down any fat from the outer surface, and any that has stuck to the plastic. If any foie meat has crept up the sides during pressing, cut that off and add to the under-pan. Place the under-pan on medium-low heat and melt down the fat. Strain into the glass vessel you used to hold the reserved fat from above. If needed, re-heat the fat until it is all melted.
Pour the fat over the surface of the terrine, making sure to coat the entire surface. Do not pour any cooked bits or non-fat, you want a pure yellow fat layer only. The fat will seal the terrine and keep it in good condition for a long while (I have no idea how long, but I'm pretty sure it's months). Once coated, wrap the terrine mold in several layers of plastic wrap (this is mostly to keep the greasy outer surface from making a mess) and place into the fridge. Leave at a minimum overnight, however I make my terrine 5-7 days before the party.
To serve, remove the terrine mold from the fridge about 10 minutes before you are ready to serve. Run a sharp knife around all four sides several times. Turn the terrine mold over and give a good shake over a cutting board. The foie should come out in a single block. If it doesn't come out, repeat the knife around the edge and try again. Remove the layer of fat (it should easily separate from the foie) and reserve (this can later be melted and strained to be used as a cooking fat, particularly nice with potatoes or for roasting a chicken). Slice terrine and arrange on platter.
As you can see above, I usually add some sort of green salad like item (this year, watercress) that I toss with a little black truffle oil. This amount of foie feeds around 40 people, depending upon how squeemish they are about foie to begin with. I have found that when I started these parties 10 years ago, I had foie left over. Today, it's all eaten quite quickly. How these times do change...
December 14, 2005
Gougeres
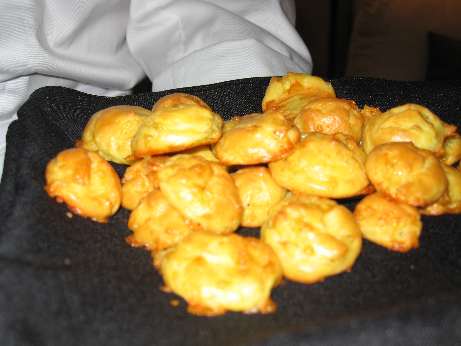
Gougeres (or Cheese Puffs) are a nice way to start a party, especially as guests arrive and imbibe their first drinks. Our first drinks this year were Kir Royale (Champagne with Cassis Liquor added), whicih always makes for a festive beginning. Champagne goes well with salty or oily foods, both of which happen to be the case for cheese puffs.
Cheese Puffs are one of those things that you can find recipes for just about anyplace. I did a quick google and came up with this one which I used as the basis. I think it's a bit high on butter and low on flour and ended up adding another 1/4 C of flour to get the right dough prior to the eggs.
Basically, you just make pate a choux, add some cheese and other flavorings (mustard is common), and then pipe and bake as normal. A few quick tips about pate a choux:
- by far the easiest, quickest, and most reliable way to incorporate the eggs is via a stand mixer with a paddle attachment
- you can easily prepare the pate a choux up to an hour in advance with no ill effect (this lets you wash up before the party). Put into the piping bag, but don't pipe or bake until the last minute. A large glass or pitcher can be used to keep the piping bag under control until you are ready to use it.
- for complex parties, it is often less cleanup work to use a zip-top bag as your piping bag either with or without a tip. For very thick pate a choux, you may (like we did) "blow out" the plastic bag and need to re-seat it within another before continuing. You can also buy disposable plastic piping bags, which will not generally suffer from this problem.
- use parchment paper for baking. This ensures quick release, and very little cleanup.
December 06, 2005
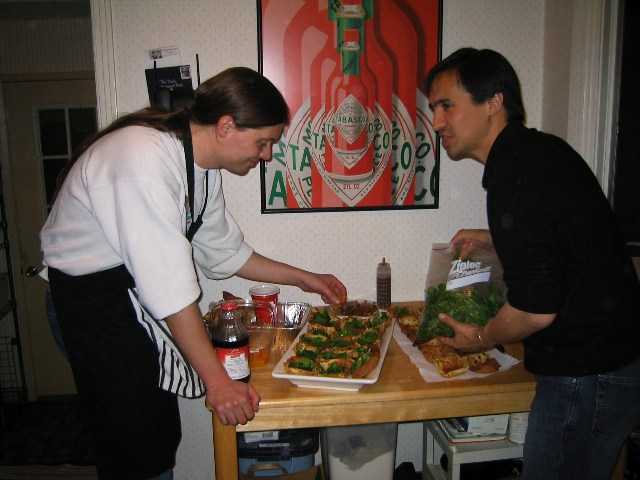
Party pictures
Checking Prep
I'm going to use this entry to link to various other blogs/entries/photos from the party (as they start getting posted):
LeeAnn took some great images using her spiffy new bounce flash.
Melissa came to the party early in order to document the preparations
William (one of my sous chefs) doesn't have any pictures, but writes about the experience from his perspective.
meriko blogs her tasks for the day (always a fun take on the work involved)
There will be a complete write up from me along with pictures/recipes and so on in the coming days/weeks. Documenting the 20 dishes this year will no doubt take a bit longer than in the past, so hang in there.
December 04, 2005
There was a party
Once again, there was a Poubelle Winter Feed. It was wonderful, fun, exciting, tiring, nerve wracking, and still more. Many thanks to all participants and chefs. More details to come, along with pictures.
Some special facts while you all wait:
- This is the 10th annual Poubelle Winter Feed
- I turned 40 this year
- My mother got a chance to attend for the first time
- We made 20 dishes this year (another first)
- I bought a painting (you can read about the process of the painting here, but I warn you that it is Not Safe For Work.)
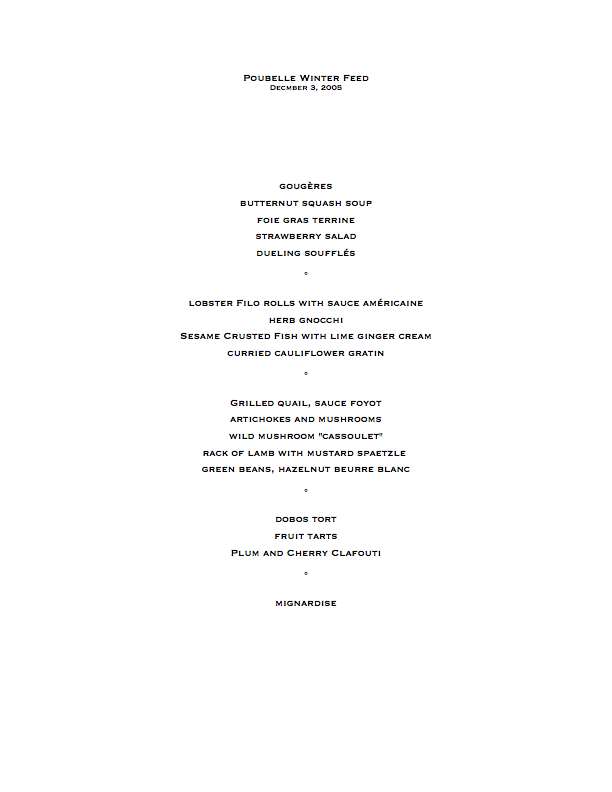
Here's the menu:
September 29, 2005
Watermelon!
A large melon
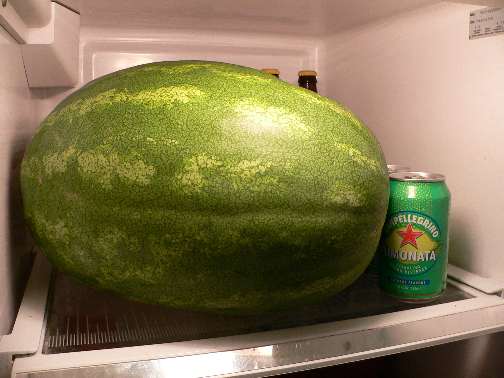
Eat local? How about something I grew myself! The watermelon wasn't the best I've ever had, but it certainly was tasty. After all of that rich food, a nice cooling fruit is about what you need. It was a big one and (as they like to say in the fruit business) "heavy for its size."
Of course, as an added bonus, there are lots of seeds to spit into the bushes. Maybe next year there will be more watermelons?
burp
2 pm to 2 am. Good thing it wasn't a school night. Did I mention there was some wine?
September 28, 2005
Ready to eat!
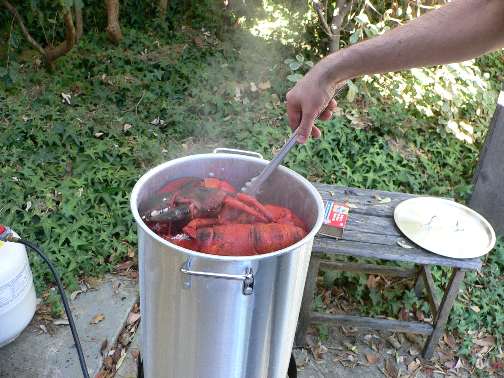
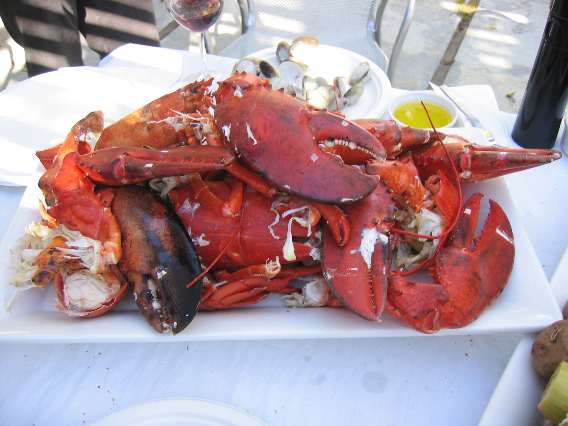
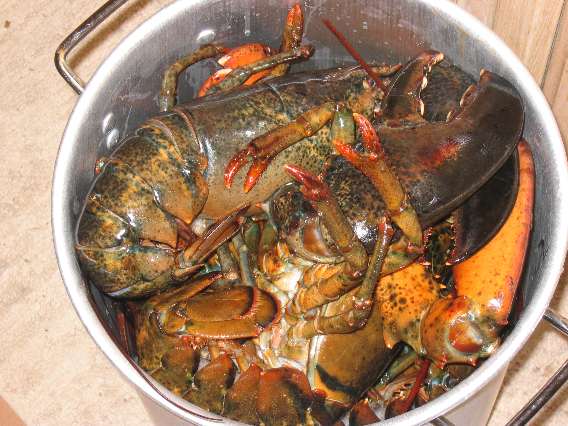
Testing the Lobsters
When the legs are loose, the lobsters are ready!
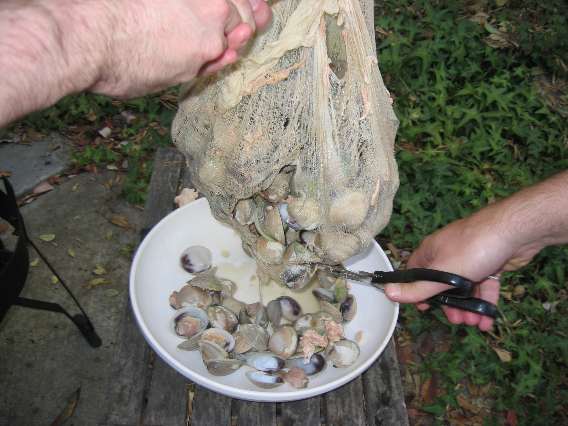
Removing the clams
It took two people to undo the clams. Let me tell you, that steam was hot!
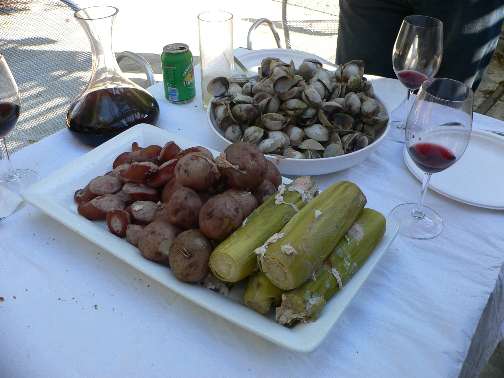
Ready to eat!
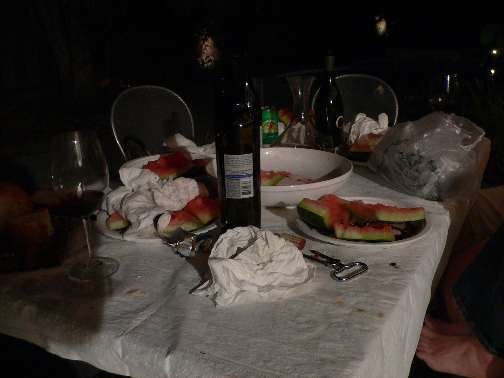
The table is set. Did I mention we had some wine? We probably should have cleaned off those corn husks, but honestly I'm not sure anyone really noticed.
Oh, I guess we need to eat these, too.
There was none left. Burp.
September 27, 2005
Preparing lobsters
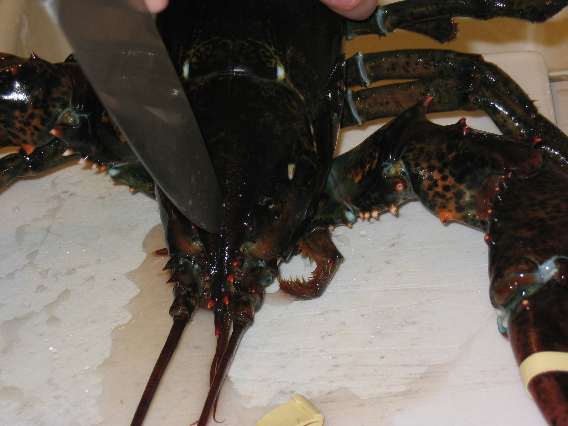
Dispatching the Lobster
Lobsters don't feel pain. However, they are certainly very tricky to deal with while still alive. I don't like to cook them with the bands on their claws (who likes to eat rubber?), and the last thing you want is a massive crusher claw grabbing onto your thumb. For lobsters of this size, even the small claws can give you such a pinch.
The quickest way to kill a lobster is to drive your chef's knife straight down into the line between the eyes and then lever forward. When you do this, make sure you have a strong grip on the tail. And keep your other hand away from the knife!
If indeed, "Lobster is my friend", why did I just do this to them?
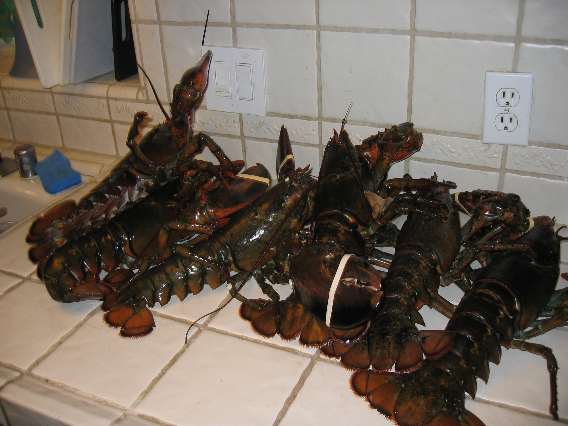
Turns out this was too many
Okay, so that's a heck of a display. I had no good way to know how many would fit in the pot. So, I get to have lobster for dinner this week as well!
As big as my hand
Here's a size comparison between my own hand, and that of the lobster. The white portion of the crusher claw looked like teeth. Yowch!
September 26, 2005
Building a Mystery
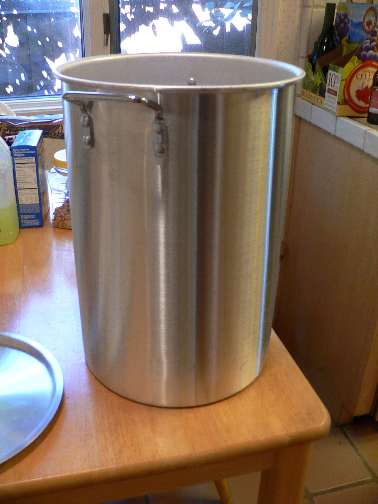
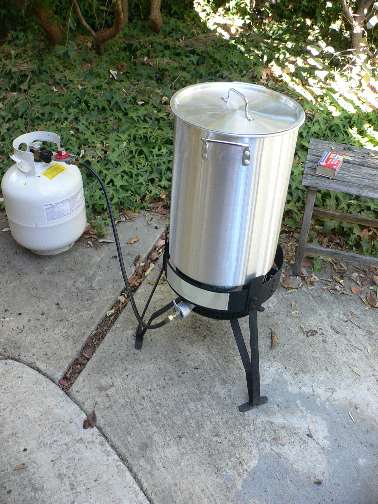
That's quite a pot, sir
First, get your largest pot. This is a massive one intended for deep frying turkeys. I've never done that (yet) but it also works great for clam bakes or crab boils.
You'll be layering the ingredients.
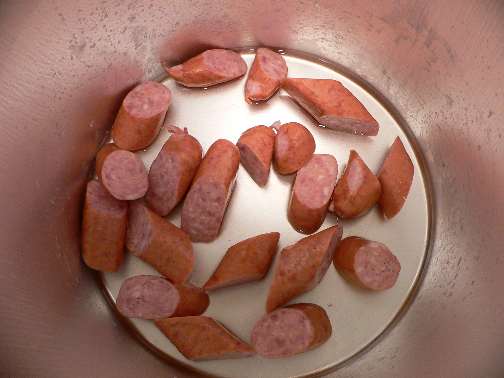
Polish Sausage
I added about 1/4 C of white wine and a bit of water. This was just to make sure we had enough steam.
Clams in cheesecloth
The cheesecloth makes it easier to take the clams out. Technically these were New Zealand Cockles and not clams. We've had quite a bit of red-tide in the states recently.
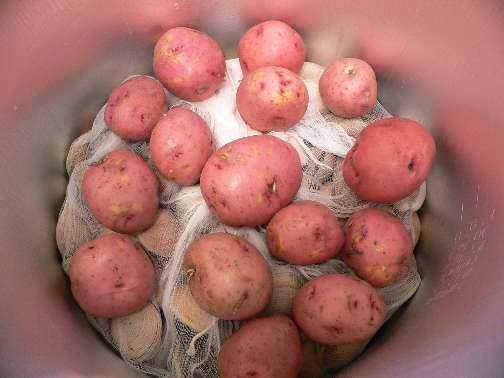
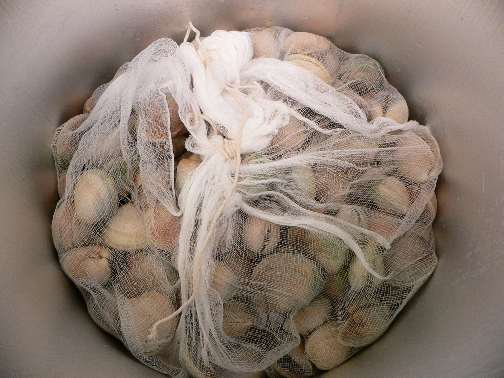
New potatoes
anne claims that these are just "filler." But they did turn out good.
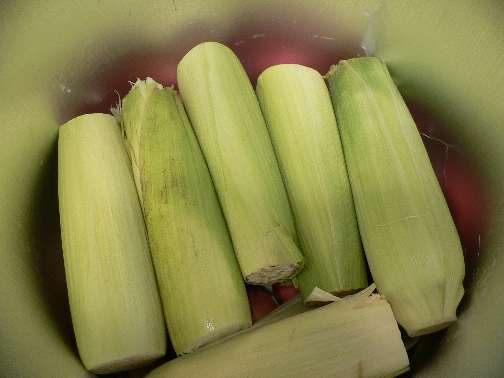
White Corn
Not the best time of year for corn. Leave the husks on so that the "lobster foam" that will come out won't be directly on the corn.
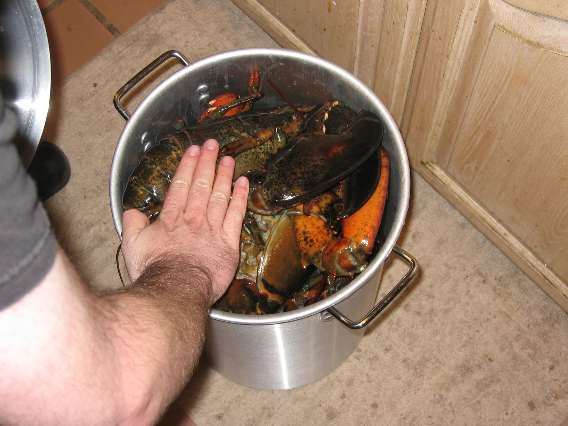
Four Lobsters
We could only fit four of the lobsters in.
Try not to burn down the house
Cover and cook over medium heat (such that steam is coming out) until lobsters are done. For these 4 pounders, that ment about 30 minutes. I yank on the small legs to see if the lobsters are done, when they are loose, it's time for eatin'!
September 25, 2005
A very large lobster
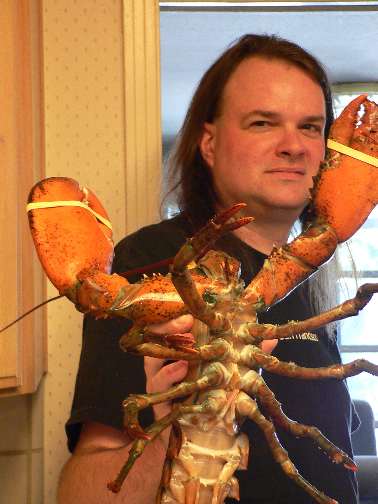
My that's large
Why is it called a clambake? You aren't baking anything. And all most people talk about are the lobsters. And let me tell you, large lobsters are pretty neat. These guys were nice and feisty -- this is always a good sign with lobsters because you know they are healthy.
More on the clam bake in the upcoming days. I'll just say that it turned out very well.
January 23, 2005
IMBB11 - Beans
For my first entry in Is My Blog Burning? I was thrilled to lean that the theme would be "beans." This is a revelation that would surprise my mother -- as a child I loathed beans in all forms, and now I love them in just about all forms. Check out the other IMBB11 entries here.
Here in Northern California, the weather has been cold and rainy, so it was obvious to me that a Cassoulet was in order. The idea of the oven and stove being on for the better part of two days was just too tempting to resist. Cassoulet can be made in under a day, if you start fairly early in the morning, and won't be eating until late. But it's more usual to prepare the day before, and assemble and cook on the second day.
Nothing better on a cold day
A Cassoulet is a French bean and meat casserole that involves a whole range of parts. Like any traditional dish, there are heated arguments about what does or does not go into a "proper" Cassoulet. I decided to make the most common one that I usually make, and include more or less the traditional ingredients.
The "recipe" (more like a general plan of attack) is as follows:
4 C dried small white beans
1 qt demiglace
2-3 lbs of meats
2 C mirpoix
3 C fresh breadcrumbs
- Soak beans overnight
- Drain beans, place in pot with fresh water, simmer until tender, 45-60 mins, reserve cooking liquid.
- Sautee mirpoix
- Layer beans, mirpoix, meats into large casserole. Salt and pepper as you go.
- Pour demiglace and/or reserved bean cooking liquid over casserole until just covering the beans
- 350 oven for 2 hours, uncovered
- Layer bread crumbs on top of casserole and return to oven for another hour
Lamb and pork are pretty common. Confit of duck or goose also. Some say to never include confit, others require it. Some add foie gras to the cassoulet. I used what looked good in the shops.
- one whole duck
- one lamb loin (trimmed from a rack of lamb that was around 1.75 lbs)
- one 4 inch wide "country pork rib" (this is a cut of pork that's really more like the pork belly with some ribs attached). Some people use thick cut bacon, or pork loin and bacon.
- one garlic sausage
The first task upon arriving home from the store was to make a demi/stock from some of the meats. Not everyone uses a stock or demi in making a cassoulet, but I personally love the rich flavor that it imparts. I used the carcass, head, feet, and wings trimmed from the duck, along with the ribs from the rack of lamb, and the ribs trimmed from the pork rib. This made a three meat stock. Trim from the mirpoix was the vegetables, and two teaspoonfuls of tomato paste was cooked down at the end. I cooked the stock for three hours, strained it, and re-cooked it with some brown roux to form the demi.
The duck yielded:
- legs and thighs for a confit
- carcass for the stock
- fat and skin, to be rendered down for fat and used to make the confit and also sautee various items in the cassoulet. The cracklings from the rendering make either a nice snack, or can be used on top of a salad much like one would use bacon.
- two wonderful duck breasts, saved for another meal
Be sure to use all of the duck
Okay, is the duck head and the little pot of skin and fat on the right already too much information and meat for you? You might want to check out my vegetarian cassoulet recipe then.
Still with me? Good. Let's move on to the next day, so we can see all of the parts together.
Mis en Place for the Cassoulet
Diagonally left to right and front to back we have:
- mirpoix (onion, carrot, celery)
- 1 quart of three meat demi
- trimmed pork (center)
- roasted garlic puree (1 head wrapped in foil, 350 for an hour)
- confit duck thighs, broiled to crisp the skin
- container of duck fat (from the confit)
- lamb loin
- two garlic sausages (I only used one)
- bread crumbs with parsley, salt, and pepper.
The meats, ready for assembly
Here's how I prepared each of the meats -- left to right, 8 inch chef's knife for reference.
The duck confit is made by coating the legs/thighs from the duck with salt, pepper, bay leaf (1), and allspice (6 whole, crushed). The duck is allowed to sit for a few hours (overnight would have been better). It is then wiped off and placed in a small pot of duck fat, and slowly simmered until tender. The duck is then cooled, and stored overnight (or until needed) in the fridge, covered in the duck fat. To use, the duck is removed from the fat (and excess is again wiped off) and placed under the boiler, skin side up, until crispy.
The garlic sausage was bought at a store and sliced into rounds. Whew! After the duck, this seems like a smart move, huh?
The lamb loin was trimmed from the bones, all fat and silver skin were removed. The lamb sat overnight in a mixture of olive oil, salt, pepper, and rosemary. A quick sear on all sides.
The pork simply had the top layer of fat scored, coated with salt and pepper, and once again seared on all sides.
You can either leave the large pieces of meat intact, or cut them into smaller pieces. The large pieces allow you to (in theory) fish the meat out of the final dish and portion it as needed. Going with smaller pieces would allow guests to just scoop out a spoonful and be surprised with what meat they got. Both methods work fine, but if the final beans end up very thick it can be difficult to fish out the very tender meat without it falling apart. I chose to keep the meats in large pieces this time.
Everything in one pot
After the meats were ready, the mirpoix was sauteed in duck fat, and then mixed with the roasted garlic. The beans (small white beans, 4 cups dry, soaked overnight) were drained and cooked in simmering water until just slightly tender (about an hour). The beans were then drained (with the cooking liquid reserved).
Finally! Time to assemble and really begin to cook this thing! Layers of beans, cooked mirpoix, salt, pepper, and the meats were placed into a large round dish.
Ready for the oven
The demi and a bit of the reserved bean cooking liquid were poured over the top until the beans were almost covered. With that, the cassoulet is ready for a 350 oven. You want to cook the cassoulet until it is bubbly and hot throughout, and the stock has started to thicken. This will take probably two hours, maybe more depending upon the temperature of all of the ingredients when they go in. If you think that the cassoulet is drying out rather than just thickening, you can add additional demi, reserved bean liquid, both, or just plain water.
What a crumby job
Once the stock has thickened a bit, a layer of bread crumbs mixed with melted duck fat is spread over the top. Cooking continues, and the stock is allowed to bubble up, thickend, over the top of the crumbs. Traditionally, the crust is from time to time pushed down to break it and repeatedly allowed to form. This is probably another hour. You can quicken it a bit by raising the heat of the oven to 375 or 400. This also assists in browning of the crust, but don't get too carried away -- if you see the cassoulet boiling furiously, you should drop the heat. You can let the cassoulet go for much longer total cooking time than three hours.
Ready to be served
Personally, I love the crumb part of the cassoulet -- so I use a pretty thick layer of crumbs. But you can experiment with what you feel is appropriate. If you have extra crumbs, save them for re-heating the next day. Ditto with any stock or bean liquid you didn't use.
January 03, 2005
The Bounding Mains
The main courses were all nice and hearty dishes. The main meat was a slow braised short ribs over risotto.
- trim fat off the top, but leave on the bone, salt and pepper
- bone side down in a roasting pan 400 degree oven for about an hour, or until nicely browned
- remove pan from oven, ribs from pan, pour of all of the grease
- return ribs to pan. Zinfandel wine (2 bottles) + stock (I used oxtail, but chicken also works) + some large carrot pieces. Liquid about 1/2-3/4 up the ribs. Heat pans until liquid is to a boil.
- cover pans (we used foil because the pans were huge, and we were actually using two pans) return to oven at 325-350.
- braise for 2-3 hours or until the ribs are tender (these were 2.5, I think). You can start checking the ribs at 2 hours
- remove foil (careful!) and let ribs cool for a bit in the liquid
- remove ribs into a small pan and cover well with foil (at this point it was 4 o'clock or so, so we just left this covered pan out). They will most likely fall off the bone and this point, and that's fine.
- strain liquid, cool, skim fat
To re-heat/serve
- reduce liquid well until it starts to become a bit thick (I think we had maybe two cups remaining after reducing from a starting point of two bottles of wine)
- return ribs (still in their small pan, still covered) to a 350 degree oven to warm up
- toss ribs in sauce, or spoon over, or what have you.
- we made a basic saffron risotto with chicken stock and cheese, which I think is an excellent foil for the sauce.
Braised Short Ribs on Saffron Risotto
Turns out during development of this dish, I wrote up how I make risotto.
Hotel Butter (and compound butters in general) are a favorite of mine, but lots of people don't cook when them often (myself included). While traditional over meats, I think they also work nicely with this vegetarian dish.
To make hotel butter:
- soften butter (I used a pound)
- use paddle attachment of mixer to whip butter until lightened (you want to get it as fluffy as you want before adding any of the other ingredients)
- add 2 finely minced shallots
- add herbs (I used thyme and parsley, which is traditional)
- add lemon juice (I used two lemons)
- mix until very well combined
- use as is, or roll in parchment paper into a "log". Wrap with plastic and keep in fridge for a week or so, or freeze for longer storage
We use this with turned carrots, parsnips, and rutabegas. The kitchen staff all got a "lesson" in turning vegetables. It starts out very interesting and fun to be learning, and quickly turns into a dull grind. This is why I have help for these things. I've done turned vegetables for a crowd all by myself once, and it is not a fun time.
As I usually do with vegetables, we par-cooked them (in order of white, yellow, and orange to avoid the colors bleeding into one another) and shocked them in ice water. For service, it was just a basic re-heat with the butter.
Turned Winter Vegetables with Hotel Butter
The beans in this are just some basic french beans (blanched and shocked as above and re-heated in (what else?) butter for service). The fun thing with this recipe is the "garnish" of shallots.
These are whole peeled shallots (another fun chore for the staff) that are slow-cooked in a pot with port wine until the wine as reduced to a syrup. This also makes a nice reduced sauce for anyone who wouldn't be eating the ribs listed above.
French Beans with Port Braised Shallots
December 24, 2004
Duck, Duck, and Duck!
This year, I had Derrick on "guest chef" duty. In recent years I've been tapping one of my helpers to come up with a dish of their own that they can take charge of in the kitchen. Usually we work it back and forth a bit, and usually try it out once sometime before the big day to work out any kinks and maybe come up with plating.
Derrick did a great duck salad with pomegranate (just pure juice reduced by half in order to form the sauce -- genius!). Derrick writes about his dish here with pictures. It was a great success over all, and made a nice transition into some of the "heavier" parts of the meal.
 Time to make the Duck
This is a pretty typical kitchen scene from during the party/service. Things are fast paced, and multiple people get the dish together for presentation, but nothing is too crazy. Well, most of the time anyway.
December 23, 2004
Fish, 2004
For the rest of the "fish" courses, we did two vegetarian dishes.
First up, was a stew of winter vegetables (calliflower, celery root, small squashes) to which we added harissa (a hot pepper puree) and some green olives. Some baby eggplants were sauteed for around the dish. We didn't want the eggplant in the stew for fear they would have become mushy. In keeping with the Mediterranean theme of this dish, we served it over large cous cous, and with a side of additional harissa (for those who like it hot), and a cucumber/yougurt sauce (for those who do not).
Winter Vegetables with Harissa
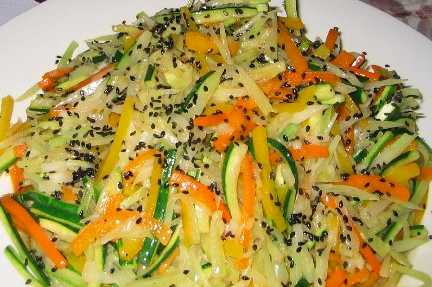
This stir fry was simple in ingredients -- fennel, onion, bell peppers, zucchini -- but they were sliced perfectly thin and consistant as part of the prep work. Tons of effort, and the results show it! Just a quick stir fry before service.
The sauce was a beurre blanc made with a blood orange reduction. "Sauce Maltaise" is a hollandaise sauce traditionally made with blood oranges, and called that because Malta is the original source of blood oranges. I've made this type of reduction before and used it with shrimp to good results.
Maltaise Style Stir Fry
And finally, one of two risottos that we made this night. The stock was made with the trim from the scallops, plus shallots and thyme, along with a lobster stock that I'd had frozen previously, plus water from re-hydrating a handful of lobster mushrooms. The lobster mushrooms themselves also were chopped up and went into the risotto. The mushrooms, along with bright red lobster butter at the end, helped to color the risotto a wonderful shade of redish brown.
Development of this dish started the day after the last party. The trim from scallops was left over, and so I made a risotto starting from that point. I knew that for a real dish I'd have to have actual scallops on top, and added the lobster mushrooms and lobster butter late in the development process. I'd had a lobster risotto at Capo in Santa Monica that had been colored by lobster butter.
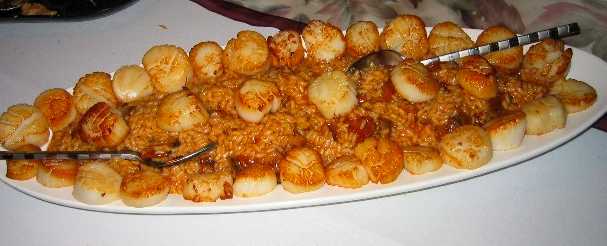
Scallop and Lobster Risotto
December 22, 2004
A plated dish
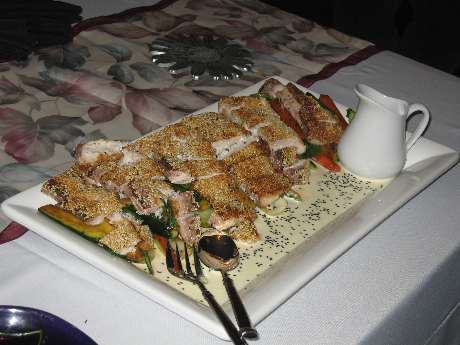
This year, we decided to do one individually plated dish. We've never done this before, but I'd been meaning to try out a varient of this particular dish for a few years now. The basic idea was rare seared tuna, sliced, with some smaller side dishes to go with it. We served this as part of the "fish" course (these dinners are broken up into apps, fish, mains, and deserts).
Carol had given me the idea of doing something called "Steak and Eggs" and I decided to go in a sort of Thomas Keller direction and play with it. The idea was to have things on the plate that might mirror or suggest a dish of "steak and eggs" that you might get at a diner. But, of course, the flavors wouldn't be just something like that.
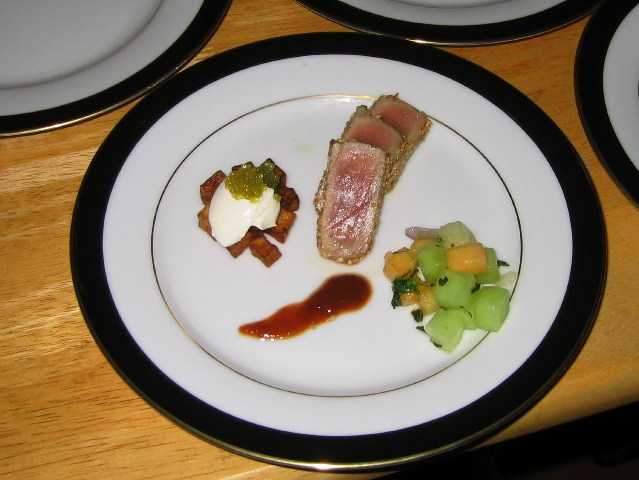
"Steak and Eggs"
The components are:
- rare seared sushi-grade tuna, coated with salt, pepper, and sesame seeds
- a melon "salad" with red onion, mint, and vinegar
- "steak sauce" made with raisins, shallots, tamarind paste, brown sugar, and orange juice
- "hash browns" topped with crème fraîche and wasabi caviar
"Steak and Eggs", half of the plates
We made up 35 of these plates in two waves. Each person in the kitchen was on one or two of the parts to the plates and we rocked the out assembly line fashion. It was a lot of fun to do one dish like this -- not sure that it would be fun or practical to do this every year, or for more than one. But it was a nice change of pace to be able to plate individually. Sometimes the platters can get a bit "plain" looking out of pure necessity.
December 20, 2004
Appetizers, 2004
This year, I sort of did a "best of" for the appetizers, making some of my favorites that I've also done enough times for it not to be overly taxing for my brain.
The mushroom soup is very easy (most soups have a large make-ahead component anyway) and based upon a standard cream-based mushroom soup. My only change is using some wild mushrooms for additional flavor, and smoking the main component mushrooms first. Several people likened the resulting flavor to a single-malt scotch.
The onion tarts I've made countless times before (both in bacon and non-bacon varieties) and are from one of my heros, Michael Richard. One change this year was that I made the bacon myself. That's sort of a fun thing to do on a series of long weekends. Well, I think it's fun anyway.
Finally, of course, what would a birthday be without foie gras (we may know in 7 more years)? It came out pretty much the way it does most years. I had meriko come over this year to clean, slice, and pack the foie into the terrine mold. It's a great learning experience if one has never handled foie before, and after eight years, I've pretty much hand all of the practice that I need. We plated it with a pile of frisee and black truffle oil, and this year brioche instead of a pain de mie. Foie terrines are also great for parties because you really need to make them a week ahead so that the flavors can blend.
Clockwise from top, smoked mushroom soup; bacon onion tart, brioche, foie gras
Smoked Wild Mushroom Soup
- cold smoke 1 pound mushrooms. Normal field mushrooms are fine, but I used portabellos because they are easier to manipulate on the grill. If using portabellos, scrape off the gills to avoid coloring the soup a dark gray color.
- chop mushrooms, sautee with 1 large onion until browned.
- add water to cover, a small handfull of dried mushrooms of your choice, salt and pepper, and a bit of thyme, simmer for 30 minutes
- puree and strain soup using a course strainer (or the yield will be very small), you can chill and/or freeze at this point
- re-heat soup base, adjust seasonings if needed
- chop fresh wild mushrooms for garnish. If using some dried, rehydrate in water, and after the mushrooms are ready, add the remaining water to the soup
- when soup is up to heat, add between a pint and a quart of heavy cream, bring it back up to heat, but do not boil
- sautee the wild mushroom garnish in butter with a bit of shallots, salt and pepper
- add a small amount of sherry as a final flavoring. I used one from Merryvale Winery called "Antiguia" which has a mushroom overtone (I think).
Bacon (or smoked bell pepper) Onion Tart
- Cut into large dice 2 large onions
- Sweat onion slowly until fully cooked, all liquid is reduced, but do not brown. 45 minutes over low heat
- Remove from heat and add 1 C of cream fresh, or sour cream thinned with a bit of heavy cream. Stir until well combined
- Allow to cool completely (can be done ahead and kept in fridge)
- Roll out puff pastry to 1/4 inch thick. I make my own, but store bought is also fine. If possible, find one made with butter rather than shortening. Cut a round using a knife or pizza cutter, about 8-10 inches around.
- Heavily "dock" (poke holes) the inside of the round with a fork. You almost can't have too many holes. This keeps the inside from rising too much, while allowing the outside to "balloon" up and form the outside edge.
- Cut bacon or bell pepper into thick matchstick length "sticks."
- You can cover/wrap everything to this point and place it into the fridge for up to a day
- Heat oven to 375-400 degrees
- Spread the onion mixture in the center of the round. You want a full coverage of onions, which will probably seem like a bit much. It's OK, the cream thickens while the tart bakes.
- Add bacon or bell pepper on top, and then some cracked black pepper and a sprinkling of fresh thyme leaves
- Place on baking sheet, bake for 35-45 minutes or until fully cooked and the bottom is nicely browned (you'll have to peak in order to see).
- Slice like a pizza and serve.
December 15, 2004
This will never work
To say that I was nervous about assembling the Croqombouche is understating it quite a bit. I figured it was either going to be a) a complete success or b) a total failure. I figured that if nothing else, we could just pile up the cream puffs and present it that way.
First up the next day was filling the cream puffs. I like to use a combination of pastry cream (seen in the plastic bag to the left in the photo) "lightened" with sweetened whipped cream. You can see how much lighter in color the filling gets when you do this. I think that pastry cream by itself can be a bit too heavy inside of a cream puff. This combination is technically known as "diplomat cream."
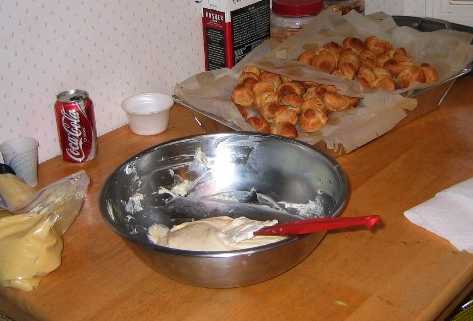
Only 1 million left to go
While Mark and Derrick were busy getting the puffs filled, meriko and I started in on the mold. This one is about 19 inches high and about 12 across. It's a specialty item that you can order over the Internet. They are expensive and really only useful for this one task. Not the most practical thing to buy, but there you go.
Before filling, we oiled down the interior very well -- this doesn't keep the carmel from sticking, but does make it possible (one hopes) to get it to release later. We used a cardboard box to hold the mold when we were not actively filling it, but most of the time meriko had to hold the hot, and increasingly heavy mold.
19 inches of stainless steel terror
We didn't get any action shots while the filling was going on. Between people filling the cream puffs, making batches of carmel (it took three of them), filling the mold itself, cleaning up, or just staying out of the way, picture taking didn't happen much. Filling the mold took about an hour. It went pretty well and once we got into the groove it also went pretty fast.
Each cream puff is dipped in carmel (with tongs when the carmel is still very hot, and later with careful finger tips) as much as possible without burning oneself. Then the puff is positioned into the mold, working up the sides and around. Both of the "fillers" wear latex gloves, so that when (not if) a bit of carmel hits your hand you a) have a bit of protection and b) can pull the latex away (or the entire glove off) to get the heat off your hands. The outside of the mold also gets hot as the metal begins to wick away the sugar's heat.
If you've never worked with carmel before, it's very hot, and sticks to you when it hits. Some of the worst burns you will ever get in a kitchen can come from it. I only managed to get a few small drips on my gloves while I was working, nothing that was really even visible in a few days.
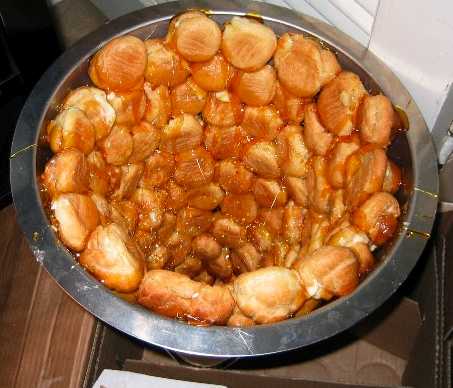
A dozen burns later
Extra carmel from the end of each batch was drizzled over a broomhandle (with plastic wrap over it and a bunch of newspaper on the floor below) using a fork to create carmel "strands." This is pretty standard sugar work, sometimes called "spun sugar" and is very fun and impressive. It's also, if you aren't careful kind of messy.

What a mess!
The carmel at this point has completely set (we waited around 15 minutes) and has secured the puffs to the sides (and hopefully to each other). In theory, or in a smaller mold, you might be able to release it via a spatula down the sides, but there was no way this was going to work this time.
Time for a welding torch, applied just enough to the sides to get the carmel to melt just a bit. Fireplace gloves and towels were then used to lift the mold away to reveal the hopefully still standing finished piece. We placed the mold on the final plate, because once you remove the mold, you really don't want to try to move it to another one.
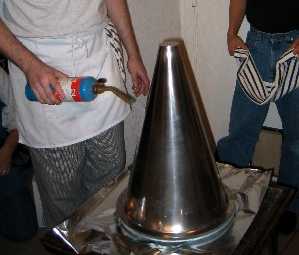
Please let this work
After unmolding, the spun sugar is spiralled around the cone to help hide some/most of the carmel inperfections or drips. We finished it off around 4 in the afternoon and hid it in a back bedroom (with the furnace vents off) until it was ready to be revealed. Here's the Croqombouche on the table with me and William.
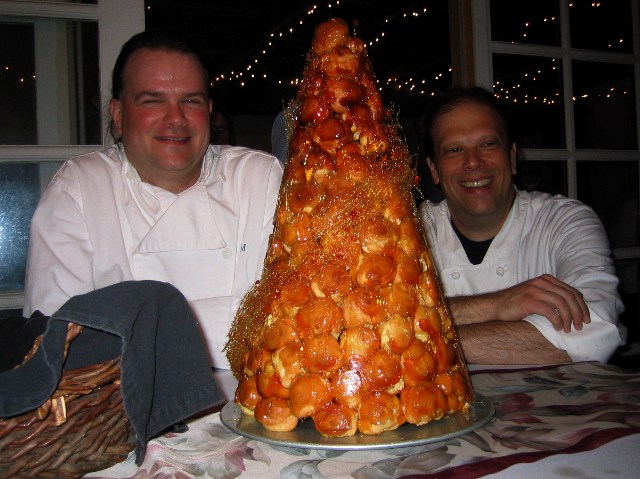
Wow
How do you eat it? You take a bread knife and hit, crack, and/or saw away the cream puffs from one another. I've been told that in England (where Croqombouche have become common at weddings) there is a tradition of breaking the entire thing at one go into a tablecloth. We disassembled it in a much less impressive manner for this party.
I simply cannot believe we pulled this off! It took almost three hours of work between all of the making and assembly, with involvement of the entire kitchen staff, and until it's done you really don't know what is going to happen. The final product was solid and was never in any danger of collapse. In fact, the next day the remains were still standing and still crunchy. The other thing that sort of amazed me was that it tasted good! The crunchy exterior of the puffs made them very different than normal cream puffs.
I'd certainly never (well, never say never) do this again as part of a larger party. But it might be fun to make (even a smaller one by partially filling the mold) for some other occasion when there wasn't also lots of other cooking needing to go on.
December 07, 2004
It starts with butter
The major task the day before the party was making the 12 dozen (slightly more, actually) cream puffs. These are the major ingredient in the Croqombouche.
There's only about a pound of butter in the cream puffs themselves. But here's the top shelf of the fridge, packed from the store. We ended up using around 12 pounds of the butter, two of which were in the form of clairified butter for cooking.
14 pounds of butter
It took four batches of my standard choux paste recipe -- that's 4 cups each of water and flour as a start -- to make enough of the dough or batter for all of the cream puffs. Choux paste is much easier to make if you transfer the cooked flour glob into a stand mixer for beating in the eggs.
Cooking was done two trays at a time. It's close to an hour of cooking because you start in a hot oven, bake to get the right puff, then drop the oven to continue cooking the center, then slit the puffs and return to the oven (now off but still warm) and let them dry out. This is done so that you don't get soggy cream puffs -- especially important if you are making the shells the day ahead.
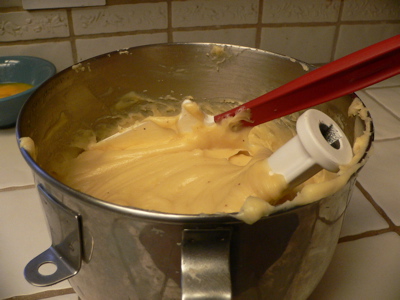
4 batches of Choux Paste
Here are the puffs being pipped down. William is coming along behind and using wet fingers (important to keep the paste from sticking to them) to flatten down the tops. If I were better at piping, he probably wouldn't have had to flatten as many of them. We made them somewhere around 1.5 and 2 inches across. I didn't want them to be too small, but if we had made them larger the later assembly would have been more difficult, I think.
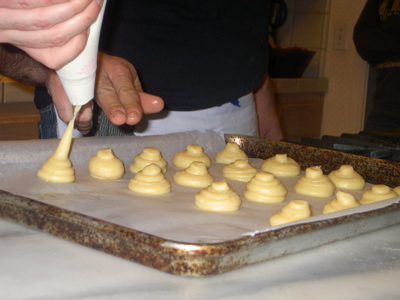
12 Trays of Cream Puffs
I used two hints from Alton Brown this time in making my cream puffs. Use bread flour rather than all purpose. And swap out one of the whole eggs with two egg whites. The bread flour gives you more gluton and thus more structure. The egg whites help the cream puffs to be more dry. I'm not really sure that these changes made much of a difference. I've never had much problem with cream puffs. However, they certainly are simple changes to do. Besides, I needed the egg yolks for the pasty cream filling I was making to go into the cream puffs.
The day before we also made the pastry cream (and bagged it into the fridge), made truffle centers, froze them, coated them (twice) in flour, egg wash, and bread crumbs, and re-froze them. This was lots of just straight production -- things that would have been impossible to try to do the morning of the party.
December 06, 2004
Prep Lists
This year prep was a somewhat mixed bag. Overall, we were ahead most of the day, and finished up with about 45 minutes to spare before the guests began to arrive. I had a few sloppy/missing items on the list, so of course we didn't catch them until a bit further on in the day.
I had a few tense moments earlier in the day when I managed to mentally weed myself into not knowing what to do next. Training prevailed, and all went well. It was, as usual, a crazy amount of fun.
We ended up swapping around some major things in the 2 to 4 pm timeframe because we decided it would be better to assemble the Croquembouche earlier rather than later. It was a one hour assembly and took three batches of caramel to pull off (just wait until you see the picture!). It's a testiment to my fellow chefs and their experience that we were able to do something so large and complex in the middle of all of the other dishes and not completely break down sobbing.
If you want to see the steps that go into a menu like this, read on...
Dish numbers:
1) Cheese and Fruit Plate
2) Proscribed Terrine with Brioche
3) Smoked Wild Mushroom Soup
4) Onion Tarts with House Made Bacon or Smoked Bell Peppers
5) Scallop and Lobster Risotto
6) Maltaise-style Sauté
7) "Steak and Eggs"
8) Winter Vegetables with Harissa
9) Zinfandel Braised Short Ribs
10) Pomegranate Duck Salad
11) Turned Vegetables with Maitre d'Hotel Butter
12) Haricots Verts and Port Braised Shallots
13) Croquembouche
14) Crepes Suzette
15) Deep Fried Chocolate Truffles
10) defrost duck thurs pm
13) make pastry cream friday
13) make cream puffs friday
15) make truffle centers friday
15) freeze truffle centers friday
15) coat twice and re-freeze centers friday
11) make hotel butter friday
2) make brioche dough friday pm
1) make fougasse am
1) make some other kind of bread am
2) make brioche am
3) thaw base am
4) make puff pastry am
9) clean ribs am
10) make crepes am
10) make crepe cups am
10) reduce pom, into squirt bottle am
11) turn veg am
11) blanch and shock veg am
12) prep beans am
12) blanch and shock beans am
12) clean shallots am
9) thaw chicken stock for risotto am
14) make crepes am
14) prep orange etc for sauce am
6) slice/julienne veg 11 am
6) make gastrique 11 am
7) make steak sauce, into squirt bottle 11 am
8) make yogurt sauce 11 am
8) prep veg 11 am
3) rehydrate mushrooms noon
5) defrost lob stock noon
5) clean scallops noon
5) rehydrate lobster mushrooms, slice noon
5) make stock, adjust/add lobster stock noon
9) 375 for 1 hour in oven noon
10) clean salad noon
10) trim duck noon
9) braise ribs (2 hr or until tender) 1 pm
7) prep tuna 1 pm
4) sweat onions down, add creme fresh 2 pm
7) cut potatoes, into ice water, 60 mins 2 pm
7) make melon salad w/ gastrique 2 pm
4) slice/blanch bacon 3 pm
4) slice bell peppers 3 pm
7) saute potatoes, cool on paper 3 pm
9) cool in liquid 3 pm
9) strain liquid, reduce 3 pm
13) soften pastry cream w/ whipped cream 3 pm
13) carmel for puffs 3 pm
13) assemble 3 pm
13) spin carmel for garnish 3 pm
1) prep cheese 4 pm
1) wash/prep fruit 4 pm
2) wash frisee 4 pm
3) test base/adjust/add other flavors (Antigua) 4 pm
3) add mushroom liquid to soup 4 pm
4) roll/cut/dock pastry 4 pm
10) supreme oranges 4 pm
13) unmold 4 pm
12) braise shallots 5 pm
1) make cheese/fruit plate 5 pm
1) re-heat/adjust/put out bread 5 pm
4) pastry, onions, topping, thyme, 5 pm
6) make beurre blanc, into thermos 5 pm
13) check Croquembouche state 5 pm
------- SLOW DOWN! - CHECK ALL SETUPS ---------------
4) into oven @ 375-400 for 45 5:15-30
3) cream soup 5:30
3) sautee mushrooms 5:30
2) toss frisee w/ truffle oil 6 pm
2) put out terrine 6 pm
3) soup out, mushrooms on side for garnish 6 pm
----------------- ALL APPS OUT 6 -------------------
STEW:
8) make couscous in rice cooker 6 pm
8) stew veg, but sautee eggplant 6 pm
8) olives at end 6:30
8) harisa on side in ramkin 7 pm
"Steak & Eggs"
7) reheat potatoes (oven for 10 or so) 6:30
7) coat tuna in seeds, S&P 6:30
7) sear and rest tuna 6:30
7) slice and plate 7 pm
Matlaise Veg
6) sautee before 7
6) plate, sauce over, garnish black seasame & chervil 7 pm
Scallop Risotto
5) shallots, lobster mushrooms, rice, make rissoto 6:30
5) finish w/ lobster butter and parm. before 7
5) saute scallops before 7
5) plate 7 pm
----------------- ALL FISH OUT 7 -------------------
Duck Bowls
10) S & grains of paradise on duck 7:30
10) saute duck, into oven 7:30
10) remove duck from oven 7:45
10) rest duck, slice 8 pm
Turned Veg
11) reheat veg in pan 7:30
11) plate w/ butter on top 8 pm
Ribs & Risotto
9) re-heat in liquid 7 pm
9) make risotto 7:30
9) lemon thyme garnish 8 pm
Beans & Shallots
12) re-heat beans (in batches) 7:30
12) plate w/ shallots 8 pm
----------------- ALL MEAT OUT 8 -------------------
Make coffee
14) make sauce 8:30
14) warm service plate in oven 8:30
14) warm crepes in sauce 8:30
14) whipped cream garnish? 9 pm
15) 350 oil for 30 seconds or until brown before 9
----------------- DESSERT 9 ------------------------
December 04, 2004
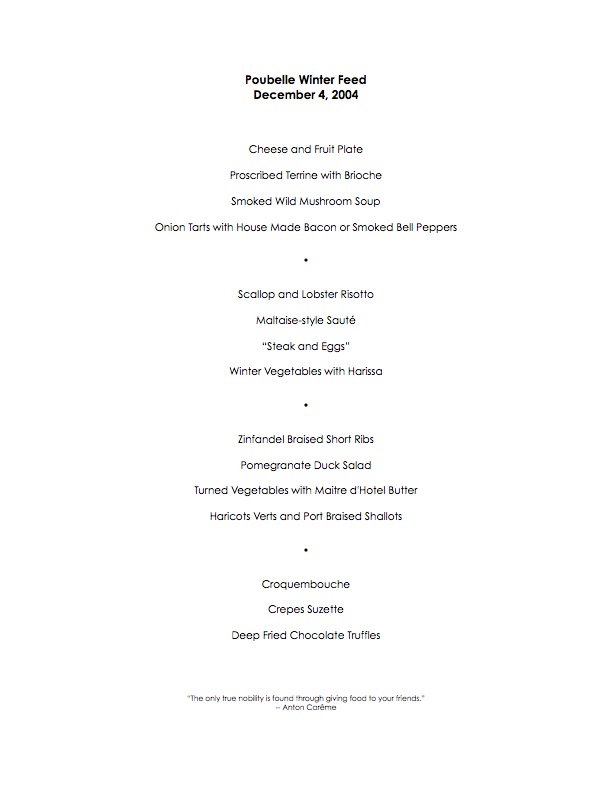
September 13, 2004
Molten Chocolate Cake
I haven't made one of these in some time. Last night I decided to see if I could make a smaller than normal batch (because who really needs to eat 8 deserts on ones own?).
4 oz dark chocolate
4 oz unsalted butter
2 eggs
1/4 C sugar
1 T flour
Oven to 400 degrees. Butter and flour (or, in my case, I use cocoa powder) two small ramikins (6 oz? something like that). Melt butter and chocolate in double boiler. Once melted, remove from heat and allow to cool slightly. When oven is to temp and chocolate has melted, whip eggs and sugar together until the ribbon forms. Pour in chocolate mixture and whip just to combine, then add flour and do likewise.
Pour in prepared ramikins (about 1/2 to 3/4 of the way up the sides). Bake 12 minutes leaving the centers very wet. Remove from oven, run a knife around the edges and upend onto plates to serve. Makes 2-4 depending upon the size of your ramikins and how full you fill them.
If done correctly, you get a nice looking little chocolate cake, that when cut into oozes a dark chocolate sauce. Much more impressive than the work involved.
You can do these ahead of time and fridge them for up to 8 hours. I haven't ever done this, but friends who have say it works well as long as you pull them out of the fridge at least 30 minutes before baking.
Last night I used Trader Joe's dark chocolate which has a 70 percent cocoa mass. This is pretty high quality, but they obviously don't conche the chocolate as long as some of the higher-end brands. The cakes had a slightly detectable grit to them as a result.
I also have normally done a separate yolk and egg white whip (pushing the yolks to ribbon with 3/4 of the sugar and whipping to peaks the whites with the remaining). This is how I was taught to do this, but is a pain if you don't have two stand mixing bowls (and I do not, although for the life of me I don't know why) because you have to either a) wash the bowl between the whippings or b) whip the whites by hand.
Also, this approach means that you have to do folding of the whites, which is more time spent. I think the separate approach gives a slightly higher rise, and the outside of the cakes is maybe a bit "crisper" due to the sugar/white combination.
But the differences are very subtle, and the above outlined approach is probably 30 minutes total from start to the eating.
March 21, 2004
Salt, salt, salt!
Winter cranks down here in California, and I'll admit that my last month and a half of cooking has been fairly uninspired overall (lame excuse for no writing, but hey). Lots of baked chickens and the sort. However, the past two weeks or so of unseasonably warm and fully blue-sky weather have jolted me out of these cooking ruts -- sort of.
I'm working on a braised short-rib recipe, which doesn't sound very warm weather at all! But today was 50ish when we woke up, so I made another run at it.
It's a basic braise of boneless beef short ribs (which for some reason are always available at Costco). I've settled on robust wine for 50% of the liquid (today was a fairly inexpensive Zin that upon tasting showed major amounts of cigar notes) and 50% beef stock for the rest. I browned off some bacon first and used the fat that was rendered to brown the beef, which I had cut into 1-1.5 inch chunks. I then tossed out the fat, added in the stock and wine, covered, and braised for about two hours.
I strained out the meat and put the liquid back on the fire to reduced to near syrup like stages -- and boy did it taste salty at this point! And for me to call something salty. Heck, ruined for sure. But, I went forward and made a mental note to not salt anything else.
While the stock was reducing I made a basic risotto of shallots, chicken stock, and saffron, and at the last minute stirred in parmasagn cheese. When the risotto was done (twenty minutes, if you will recall) I tossed the beef chunks back in the stock to re-heat and also added the reserved bacon slices.
Plated in huge bowels with just two or three beef chunks per plate on top of the risotto, and just a tiny smattering of the sauce around. Fresh thyme sprigs from the garden on top. No salt was tasted in the eating -- I guess that intense sauce thing works out in the end.
This is the 2nd run at this, and I think this dish is going to appear at a popular winter dinner later this year as a result. Blarg! It was intensely yummy!
"Blarg!" is my only word for this type of flavor. It is the intense, reduced, heavy, wined, meated, concentrated explosion that you get from this type of cooking. Putting the smallest amount of the sauce or meat in my mouth causes an actual physical reaction. I can feel the saliva drop from the back portion of my mouth. This, yes, this this this, yes, this! Why isn't this what I taste when I go out to eat most days?
The reason this dish works so well is the very clean and classic flavors of the risotto (which is also quite pale in color), matched with the almost overwhelming intensity of the meat (which is contrawise almost black in color). And, of course, a little herb on top so that you figure the $25 per plate was an excellent value. You don't need much of this, but boy is it worth the effort.
December 30, 2003
Sort of Fancy Dinner
Well poop. I was going to have Carol and the kids over for a "fancy dinner", but the flu going around seems to have caught up with the clan. I had some of the ingredients already purchased, so I went ahead and made a shortened version of the dinner.
For the meat course, I made a slow smoked prime rib. I crusted it in a combination of sea salt, oregano, black pepper, and onion. I ran the smoker at around 275-325 for just under two hours, which took the two-rib roast to 120. I let it rest for 15 minutes, at which point it had coasted up to 128. The result was a pretty darn uniform traditional rare.
For the sauce, a Tom Common reduction of chicken, oxtail, red and white wines. I took it down close to a glaze, but left it a bit looser than I do for more formal dinners. I sort of wanted it to be like an "au jus."
I had a baked potato. But, had the kids come over I was going to do mashed. I also would have added my traditional Green Beans Done Correctly (blanched, shocked, reheated at the last minute in clarified butter) -- a trick that Carol wonderfully trotted out for Christmas dinner much to the pleasure of the guests. And, I was also going to do either a Hollandaise or Foyot sauce. Two sauces do mean love, after all. But, hard to make for one, and only for the most special of occations would I toss what would have been left over.
Even in just "meat and potatoes" mode it turned out very nicely. And I can't recall the last time I had a roast, so it was a wonderful change of pace in that respect. But now I've got a whole bunch of leftovers that need use in sandwiches.
December 05, 2003
Deep Fried Chocolate Truffles
I made these two years ago and have been meaning to get the recipe posted here and off of my side cabinet where it is on a sticky note. It is a very impressive way to end a meal, yet is quite easy to do and is mostly a make-ahead. Originally from Michel Richard.
- make chocolate truffle centers (whatever recipe you normally use. I use a 2/1 chocolate/cream ganache that I then table until firm enough to make balls).
- freeze centers until solid
- coat in flour, egg wash, fresh bread crumbs (to which I added cinnamon, you can leave this out or use other spiaces as you wish)
- repeat all three steps of the coating a 2nd time to entire complete coverage
- freeze once again until fully solid
At this point, you can leave them in the freezer in a zip top bag until you need them. I had some leftovers that I kept for a month and then re-used.
To cook, heat a light vegetable oil to 350. Deep fry just until the coating becomes brown (about 30 seconds). Serve/eat immediately.
I usually do a test one to see how melted the center gets and then adjust the timing a bit. The ideal goal is to have a crisp fried outer coating, a liquid, and at the center just a tad of still solid truffle.
September 09, 2003
Winter Menu
Sandwiched in-between two weeks of hot weather (in the 90s, which it was last week and which it promises to be again by the end of this one) we had a chilly (sort of) weekend. Chilly enough that I didn't want the grill, didn't want the BBQ.
So I made Zinfandel Braised Short Ribs over a bed of Saffron Risotto. I reduced the cooking liquid from the braise into a syrup and spooned it over the ribs, which I placed one each on top of a mound of the risotto in a pair of huge bowls. One tiny spring of lemon thyme on top. Carol wasn't cold anymore.
Risotto isn't hard to make and too many people get too bent out of shape over it. Here's my master plan:
1) Melt some butter in a heavy saucepan. If you have onion, shallots, garlic or other flavorings that need cooking before hand, cook them in the butter
2) Add arborio rice. Stir to coat.
3) Add stock to rice, just to cover. Ideally you'll end up needing twice as much stock by volume as rice.
4) Reduce to simmer. Keep at a low simmer, add stock as needed to just barely keep the rice covered.
5) Rice takes twenty minutes to cook. Set a timer. You can start checking at 15 minutes, and the cooking time can vary anyplace from 15-25 minutes.
6) Add stock as needed, stir frequently. Ran out of stock? Use water.
7) When done add cheese and/or butter to finish the dish. If after the addition it is not runny to your liking, add additional stock or water to adjust it.
8) Serve and eat right away. The risotto should be the last thing you make before service.
July 28, 2003
Stuffed Pork Tenderloin
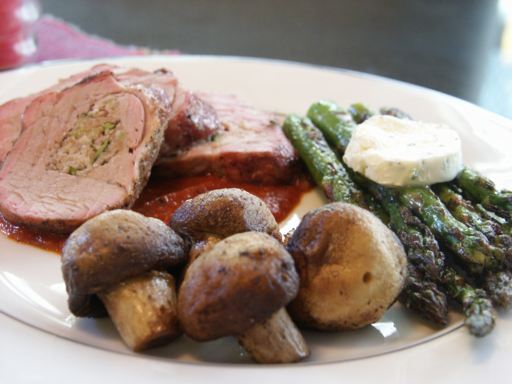
Stuffed pork tenderloin is a great dish to have in your back pocket. It's pretty quick, most of the work can be done ahead, it's impressive looking, and it's cheap. It also lends itself to all kinds of interesting creativity with a fairly low risk of failure.
James Beard claims that one pork tenderloin will feed one person. But we all know what James Beard looked like. I figure one tenderloin per two persons with a bit left over. I picked up a 4-pack of them recently at a warehouse store for $20. That's $2.50 per person for the meat, which is a pretty good deal.
MEAT PREP
Pork tenderloins are about 12 inches long and 2-3 inches in diameter. They are tapered at one end (often to a very thin "point" that's fairly useless). If you buy at high-end butcher stores you'll sometimes see trimmed tenderloins that are about half this length and cost much more. I think it's better to buy untrimmed, which also allows you to cut the ends off after cooking for a nicer presentation.
Pork tenderloins have a "silverskin" of membrane. Using a sharp knife, trim off some of this. I usually don't get too carried away here, but do try to "break up" the silverskin into thinner bits. If you leave it entirely intact it will tend to
shrink during cooking and sort of pinch the meat.
If the thin end is very pointy, cut that off. If the thick end has an extra "lobe" of paler meat (leftover from when separated from the loin) you can trim that down or off as well. if there are huge ugly globs of fat, those can get trimmed, but normal surface fat can be left alone -- it will render off during cooking.
STUFFING PREP
You want to make a hole down the length of the meat to allow stuffing. There are a bunch of ways to go about this, I'll describe the method I use, which I think is pretty easy and more importantly -- safe. I'll assume you are right handed, but if you aren't, just reverse everything.
Place the meat on a cutting board with the thicker end on the right and the thinner on the left. Take a thin boning knife and place it parallel to the meat in your right hand, with the sharp edge pointing away from you. Place your left hand flat on top of the meat and press down a bit. Insert the knife into the middle of the thick end.
Slowly and carefully work the knife through the meat. Use your left hand to both stabilize the meat and to judge where the knife is. Keep the knife in the center of the meat. Keep your left hand flat on the top! You don't want to poke it out either side, or even worse out of the top (and into your hand!). This sounds harder than it is, but pork tenderloin is pretty soft meat, so it really doesn't take much pressure to do this. Ideally, you want the point of the knife to end up poking out the small end of the meat. It's OK if the knife is too short for this, just stop when you've got the knife inserted as far as you are able. You're just trying to poke a hole at this point. No need to try to widen it out into anything big enough for actual stuffing.
Carefully remove the knife. You've now got a basic cut through the meat and need to widen it to allow for stuffing. I first insert my sharpening steel into the same hole I made with the knife. You can "bunch up" the meat to allow the steel to poke out the other side. You can use a dowel or other (clean) pencil thickness rod you may have around.
Remove the steel. Next, poke in your index finger and carefully widen out the hole some more. Do this from each end of the meat. Don't worry if you make a hole in the side of the meat. Next time just be more careful. Whew! All done!
MAKING THE STUFFING
The stuffing can be anything you like. A few guidelines:
1) Have some fat in it. Tenderloins are pretty lean and the fat in the stuffing helps to keep them moist.
2) If using vegetables that need a fair amount of cooking (ie, onions, carrots, celery, bell peppers), sautee them first. Allow to cool before stuffing
3) If using only vegetables and they are high in water content (ie, mushrooms, squash, zuchini), you may also want to sautee them to drive off some of the liquid. If they don't make up a large proportion if the stuffing, you can leave them uncooked.
4) Cut whatever you are using up into small enough pieces that you'll be able to stuff it easily.
5) Binders and starches such as corn bread, bread crumbs, rice (cooked), or couscous also work well. If you are including something very very high it fat (such as charizo or bacon) either cook off some of the fat first, or include some sort of binder. Maybe both.
6) I'm going to guess you need between half a cup and a cup of stuffing per tenderloin.
For this dinner I used (for two pork tenderloins):
- 1/2 C grated zuchini
- 1/4 C grated parmasagn cheese
- two italian sausages, taken out of the casings
- trim from the tenderloins, whacked up into very tiny bits
Mix together, uncooked, until well bound. Set aside.
STUFFING THE MEAT
Start at the fat end. Poke some of the stuffing into the hole and use your thumb or finger to push it down the length of the meat. Do it a bit at a time. From time to time, squeeze the meat (like a toothpaste tube) to get the stuffing to move more down the meat. Stuff from the thinner end as well. Don't feel the need to overstuff.
At this point, you can season the outside of the meat any way you would like and place in the fridge until you are ready to cook.
COOKING -- INSIDE
Heat oven to 375 degrees. On the stovetop heat an ovenproof skillet, adding the fat of your choice. Use the smallest skillet that will comfortably fit the number of tenderloins you are attempting to cook. Sear all sides of each tenderloin (3-4 minutes per side) and then place the skillet directly into the oven. Cook for 20-30 minutes or until done to your liking.
COOKING -- GRILL
Build a hot fire on one side of the grill. Grill the meat over direct heat for 3-4 minutes per side. Then move the meat to the side, cover the grill and allow to cook for around 20-30 minutes, or until done to your liking.
COOKING -- FINISHING
I cook pork to 140-145, which will leave it a bit pink. If you like it well done, pull it from the oven at 150-55. During resting, the temperature will rise up into the "safe zone" (or as I refer to it, the dry and overcooked zone). Actually, this method is pretty forgiving, because the interior of the meat is "basted" by the stuffing.
Rest on a cutting board for at least 10 minutes. Slice about 1/4-1/2 inch thick on a bias (which makes the center look even cooler).
DINNER NOTES
It was sort of interesting that this pork got a smoke ring on it, even after only 30 minutes on the grill. I'm suspecting it's due to the use of lump charcoal, but I've never noticed this before. Sort of interesting -- to me at least.
Served it with a basic red sauce that I had slow cooked earlier in the day, some grilled mushrooms and asparagas. Topped the asparagas with some more of the hotel butter I had left over from the day before.
This was a great dinner for a 90 degree day here in California. Except for the sauce, the entire thing was cooked outside -- leaving the house in much better shape.
July 14, 2003
Summer Party
Well, here's how the party played out. It was lots of fun and the food turned out especially good this year. And, of course, Carol's tables looked fantastic. We also finished prep with an hour to go before the party, which I think is a New World's Record.
When the guests arrived, the serving table was pretty much covered with Salads and Starters. I like salads for summer parties. They're all about prep and little to no actual cooking -- which helps to keep down the temperature in the kitchen.
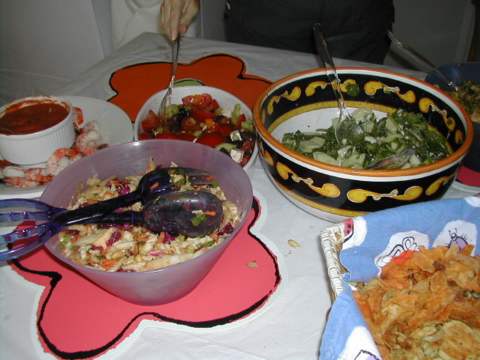
Spinach, Blue Cheese, Apple Salad
Used Maytag Blue cheese and a very basic vinegar/mustard dressing. It was excellent and elegant.
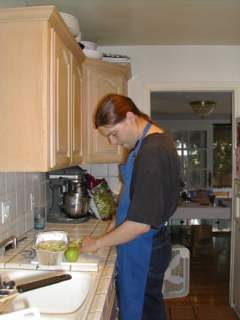
Chinese, Peanut "Slaw"
Two kinds of cabbage, lettuce, carrots and a dressing of peanut butter, hoisin, soy sauce and lime.
Greek Salad
Your basic tomatoes, olives, feta type salad. Used lemon/olive oil and sumac powder in the dressing.
Taco Bean Salad
Pinto beans, lettuce, tomato and cheddar cheese with crumbled up tortilla chips. A dressing of salsa, lime, and oil.
Shrimp cocktail
The shrimp were boiled in a cajun spice mixture. The cocktail sauce was made from scratch, including the ketchup. Good grief, what was I thinking? But it got a whole bunch of compliments -- which I deflected to William who made it.
Cheese and Fruit Platter
Then, we started bringing out the main dishes as they finished cooking. Mostly it was slicing and plating.
Carol's Non-Traditional Spare Ribs
Spare ribs coated in rosemary rather than normal BBQ spices. I also made two racks of beef ribs with the same flavoring. The sauce was a thickened pork stock with more rosemary and mustard added.
Hot 5 Ways to Sunday Babybacks
I made way too many of these (and knew it as I was making them). But, they reheated well on the following day during party cleanup mode.
Carol's Chicken
Spatchcocked and coated in garlic and rosemary rub. In case you can't tell, Carol loves Rosemary with a Loving Love. Cooked in the smoker for about two hours.
BBQ Sausage
We made these from scratch. A light italian type seasoning. 50/50 pork butt and beef tri-tip. Smoked for about three hours in the upper portion of the smoker.
BBQ Beans
7 hours in the smoker with meat dripping in to them.
Onion Rings with Remoulade
A smash hit. William and Derrick were slaving over a hot oil pan for about an hour making these on demand.
Vegetable Tamales with Tomatilo Sauce
A mixture of diced vegetables inside, steamed for about an hour. We put these out early and had to keep re-stacking the plate with more. I guess everyone had at least one.
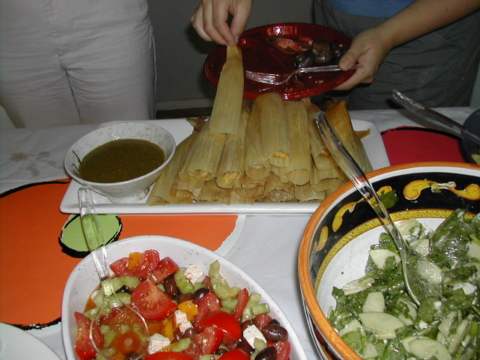
Rediculous Mushrooms
5 pounds of mushrooms cooked down in red wine, sage, italian seasonings and butter until they are dark and inky looking. There were two left.
Profiteroles with 3 sauces
Derrick, Carol, and I filled over 160 mini-cream puffs with vanilla ice cream. Served with vanilla sauce, carmel sauce, and chocolate sauce.
BBQ Pineapple
Coated in coconut milk (which I don't think they really needed) and dipped in cinnamon/sugar and then grilled. Very juicey!
May 18, 2003
Rolled Pork Loin
I've been trying for a while to figure out the trick to good pork loin. I've tried just about everything, brining, marinades, rubs. Short hot cooking, longer and slower. Just about no matter what I do it ends up drier than I wish it were. I'm beginning to resign myself to the fact that the modern hog just doesn't have a high enough fat content in the loin area.
In any case, the latest (moderately successful) attempt was to butterfly out the loin, smear it with pesto and then re-roll the entire thing back into the original shape. I did a quick oregano/pepper rub as well. Pulled it out of the oven at what the termometer said was 120, but I think it was way over that -- I swear next time I'm going to undercook by about 10 minutes -- it must have carried over to 170 or more because it was well and fully white on the inside.
Made some basic spaztle and fried them in butter. A simple brown sauce made of white wine, oxtail, chicken stock and some roux, which I then used to deglaze the pork cooking pan.
I sliced the pork fairly thin and used three of the spirally-looking slices on the plate. I prepared and ate this while watching CQ a movie that was both better and very different than I thought it would be.
May 04, 2003
Cherry Smoked Lamb
The rains have finally tapered off here in California and so I prepared a "Spring Menu" for Carol. And (as so rarely happens) the dish turned out almost exactly as I had imagined it.
The main course was: Cherry Smoked Rack of Lamb with Mixed Vegetables, Morels, and Asparagas over a Red Wine Oxtail Reduction Sauce.
I frenched the rack of lamb down to a no-fat state and gave it a rub of salt, pepper, and marjoram. For the Vegetables I used a small melon baller to make balls from Yukon Gold potatoes and Carrots and I also had some local English Peas from Half Moon Bay. The Morels had also been gathered locally and I used only the top inch of the Asparagas.
The rest of the prep simply involved boiling the potatoes and carrots in salted water until mostly cooked and then shocking them in ice water.
The sauce was made with the scraps from the lamb cooked down with two cups of oxtail stock and about half a cup of red wine. After 30 minutes, I strained the result and continued to reduce until it was a light sauce/broth.
Cooking was easy at that point. I lit the Weber and made a good hot fire to one side. Once very hot, I added four large chunks of cherry wood and placed the lamb off to the side and covered the grill. I smoked the lamb for about 25 minutes (I think I overshot by just a few, actually). Pulled it off and let it rest while I finished the rest of the dish. It came out a great red-ish wood color from the smoke.
The Potatoes and Carrots I sauteed in a very hot pan with clarified butter, and then added the peas at the end. Just salt and pepper to flavor.
The Morels and Asparagas got a similar sautee, but with the addition of some fresh thyme from the garden.
For plating, I used very large white chunky plates. The vegetables went to one side (all globe-shaped), and the Morels and Asparagas (all pointy) to the other. The rack of lamb was cut into two sections (about 4 ribs each) and set to the third side. Into the Benz-logo shaped center area I spooned the sauce.
I served a 1991 Stag's Leap Cabernet with the lamb.
For desert, local strawberries in Chambord and a dollop of whipped heavy cream flavored with vanilla.
February 20, 2003
Caramel Sauce
Several folks have sent in email asking how to make caramel sauce. It's easy, quick, and lots of people are impressed by it. It's also a great make-ahead part to a meal.
1) In a large (2.5-3 qt) heavy bottom sauce pan combine 1 C white sugar and enough water to moisten. You can use no water if you are used to this, or lots of water if you are new at it. More water will just take longer to cook out.
2) Place on medium heat until the sugar melts and begins to boil. Continue cooking until carmelization starts -- at this point, stir or swirl the pan to keep even browning happening. BE CAREFUL! Sugar is very hot and will stick to your skin, giving you a burn like no tomorrow.
3) When the amount of browning that you like has happened, turn off heat, add 1 C heavy cream with your hand WELL AWAY from the top of the pot. It will foam/boil/sputter like crazy. This is why you use a much larger pot than you think you will need.
4) When cooled down a bit, you can add a) flavorings b) more cream if you think it is too thick.
When cool enough to not melt plastic, pour into a plastic squeeze bottle. Caramel sauce keeps very well, on the counter for at least a week. The amount of sugar is so high that nothing really can grow in it, and the opening to the squeeze bottle assists here as well. To re-heat, simply place the squeeze bottle in a container of hot water (I usually use one of those 32 oz plastic cups you often get for free with Large Drink Purchase).
I usually take the sugar to a pretty dark brown, but you can adjust this to your liking. The sugar continues to cook a bit after adding the cream, so it will darken more, while the cream itself will lighten it. I find that the end color is about the same as when I added the cream, maybe just a tad darker.
February 08, 2003
Fancy Dinner
I haven't made a fancy dinner for Carol in a while, so Friday night I did so.
First course was a cajun inspired shrimp bisque. I had some leftover shrimp stock in the freezer, which I cooked with some bell peppers, onion, and celery. Tossed in some pre-cooked rice and let the whole thing cook down for a while. Then I blended it, strained it out, reduced it, adjusted the seasonings with cayenne pepper and salt. Then I added heavy cream and mounted the result with lobster butter (again, I had some in the freezer).
To serve this, I also made some very small savory cream puffs, which I filled with a garlic/shallot/tarragon sautee of shrimp. These went in the middle of the soup bowl.
In keeping with the southern theme, the main course was maple glazed boneless pork chops atop rounds of garlic toast, mixed sauteed vegetables, a "weed salad" and thin strips of jicama. I plated these all towered together, in a sort-of homage to tornados Rossini. The pork ended up being overcooked, which was the only thing I was disappointed with. The contrast of the textures of the veg and salad turned out very well.
With this dish, there was certainly the danger of heading into "confusion cuisine". I used the jicama and chayote squash as part of the veg in order to work with the sweetness from the sauce (both have an apple-ish potato-ish taste and texture), but maple, plus southwestern vegetables, plus southern sense was perhaps a bit too much. Flavor wise everything was fine, and the plating didn't turn out too badly.
To finish off, some very simple apple tarts, with basic vanilla ice cream and a bourbon caramel sauce. These were also good, although I should have thinned out the sauce with a bit more cream. As it was, it was a bit too much like candy in terms of texture.
The extended entries now has pictures of each dish. Also, for some reason people keep asking how long these things take for me to do. Prep and non-during service cooking was about an hour and 15 minutes. The only thing that needed to be cooked "live" was a pork chops and veg that went with them.
I don't usually make prep lists for basic dinners, but there were a few things I didn't want to forget this time around...
- fine dice veg for main
- prep salad for main
- prep jicama for main
- prep dressing for main
- make pate a choux and cook
- prep shrimp for filling, herbs, shallot, garlic
- make bourbon carmel sauce, into squirt bottle
- cut and lemon apples v/ thin slice
- make tarts
- glaze tarts w/ apricot
- veg rice and stock for soup
- blend/strain soup
- mix up galze for main
- cream and butter soup
- sautee shrimp and fill
- plate soup
- chervil on top
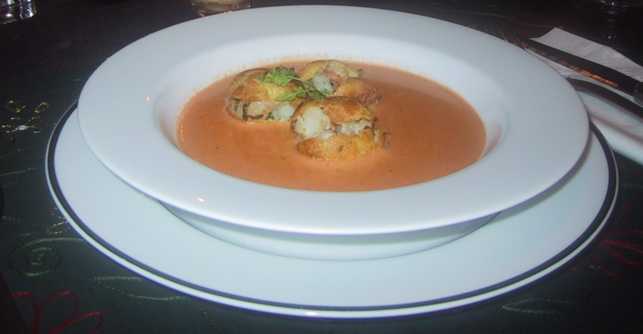
- cut toasts for main
- broil & garlic butter
- spice chops
- cook chops & in oven
- sautee veg
- add glaze, reduce, into squirt bottle
- plate main
- toasts
- ring form, veg
- pork
- salad
- hicama
- glaze around
- cut tarts
- caramel on bottom
- small ice creams
February 02, 2003
Snausages!
Yesterday morning I decided to drown out the sounds of CNN with that of a meat grinder. Bratwursts, to be specific.
Used about 3 pounds of pork belly, and another 2.5 pounds of beef chunk rib meat. You need sausages to be around 30% fat. Chuck is fairly fatty (around 20%) and pork belly is uncured bacon, so it's probably closer to 50% fat, sometimes more. It's an easy way to obtain fat content in sausage. Most commercial recipes call for "pork jowl fat" which if you ask for it will get you nothing but strange looks from most butchers. Pork belly is cheap and widely available at Asian meat counters. Plus, I love saying "pork belly" especially if I can say "pork bellies are up in active trading."
I ground the meat once through the coarse plate, sprinkled with salt, a pre-mixed seasoning, and a cup and a half of water. Then ground again through the fine plate, mixed the whole thing up with my hands, and prepared to stuff. You mix the seasonings in after the first grinding because this gives you some free blending as you do the second grind.
I used medium pork casings -- boy were these long! I figured I'd need two, so I cleaned them out. I couldn't even fit all of one of them on the stuffing tube. But, I need not have worried -- what I could fit managed to hold all six and a half pounds of the sausage -- wow. This was around 2 dozen links or so.
I froze 3/4 of the batch and cooked up the rest by simmering them long and slow in a mixture of chicken broth, onions, butter, and hot sauce. I then quickly grilled them to color the outside and then returned them to the broth. This is a fairly traditional way to cook brats. Ate on buns with homemade potato salad that was heavy on the mustard.
Why special? You try stuffing 6 pounds of sausage yourself via a KitchenAid. One hand on the sausage to keep it from falling off, and the other feeding sticky meat mixture into the too-small opening. Today, I got on line and purchased a push stuffer -- which holds 3 pounds of meat at a time, meaning that basically two pushes would have gotten all of the meat stuffed.
I've decided to add homemade sausage to my standard set of BBQ batches, and if I'm going to do this, the stuffer is an absolute requirement. I honestly think I'll make sausage much more often this way.
January 25, 2003
Rewarding Oneself
The other night I made one of my favorite low-key dinners. It's pretty fancy by lots of people's standards, but since the cooking is mostly about waiting, for me it's not a big deal.
- Slow Smoked Rib Roast
- Saffron Rice Pillof
- Sauce Foyot
I'll call it special. I had a good day at work, and wanted to reward myself. Something out of the ordinary was called for, and I hadn't made this in probably a year. Normally, I would have opened a nice bottle of wine with this, but instead I had a bottle of pilsner beer.
RIB ROAST
I used about a 3 rib roast, but unfortunately it was boneless. I often will coat the roast with various herbs and/or garlic, but this time I chose to just use salt and pepper. I build a medium fire in my Weber kettle grill and let the coals burn down to ash. Then, added about 4 chunks of hickory wood, placed the roast offset from the coals and closed the cover. I roast this size of roast for a total of between an hour and 15 minutes and an hour and a half. I turn the roast every 30 minutes, and add more wood as needed. I like to keep a fairly heavy smoke going.
I normally like my meat fairly rare. I pulled the roast this time at 115 degrees, which was quite rare in the center, but less so on the outsides. It's difficult to get a real strong smoke flavor and still have a very rare roast, especially with one this small. It's also difficult to have an even doneness throughout -- but that is a plus if you have guests -- unless they all want rare. I let the roast rest for 10 minutes while I finished the rest of the dishes (during this time, the temperature continues to rise about 10 degrees), and then carved it very thin.
RICE
This is a very basic recipe as well. Rice, about 1.5-2 times the amount of some liquid (I used chicken stock), some butter, minced shallots, and saffron. You cook the rice in butter with the shallots until you get a nice brown color on the rice -- maybe 5 minutes. Dump in the liquid and saffron and bring to a boil. Cover, place on low heat, and cook for 20 minutes. The rice will hold for a long time, but this time I finished it well before the meat was done. So, into a 200 degree oven with the heating plate. Don't uncover the rice at all until you are ready to serve.
Other methods can include: dumping into a rice cooker after the initial sautee (good for large amounts), or placing in a 325 oven for the cooking (frees up a burner).
SAUCE
Sauce Foyot is basically a hollandaise sauce with the addition of meat glaze. The first time I read about it, I thought it was sort of a strange idea, because I think of this family of sauces as mostly a fish/white meat/vegetable thing. But, with a good hit of lemon in it, this sauce is fantastic with smoked meats. Which, you'll notice, is what I'm making above.
This entire family of sauces (emulsion of egg yolk and melted butter) terrifies many people, but there's no real reason to fear them. Maybe some folks try too hard when making these. A simple approach works best, I find. Here's how I do them now:
Place the egg yolk in a stainless steel bowl. Add water or other liquids from the recipe (in this case, juice from half a lemon). Whisk briskly to combine. Place the bowl over medium-low heat, tilted to one side. Whisk like mad. Keep moving the bowl around, trying not to let any one spot get too hot. As the edges of the bowl heat up, be sure to stir around broadly with the whisk. Basically, what you are making at this point is a zabaglione. When the egg/liquid mixture gets to the desired (thick) consistancy, and is fairly hot (but never above 140, which is where the yolks will cook) to the touch, remove the bowl from the heat, and whisk again strongly to cool it down just a bit. This will all go quite fast, especially with only 1 yolk. You'll really be able to see the sauce thicken as the egg cooks.
Next, drizzle in the melted butter (a bit slow at first) and whisk to combine. Add more butter (it can be done quicker once the emulsion is well taken) and keep whisking until you have the consistancy you wish (for 1 yolk, I think I end up using a little under a quarter of a stick). Then, stir in any flavorings (in this case, about a tablespoon of oxtail beef glaze), and adjust seasonings.
Notice: no double boiler, no 14 pans, no weird starting one way, then adding stuff, then doing yet something else. One bowl, some melted butter, and a whisk.
These sauces don't hold particularlly well, but from start to finish, it probably takes less than 5 minutes to make the entire thing -- so you do them right before you are ready to plate. The first time you do one, you'll be nervous. As added protection, keep a glass with a few ice chips in it. If you think the sauce has gotten too hot, too fast, during the first step, remove from the heat and toss a few small chips in to help it cool off.
PRODUCTION
The reason this is a low-stress meal for me is that it goes together quickly. When I get home, I start up the fire and pull the roast out of the fridge. Put the butter on to melt, chop the shallot, measure out the rice and liquid (putting the saffron into the liquid to steep), get out the items for the sauce.
Once the meat is on the grill, I'm pretty much able to just relax. I start the rice after the meat as been in for about 45 minutes. It'll be done well in advance, and keeps well. By now the butter is also fully melted, so I turn off the low flame there. Then it's just keeping an eye on the smoker until the meat is ready to come in the house. The sauce goes together while the meat is resting, and then it's all about the carving and eating.
The meat comes out smokey and juicy. The rice is a nice counterpoint with the medicinal/floral scent from the saffron, and the tart and meaty-flavored sauce blends well with both. Heady stuff, to be sure, but one can't eat alot of it at once.
January 21, 2003
Mushroom Cassoulet
Here's an interesting recipe for a non-meat version of a classic Cassoulet. I've made this three or four times and it's been a hit even with the meat eaters. It's a fair amount of work between the veg demi and the smoking of the bell peppers -- but probably less work than a "real" Cassoulet.
1 pkg white beans
Assorted wild and regular mushrooms
1 Carrot
1/2 onion
1 Stalk Celery
1/2 head roasted garlic
1 tsp thyme
1/2 C bread crumbs
Butter/oil
1-2 red bell peppers
4 C brown veg demi (*)
- Instructions roughly parallel what you'll find in a traditional cassoulet
- soak beans overnight
- cook beans in water until medium tender -- about 30-45 mins
- drain beans, reserve liquid
- fine dice Carrot, Onion, Celery -- sweat until soft
- Clean, sautee mushrooms
- Cold smoke red bell peppers, slice
- Layer beans, mushrooms, veg, garlic, bell peppers in high sided casserole. S&P as you go.
- Add brown veg demi to just under covering the beans. Add reserved bean liquid as needed
- Top with bread crumbs
- Bake, 325-350 for about an hour, or until hot and bubbling throughout. Press down browning crust as you go
(*) Brown Veg Demi
See also
5 lb mushrooms
2 carrots
2 celery stalks
1 large onion
1 leek
(other veg as you like)
2 T tomato paste
1 C red wine
1 T Parsley
1 tsp Thyme
1 Bay Leaf
6 black pepper corns, whole
1/4 tsp each Oregano, Marjoram, Basil
- Rough dice all veg
- Roast in oven at 400-450 with or without oil until well browned. Start with root veg, add mushrooms later
- Stir in tomato paste, continue cooking until browned
- Deglaze and place in pot
- Add wine and seasonings, then water to cover well
- Simmer at least 1.5 hours
- Should be quite brown
- Strain
- Make brown roux from butter and 1/4 C flour -- brown well
- Stir in stock, cook/reduce 30 mins
- Strain
- Makes around .5 to .75 gallon
December 31, 2002
Pasta Hack
Today I make lasagna. I don't know, it just feels like new years somehow -- in a simple, easy, homelike, fireplace, warm, steamy, spice-smells sort of way. I've done some really complex new years dinners, and my friend meriko goes nuts with hers. But for some reason my default is something comfortable.
I'm going to make the lasagna "properly" in the sense that it's going to be a long-cooked meat sauce from scratch with both beef and pork. A bechamel sauce as well, along with ricotta (which I love with a loving love) and mozerella. There's a bunch of "cooking prep" that goes into a lasagna, and none of it's very difficult. But a large number of little bits can really throw folks off.
The "hack" part of this is something I'd heard about a while back and have since completely embraced. I put the pasta in raw. There are special "put in raw" brands of lasagna noodles, but some cooking magazine did a test and found it didn't really matter what kind you used. Years later I actually tried this approach and it works fantastic. You leave your tomato sauce a bit loose (or add a bit of water before using, maybe half a cup) so there is extra water to help cook the pasta, and you cover the lasagna for the first bit of cooking (which lots of recipes have you do anyway), but really that's it. The only real downside to this is you have to snap the pasta rather than cut it if you are trying to get it to fit into an odd-shaped container.
I've done this with other baked pasta dishes, such as baked ziti, which is really just tube pasta baked in tomato sauce with cheese and whatever else you find interesting. I think the last time I found mushrooms interesting. I haven't yet tried this with macaroni and cheese -- but I theorize that if I made the cheese sauce looser it likewise would be able to cook the macaroni while baking.
But I hesitate to tamper with my mac and cheese. Carol's kids have turned into big fans of it, and like to help make it. And even several "guest kids" have voiced their approval -- after some initial hesitation because it wasn't "the normal kind." Mr. Kraft you have a lot to answer to.
Michael and Sydney (the aforementioned offspring) are great eaters. They've got their normal food dislikes (hey, we all do, even me), but for the most part they'll at least try anything. They love broccoli, duck, shrimp, real BBQ, rice, beans, salad. Sydney's first "real French meal" was a cassoulet I made, complete with a massive range of meats. Michael is currently angling for me to make him a "fancy dinner," which I'll probably do before too long (I'm thinking quail). Carol claimed they are now actually "spoiled" with respect to food but I just like to think of it as enlightened. Of course, I'm not the one who has to put up with "But Mom, how come you don't make broccoli like Tom?" "Damn you, they used to be happy even when it was just steamed!" Oops.
To wrap this back to the original topic, a few years back we spent new years with another family -- one whose kids are picky eaters (their Dad, a close friend of mine, has a standing $10 offer for the first person who can get his kid to eat chicken). We made homemade pasta (the kids all liked helping, and I don't know a kid who doesn't eat pasta). I put together a complex lamb and reduction sauce main course for the adults (using some of the pasta twirled up as a base -- I wish I'd taken pictures, it was freakin' great looking). But of course, Michael and Sydney wanted the lamb too, and the sauce, and the green beans, and even were eyeing the morel mushrooms (neither of them like mushrooms, but these looked more spooky, I think). There was quite a bit of "if she" (referring to one of the other kids) "doesn't want lamb, can I have hers?"
Sigh. Now I almost wish I had some lamb. But, to the pans -- it's sauce time -- and the pasta hack.
Update: Also made a fugasse which is a flatbread made basically with a soft pizza like dough. But you roll it out oblong and flat, and then slash it into a 'tree'-like shape (I use a pizza cutter to do this) and pull the tree out (I don't really know how better to describe this, and hopefully a picture will eventually appear). You end up with an octopuss/tree/fan/butterfly shaped flat bread. You cook it at high heat (I use 450 on a pizza stone) so that the outside is very very crisp. After pulling it from the oven, I drizzled some pepper infused olive oil and coarse salt over it.
December 20, 2002
Short Ribs
Tonight I braised some short ribs in a combination of oxtail stock and red wine. After they were done, I took them out and let them rest a bit. The braising liquid was de-fatted and reduced until it was a glazee. Tossed the meat back in the reduction and finally served it all with pearl onions, butter braised mushrooms, fine dice of carrots and squash.
I had everything to hand except the ribs themselves and the squash. So it was a very nice $20 dinner for two. The wine we drank with it was more than twice that. Eek!
December 15, 2002
Baby Shower
Carol and I went over today to help out with my friend (and sous chef) John's baby shower. We've been having storms and wind here all weekend, so they had lost power the day before. John was therefore a bit behind in his prep -- he had trouble finding stores that were even open. We got there about two hours before the shower, and he had just finished the shopping and was starting to get organized.
Time for power cooking! Lots of chopping, putting things together, random prep. It was tons of fun -- it's very different when I'm not the one in charge. I can just look for things to do and try to get them done. We made an onion tart, lamb and dill meatballs with a sour cream dipping sauce, latkes with smoked salmon, a sweet potato soup, humus, and a cheese tray (very nicely arranged, I might add). Finished with half an hour left over. Wa-hoo!
The food turned out very nicely, and it certainly looked great.
Peter Gabriel concert that night. What an incredible show he puts on. A complete nut. Joe Bob says check it out.