July 06, 2006
Summer Party Pictures 2006
We had fantastic summer party with lots of our friends. The long weekend ment that some regulars couldn't attend, but we got some great photos of what they all missed.
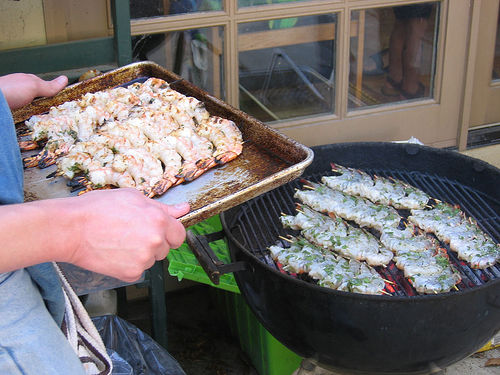
anne got lots of action shots of the preparation (and us being goofy with the Guitar Hero video game). She also decided that we needed some more "pig" related decorations. The cream cheese pig and vegetable cut pigs were all her idea. I'm especially impressed with the pig-cut-out then re-inserted into the carrot.
Melissa showed up with the fancy camera again.
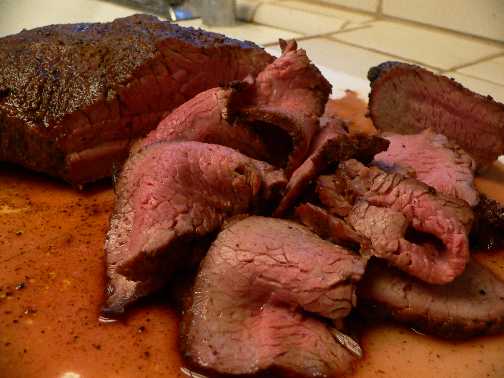
Tim's new job means he also had to get a fancy camera. He decided to go for a more "art" type shoot this time. I think some of these turned out really nice.
October 10, 2005
Smoked peppers
It's headed towards fall here in California, which means that the garden is on its last legs. One thing I planted this year was a row of several kinds of hot peppers. They got lots of sunlight, and so I had a huge crop. Many more than could be eaten or even given away.
So, I decided it was time to smoke/dry the peppers in order to save them. Smoked jalapenos are called "chipotle" (although actually this is a general term, there are 6 or 7 sub-categories that go by their own specific names). Smoked habaneros don't have a specific name that I know of.
I wish I'd thought to do this before Derrick wrote his hot pepper article!
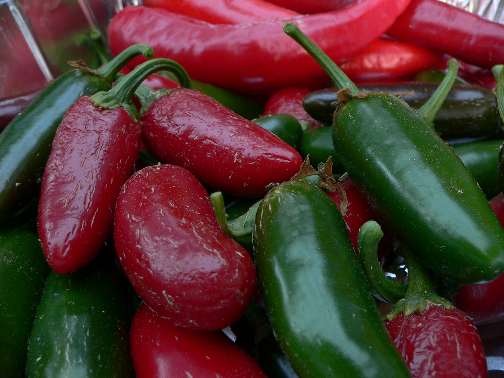
Jalapenos Raw
Habaneros Raw
I put the peppers in a single layer in a disposable half-sheet pan. The pans got in the top of my smoker, which I usually use for BBQ while the peppers are smoking. I use fairly low heat (200-225) with lots of wood.
After about 6 hours in the smoker, here's what we have.
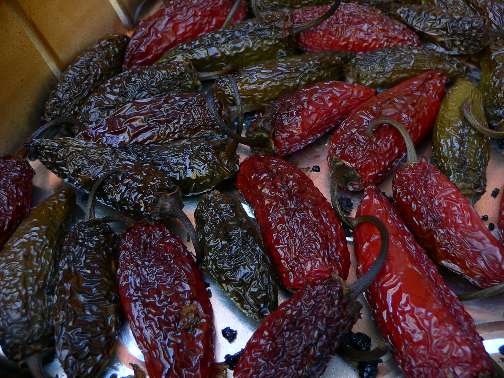
Jalapenos Half Done
Habaneros Half Done
You need to keep going until the peppers are completly dry, or they are only going to mold/rot when you put them into jars.
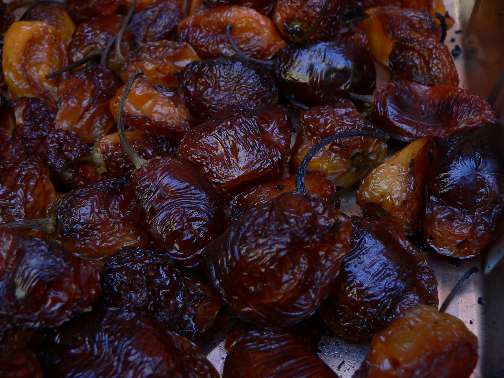
12 total hours, here they are!
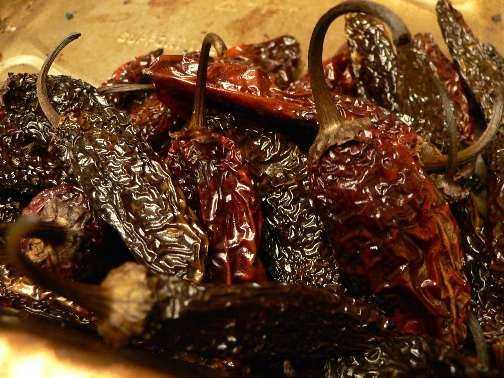
Jalapenos Done
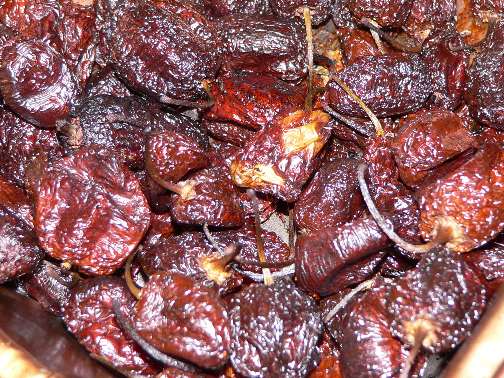
Habaneros Done
August 17, 2005
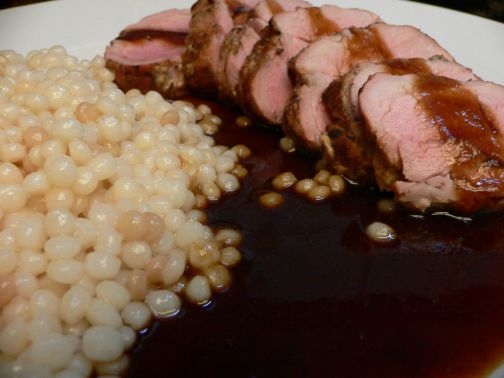
CousCous
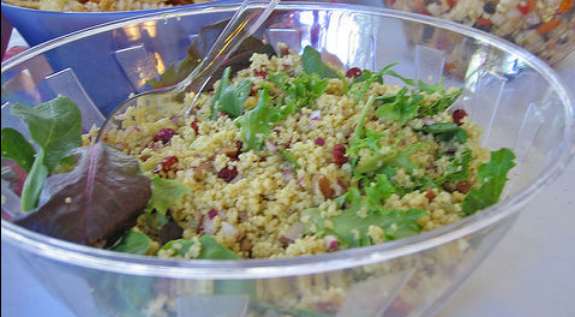
Cous Cous from a previous party
Sam asked me to post my recipe for Curry Cous Cous. I had made this for my summer party, and also brought it to the first Bay Area Food Blogger's BBQ.
- 4 C cous cous
- 4 C boiling water
- 3 to 4 T curry powder (you can make your own, or use some icky pre-made. I was lazy this time and used Sharwood's Hot Madras)
- 1 medium red onion, small diced
- 1/2 to 1 C nuts (I used pecan pieces, which I toasted ahead of time)
- 1/2 to 1 C dried fruit (I used cranberries)
- juice from 3-4 citrus fruits (I used a combination of 4 tangerines (from my stupid tree) and 1 lemon. My tangerines are very tart, so you can up the lemon amount if you wish.)
- 1/4-1/2 C olive oil
- salt & pepper
- Some amount of salad greens (I used baby spinach this time, but in the past have used some form of bitter greens)
Pour hot water over cous cous in a large bowl. Add curry powder + about 1 T salt. Stir to combine, then allow to sit until partially cool (about 10 minutes). Fluff. Mix in onion, nuts, and dried fruits. Fluff. In a separate bowl, whisk to combine juice, olive oil, salt and pepper to taste. When cous cous is mostly cool, add dressing and toss again. Shortly before service, mix in salad greens. Can be prepared several hours ahead and kept in the fridge.
Makes 1 large bowl to take to a party.
July 07, 2005
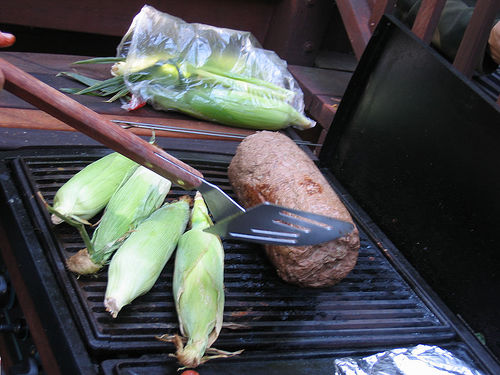
Bratwursts
Sausages in the Smoker
William gave a little "sausage class" to the other prep cooks (I think I was busy working on the pies at the time mostly) the day before the big BBQ. Sasuages are fun to make, and especially so since I have a stuffing horn. This makes the filling process go much faster.
Here's the spice blend and basic instructions (again from William).
The post-it note bratwurst sausage spice mix (per 6 lbs of meat):
3 T kosher salt (started with 2 T added about another T after tasting cooked sausage)
2 T black pepper
2 T ground mustard seed
2 t sugar
2 t finely minced garlic (garlic should not dominate the taste)
1 t majoram
1 t mace
1+ t nutmeg (a little more doesn't hurt esp. if you don't have mace)
1 t ground sage
1 cup water
Large plate grind meat w/o spices. Add spice and water and mix thoroughly. Re-grind on small plate. Load up the sausage horn and let 'er rip! (so to speak). Then go "wheee!".
As I mentioned before, we used about 2 pounds of a pork butt, 4 pounds of beef tri tip, and half a package of bacon. This last was added because we all decided that there wasn't enough fat in the other meat. Usually you want about 30 percent fat in sausages to keep them moist.
The other fun thing about sausages is washing out and using the casings. Tim had never done that before, so we made him do the washing. I'd gotten some salt packed casings that were actually fairly mild in odor, but you certainly knew someone had opened them. Lots of comments were also made when threading the casings onto the stuffing horn. Hey, it is what they originally made condoms out of anyway.
Oh yeah. Going "whee". When you make sausages, it's pretty common to "link" them into the individual "units." When you are dealing with 4 feet of filled sausage casing, however, you can't very easily twist each one. Instead, you pinch off three of them (ie, one to the left of your left hand, one to the right of your right, and the one in the middle). You then spin the middle sausage around 3 or 4 times, thus doing two twists at the same time. The appropriate thing to say when doing this is: "whee!!"
July 06, 2005
Tequila Shrimp
The Raw and the Cooked
William provides this play-by-play of the grilled shrimp dish -- we used U15 shrimp which means there are less than 15 per pound. They were quite large:
The shrimp marinade (nothing scientific, no quantities...everything eyeballed):
- large handful of cilantro (2/3 of a bunch, stems weeded out), chopped semi-finely
- lime and/or lemon juice, enough but not too much to pre-cook the shrimp, maybe 1/2 - 2/3 cup
- a large "glug" of tequila, a cup or so....if you don't smell tequila wafting from the dish then add a bit more
- olive oil
- salt, black pepper (er, to "taste")
Whisk to blend....one *could* taste it (I didn't) but it looked right...slightly emulsified-looking, tequila fumes rising...heh.
Use: Shrimp shouldn't be swimming in it. We had so many skewers that we kind of "slack dominoe'd" them in the pan, poured the marinade over, let them sit in the fridge ("wow, the fridge reeks of tequila"), flipped the skewers to get the parts that had not been down in the marinade, let them sit some more.
Cook: Grilled over an incredibly hot grill...2-3 minutes or until shrimp are pink and "no longer squishy"...bits of charred cilantro are "OK".
July 05, 2005
Salsa Shark
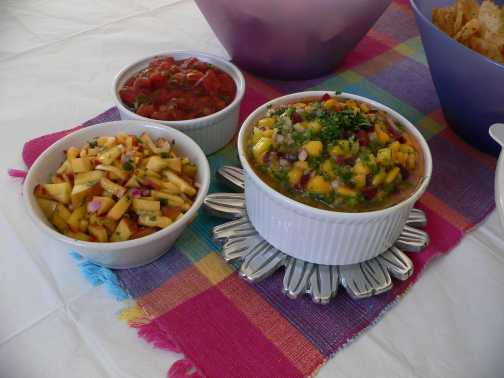
A trio of salsas
Salsas always make a nice side for BBQ. This year I made a bunch, and sort of got carried away with the flavors. They all turned out good, however. Clockwise from top: tomato salsa, mango salsa, nectarine salsa.
The tomato salsa had tomatoes, serano peppers, green onions, cilantro, and lime juice (ie, a basic salsa). Canned tomatoes had to be used as those I found in the market were disappointing.
The mango salsa was mangos, jalapeno and serano peppers, maui sweet onions, cilantro, mint, and lime juice. In addition, some chopped sweet fresh cherries were also added.
The nectarine salsa was nectarines, habanero peppers, red onions, cilantro, and wine vinegar.

Who says salad is lettuce?
From top right to lower left, tomato and mozzarella, jicama salad, curry cous cous salad.
The tomato and mozzarella was a basic Italian style salad. We used grape tomatoes and bocconcini with thin strips of basil. Derrick whipped up a vinegarette of balsamic and olive oil.
The jicama salad was diced jicama, two kinds of bell peppers, red onions, fresh corn, and black beans. I made a quick dressing of lime juice with chilli style spices and a combination of olive and vegetable oil.
The cous cous salad was simply cous cous that had some curry powder added to the water used to re-hydrate it. After it cooled a bit, I added pecans, dried cranberries, red onions, and a quick toss of lemon juice and olive oil. I also mixed in some bitter salad greens to give things a bit of a kick.
Unseen is the potato salad that I made with lots of hard cooked eggs and mustard in the dressing (I don't like bland potato salad dressing).
At the top of the photo you can just see that yes, I in fact did have one salad made with lettuce. It was just greens, a dijon vinegarette, and some Maytag blue cheese. Oh yeah, and some croutons that I purchased! Oh no!
The other interesting sides just visible sort of in the middle are the pickled carrots (made with habanero peppers in the brine), and pickled red onions.
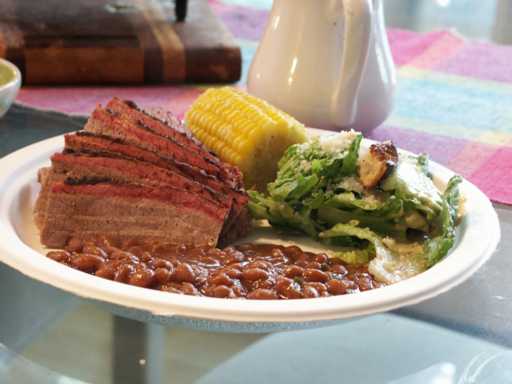
July 04, 2005
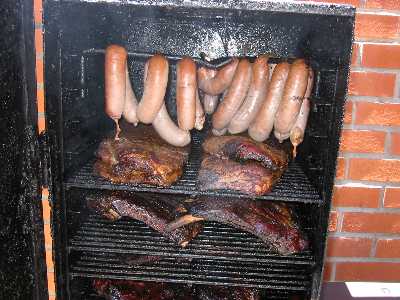
Fill your smoker with meat
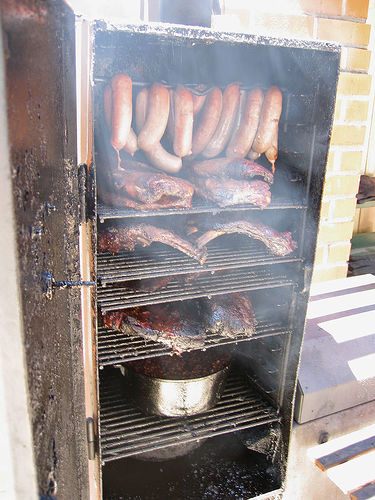
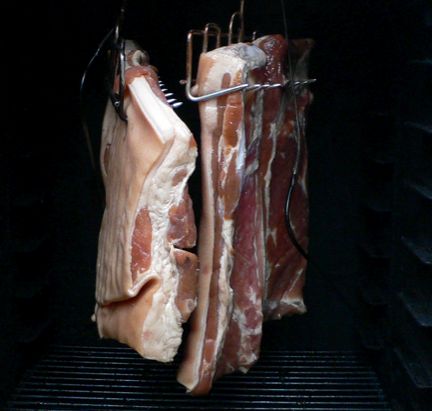
That's a lot of meat, sir
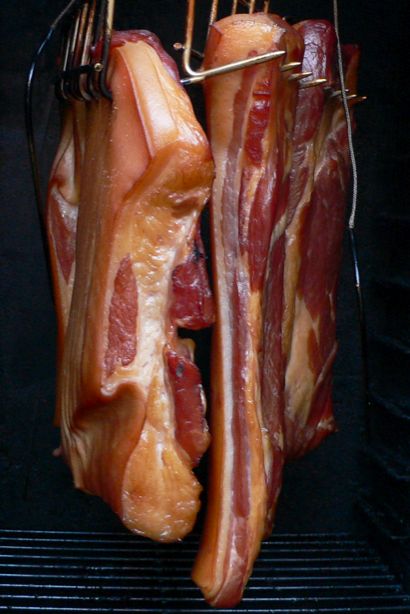
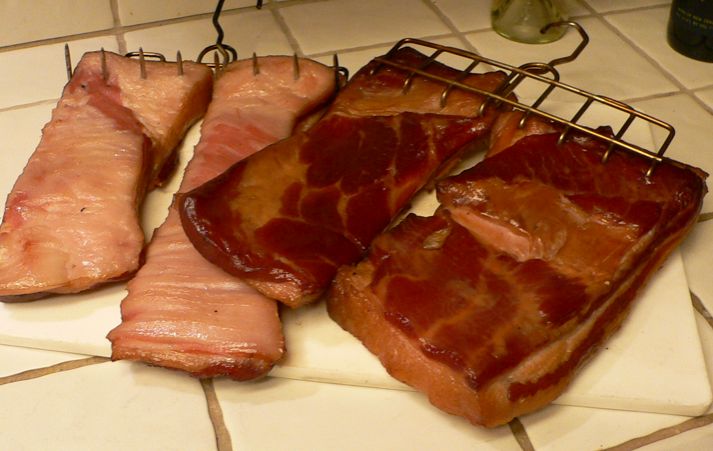
The first image (taken by Melissa) from this year's summer party could be entitled "Pack your smoker with six dozen slabs of meat." This is a fun game that everyone should play, although you need to invite over a few guests to help you dispose of the remains. Either that or eat leftover BBQ for the next several months.
From top to bottom we have:
- 3 pounds of homemade bratwurst (smoked for two hours)
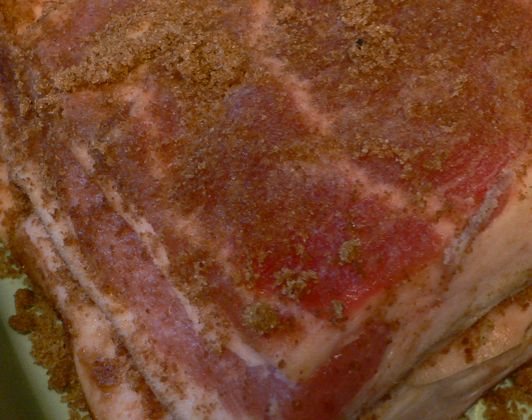
- 4 slabs of pork ribs, trimmed to a Saint Louis Cut, rubbed with my standard BBQ rub (see below)
- 2 slabs of beef ribs, rubbed with salt, black and red pepper
- 4 trimmed sides from the above mentioned pork ribs, same rub
- 2 whole beef briskets (13 pounds each), same rub as the beef ribs
- 1 Huge pot of beans, simmering away for the entire time, with meat juices dripping in for the last three hours of cooking. This is my standard addition to just about all smoker runs.
Started the fire at around 4 AM, and the coals were ready by 4:30. Briskets and the beans went in first, with the beef ribs and pork sides being added about 5 hours later, and the pork ribs an hour after that. The sausages only needed a few hours to cook through, so they went on around noon or so.
This is, in case you can't tell, quite a bit of meat for my smoker. I had a tough time keeping the temperature up, and also had a difficult time with the air circulation as a result. I normally never try to cram this much food into it, so it was an interesting challenge.
My standard rub is (I don't give quantities, since I have no idea what they are, but list in order of most to least):
- salt (maybe about a third of the total volume)
- ground black pepper
- onion powder
- garlic powder
- paprika
- cumin
- chilli powder (dark)
- ground oregano
- ground red pepper
I mix all of this up in a large leftover spice container, and it's good for probably three or four BBQ runs. I know that many people use sugar in their rubs, but I've found that for longer smokes, it's too easy for them to burn on me. I don't have the heat on this rub too high, so the sugar doesn't really seem needed.
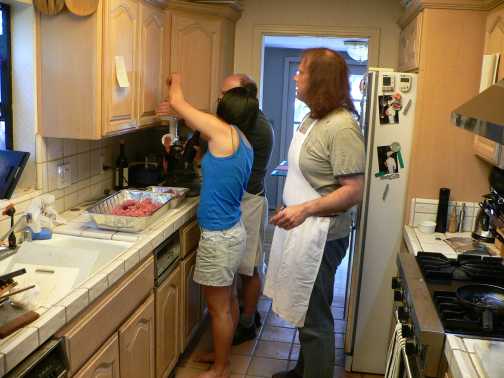
More images and recipes from the party are forthcoming. But until then, I leave you with "Your Moment of Zen." William and two helpers doing the 2nd grind on the sausage meat (4 lbs beef tri tip, 2 lbs pork butt, 1/2 lb bacon). And yes, anne is in fact holding a beer while working.
Never watch how laws are made
June 05, 2005
Sun Sweet Chicken
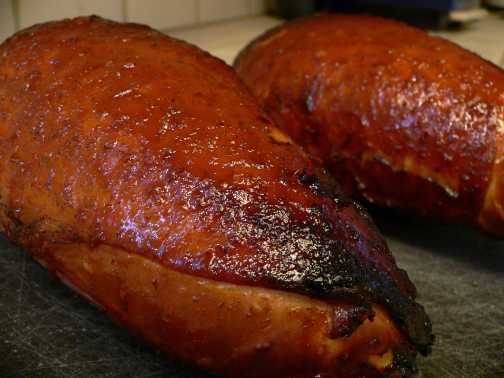
Chicken with Orange Habanero Glaze
Yes, yet another in a series of "quick smoked BBQ." Today I made a pair of smoked chicken breasts. I wasn't really intending to do so, except that the package of "split breasts" that I got at the market turned out different than I was expecting. These were split breasts from a large roasting chicken -- probably two pounds each!
The marinade/brine was made up of:
- two cups of orange juice
- two tablespoons kosher salt
- two tablespoons fine chopped habanero peppers
- some packaged "jerk" seasonings (about a tablespoon)
I left the chicken to marinate for a few hours while i was cleaning and puttering around the house.
Fired up the grill to a medium fire, and added two large chunks of hickory wood to it. Offset grill/smoked the chicken breasts for about an hour and a half, basting with reduced glaze (see below) every twenty minutes or so.
Prepare to eat!
The dish turned out very nice. The extra weight of the meat made them much juicier than the normal smaller breasts you get in the store. I think from now on, I'll either seek these out on purpose, or perhaps try to use roasters whole.
While the fire was getting going, I reduced the glaze/marinade to a thicker consistancy. There are three reasons why you want to boil your marinade if you are going to baste with it:
1) kills off any bacteria caused by contact with the raw meat
2) by making it thicker, it sticks better and also concentrates the flavor
3) getting it up to temp keeps it from cooling off your product too much
I've been making a few things of late with habaneros in them. I like the flavor that these peppers have, but they are very hot. As a result, it is sometimes a pain to deal with just one (or half of one) for a single dish. To get around this problem, I used to use packaged hot sauces that contained mostly habaneros. Unfortunately, recently it is more and more difficult to find those -- often they use ground carrots to have a nice orange looking paste that turns out to be not very hot.
To get around this, I make my own habanero puree. Cut the tops off about a dozen habanero peppers and remove the seeds. I recommend wearing gloves while doing this -- it takes several hand washings to get the oil off your hands and even after that, enough remains to do your eyes some serious damage should you touch them. Place in a blender along with a good pinch of salt and enough vinegar to allow blending. Blend until a fine puree is achived -- adding more vinegar if needed. Place in a small container and keep in the fridge. It will probably separate a bit, this is fine, you can either scoop the puree from the bottom, or stir up as needed.
May 31, 2005
Gyro Meat
My contribution to the weekend's BBQ was Gyro Meat Roll. I based the basics on a show from Alton Brown.
Thanks to Melissa for the pictures! I was up to my arms in cooked lamb and didn't get to take as many as I would have liked.
The Magical Mystery Roll
Gyro meat is one of those things that "I never realized people actually made." (to quote someone at the BBQ). They're right. It seems like the roll appears out of nowhere pre-made. But obviously, the recipe comes from someplace, and it isn't a factory. Here's what I did (recipe makes a 6 lb gyro roll, which is enough for probably 20-30 medium sized servings. You can easily make this anywhere from 2-6 pounds in size. I've scaled the spices for 6 pounds, but hopefully obvious division can be done by the home reader):
- 4 lbs leg of lamb, trimmed of most fat (I think I should have left more of the fat on for moistness and flavor)
- 2 lbs beef trip tip (optional, you can use just lamb, but I happened to have this extra tri-tip around)
- 1 head garlic, minced -or- 3 tsp granulated garlic
- 3 T marjoram, dried
- 3 T rosemary, dried
- 3 T kosher salt
- 3 T black peppercorns
- 3 medium or 2 large onions
The night before:
- Cut the meat into 3/4-1 inch cubes (no need to be precise here)
- Place all remaining incredients except for the onions into a food processor, grind until peppercorns are, uh, ground and everything is a fine powder.
- toss spices over meat cubes, seal in a zip-top bag in the fridge
- Grind onions in food processor (no need to clean from previous spice blend) until a complete mush/paste
- Place onions in a towel/cheesecloth, twist the top, and squeeze very hard until as much of the water comes out as possible (these two steps will leave you in tears if you are sensitive to onions -- I'm not due to contact lenses and even I was having some trouble here)
- Seal up onions in zip-top bag and place in the fridge as well.
The next day:
- Toss meat and the ground onions in a bowl.
- Working in batches, grind meat cubes in food processor until course grind
- Toss meat again to make sure well distributed
- Working in batches, re-grind meat to form a paste (yes, it will look over ground)
- Return meat to bowl and layer back in the batches, trying not to get any large air pockets between them. Press/form into a roll.
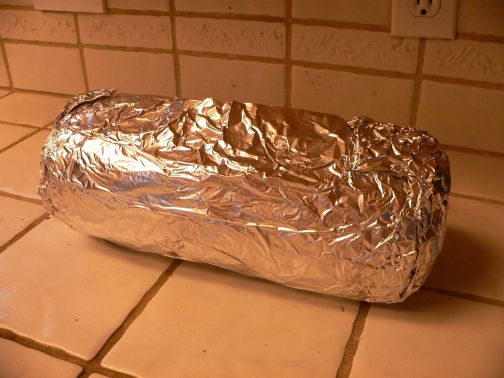
Alton in his show used either a rotisserie grill, or baked it in the oven. I chose a different method that seems to work pretty well. After grinding, the meat is wrapped very tightly in several layers of heavy foil. You pull the foil tight like when making compound butter to keep it in a nice round log shape. Stash in the fridge for a few hours to make sure it firms up.
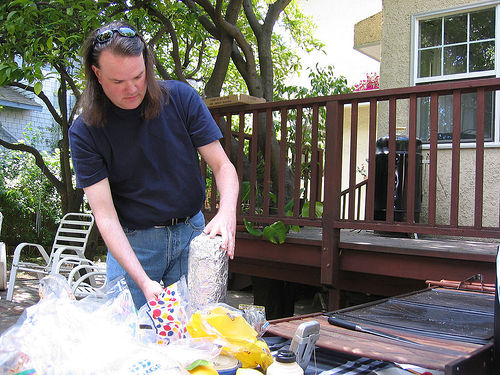
Starting to Grill
Since this was a gas grill, I cooked the meat over a low-ish heat with a large foil pan on top of it (I'm not sure that last part was needed). Every 15 minutes or so, I rotated the roll about 90 degrees to make sure that cooking took place from all sides. A probe thermometer inserted into the end of the meat monitored the temperature.
It took about an hour and a half to bring the internal temp up to 165. I probably could have stopped short of that. The final product is more well cooked than most lamb dishes on purpose. You certainly want it to be mostly cooked before removing from the foil -- otherwise it will far appart during final grilling.
If you use a Weber type grill (as I did the first time I tried this), you can keep the meat offset to one side and only need to turn it once or twice.
Browning the gryo
After unwrapping the meat, it will look a bit "wane". Ignore the comments of your guests concerning what the long steaming log looks like. Return to the grill over direct heat and cook until nicely browned on the outside. It should be pretty firm and hold together while you are cooking it.
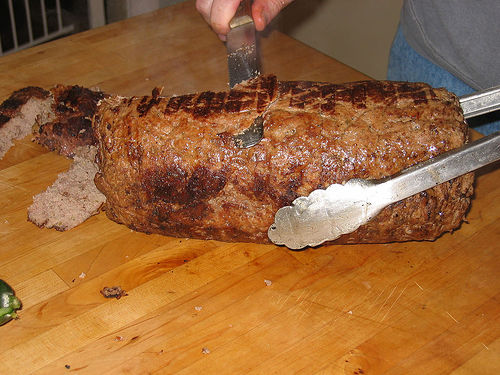
Carving Slices
Slice long thin strips from the outside, moving around the roll after each slice. Slice from each end until all of the brown bits have been removed. You can also make slices from the non-brown parts within, but they obviously don't look as nice.
You can return the roll to the grill to re-brown another layer and slice off more slices. Or, you can cool and wrap the roll to make leftovers the next day. Re-heating can be done either by re-browning on the grill, or by making cold slices and then frying in a pan until browned.
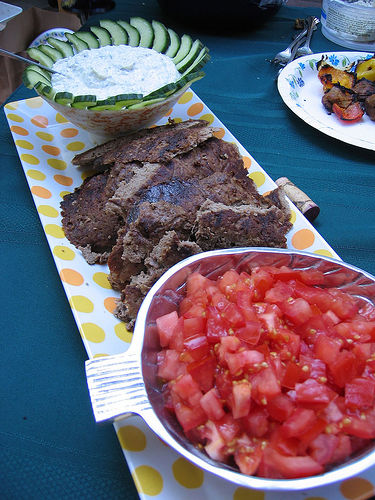
Gyro Service Platter
Here's the classic service, with Tzatziki Sauce and Diced Tomatoes. Not really in season yet, ah well. I cheated on the bread and used a Middle Eastern Flatbread that I purchased from Trader Joe's. It's perfectly exceptable -- but maybe next time I'll also make the bread, because it was the only thing that I'd actually bought.
May 30, 2005
Map of the ribs
My friend Derrick is fast becoming used to BBQ. When our friend Tim announces he's having a BBQ, Derrick is always quick to want to make it a "real BBQ" with some form of long cooked meat. Yesterday he wanted to make ribs (for, as far as I know, the first time). They turned out great, but prior to this he's asked for some tips. Below is the email that I sent him about ribs and trimming of same.
As an aside, while Tim may not have a "real BBQ" he does have an incredible flat gas grill for exactly that purpose. When I finally break down and get a gas grill, it's the kind I'm going to be getting.
Begin email:
I went back over some logs. 6-8 hours seems the norm for my smoker, at around 200-250. Cook the ribs meat side UP, rib side DOWN for the entire time. The ribs on the bottom protect the meat from the more direct heat. You can stack racks of ribs on top of one another to good effect. If you do this, swap them top to bottom every hour or so (more important in the first part of cooking, so that they all get good levels of smoke).
It's also possible that they don't fit in your smoker at all. If that is the case, I'd recommend cutting the slab in half so that you have two "half-racks" -- they'll cook just fine that way. Visualizing it in my head, I could imagine that they might just barely fit w/o cutting them. If that's the case, I'd say try to squeeze them in w/o cutting because they will shrink as they cook.
I suspect you are getting some kind of high-end ribs from a fancy butcher. If this is the case, they've probably been pretty well trimmed. However, if they are not, you may want to consider trimming them. You certainly can cook them untrimmed as well -- I started off doing that myself. As with all BBQ, there are lots of arguments about the right thing(s) to do and if you need to do them. The good news is they are all basically orthogonal to one another, so you and pick and choose what (if anything) to do.
These notes apply to Spare Ribs. Baby back ribs don't require any of the following, except for the skinning (step 3). A fully trimmed rack of spares will sometimes be called Saint Louis Cut Ribs or Kansas City Cut Ribs. I think that one of the two is more aggressively trimmed of the cartilage (step 5), but can never remember which is which.
So, How to Trim Spare Ribs. Maybe interesting reading even if you don't need to actually do it.
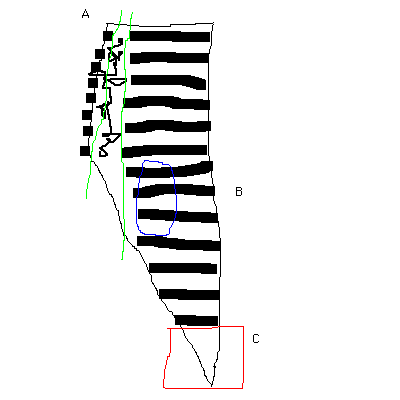
The enclosed picture is either the state of California, or an untrimmed rack of ribs. This is from the "underside" or "rib" side or "concave" side. Obviously if your rack is from the other side of the animal, it will look flipped. I'll list things I do to ribs in the order of decreasing ease.
1) Remove the "deckle" (I'm not sure that's anatomically the right name, but I keep hearing it called that in BBQ shows). This is a flap of meat located around the blue area B (central valley) in the picture. It's only an ounce or so of meat, is not particularly interesting to eat, and often gets in the way during cooking. You don't have to get all fancy about it, just pick up the flap (it really is a flap in that sense), and cut it off where it joins the main body of the ribs. Again, you aren't filleting a fish, so don't try to "get close to the bone" or anything like that, some left behind is OK, just try to get the worst of the "flappy bit" gone.
2) There's a tail end of the ribs (red area marked C, San Diego/Baja)) that don't have any ribs. Again, this is sort of annoying and tends to cook different. On *really* untrimmed ribs it's long enough to make it hard to fit into my smoker. I usually trim off the thinnest bit, but can't stand to completely whack it all off.
3) Skin the ribs. Even trimmed ribs usually still have the skin (note, I don't mean the pigs outer skin :-) ) on. Some BBQ folks say the skin is a protection during cooking. Others (and I agree) think that leaving it on makes for less enjoyable eating. The skin never tenderizes and cannot be chewed at all. To remove the skin easily, work a butter knife or screwdriver (I don't know why BBQ sites recommend the later, but they always do. I use a butter knife) under the skin at the point of the last rib (near C in the diagram). For this picture, go in from the right. The skin is right over the rib, there's no meat between the skin and bone. Since you are working over the bone, there's no danger you might poke into the meat or anything. Once you have the knife basically all the way under the skin (and along the bone), wiggle it back and forth and DOWN (towards C) until it comes out and tears the skin away. If you do this right, you hopefully end up with a "flap" of the skin. It may be a bit ragged, that's OK.
If it's REALLY ragged, you can repeat with the next rib up the chain. Sometimes the butchers will have nicked or cut the ribs as part of the trim or butchering process, so you may have to go up a rib or two to get to more solid skin. Basically, you want something you can grab onto easily. Take a paper towel, grab hold firmly of the flap of skin with one hand, and hold down the rib/meat below it with the other, now, just jerk the skin up and towards the top of the ribs. You've maybe done with the salmon before. Should all come up as one piece more or less. That's it!
The skin doesn't actually cover all of the ribs all of the way up, so don't be worried if it's not a rectangle when all done. If parts of it don't come up, I usually leave them rather than try to worry more bits of it out.
This sounds harder than it is. It's actually very easy, once you've done it once :-)
4) Remove chine-bone. Located near area A (Northern California Coast) in the diagram, on the left hand side, the large black squares are the chine-bone. This is identical to the chine-bone on a rack of lamb, which is most often removed by butchers or at a minimum cut, so that you can slice the rack of lamb without hitting solid bone.
On racks of ribs, you may find:
a) no chine-bone, completely trimmed away. In this case, nothing to do.
b) chine-bone, cut approximately into "squares". In this case, you can either leave it on or not, you'll be able to slice the ribs through the cuts more or less. Usually when they have done this "service" for you, they've also cut into the cartilage area as well, so I usually trim the cut area away. It's going to cook weird because it has all these darn slices in it.
c) chine-bone, uncut. In this case, you really probably should remove it, because service will be a pain. I know, I've tried.
If you decide to trim off the chine-bone, proceed to step 5 as there is no point in making two of these darn cuts if you can get away with one (after you read below, you'll understand why I say this).
5) Remove some of the cartilage section. The squiggly lines between the two green lines near area A are the cartilage. You can remove some, all, or none of this section. Trimmed ribs may be trimmed down all the way already, or not. For competition ribs, they usually trim very aggressively, leaving only the bone area. I think this is wasteful of the meat, but understand why they do it for the judges. The other reason to trim some of this is that this portion of the meat is much thicker, and will take longer to cook. By the time it is tender, the ribs area can be overdone and dry. If you trim this all in one piece, you can cook it separately for longer or (what I usually do) whack it up to make a browned pork stock out of it. The cartilage makes the stock very rich.
So, you can trim in a line along anyplace between the two green lines. You can take off just the chine-bone. Or you can cut waaaaay up near the ribs, or anyplace in between.
Place rack of ribs on a large cutting board, rib side up, long ways away from you (in the diagram, you could be standing in area C), but close to the edge so that you can easily reach up to the top. You do not want to work side-to-side -- the knife could slip, so you want NOTHING in the direction of travel. Get a large heavy knife. I use a meat cleaver. You want a knife with a heavy "heel" edge to it, and I recommend that you NOT use your best knife. You aren't cutting through any bone, but it's still some pretty heavy work.
Place the heel of the knife at the TOP of the line you'll be cutting down (ie, you are going to work from the top down, and will be cutting with the heel of the knife rather than the tip), overlap the ribs by maybe two or three inches. Hold the knife firmly, make sure all other body parts are well away from it, and any forward direction of travel. Press down HARD and slightly forward. The knife will slide forward and down, and hopefully you will hear a sickening "CRUNCH" as it goes through the cartilage. Repeat, moving down two or three inches each time, until you have cut all of the way down along the line you wanted. Depending upon the Force of Your Convictions and the heftiness of the knife, you may be able to make the cut in larger than two or three inches at a time, or you may need to take it one cartilage "lump" at a time.
Again, I probably make this sound harder than it is. It certainly was a bit nerve wracking the first time I did it. The cuts aren't more difficult than cutting through chicken bones/cartilage, but there's more of them in any one place. Try hard to resist the temptation to hold onto the meat near where the knife is. I've had a few close calls before I learned that.
May 23, 2005
Tri Tip Slices
Tri Tip
Again with the offset smoke/roasting. Today's entry: tri tip.
Rubbed with a basic BBQ seasoning, offset smoked for 45 minutes (turning/flipping halfway through) until an internal temperature of 140. Carried over up to about 147.
Didn't do anything super exciting with this, except pile it high on some crusty rolls and eat. "What is it with you and the sandwiches, kid?"
May 22, 2005
Quicker BBQ
Smoked Pork Tenderloin, Carmelized Onion Sauce
I've been experimenting with faster forms of "BBQ" or smoking for use with more tender cuts of meat (ie, chicken breasts, pork tenderloin, loin steaks, etc). These cuts don't contain enough fat within the meat itself to cook at the low temeratures for the extended periods of time that "real BBQ" requires. But they sometimes do taste good with a smoke flavor.
Today I used a pork tenderloin, treated simply with salt and pepper and a light brush with a French mustard. I cooked it offset from the fire in a Weber grill, well away from the heat. Two large chunks of pecan wood provided the smoke. This method ends up being like roasting in an oven with the additional flavoring of the wood.
Total cooking time was just over 20 minutes, and I took the meat up to just a few degrees shy of a target of 140 F. A small piece of meat like this will have minimal carry-over (I wasn't watching during the resting, but I think this peaked at 143 or so), especially if you aren't cooking it directly over the flame. This temperature may be too rare for some of you, but I find that you can very easily overcook pork, so I prefer mine a bit less cooked than some. In any case, cook to the temperature that you prefer.
The sauce sounds impressive and is either easy or hard depending upon how you look at it. I took about a pint of left over French Onion Soup, strained the onions from it, and reduced over low heat until a syrup/sauce was reached. Really can't get much simpler than this, however, the input might not be something people have on hand:
- carmelize onions until very brown
- deglaze with white wine
- add 1/2 chicken stock, 1/2 oxtail stock
- S&P to taste
- thyme
- simmer for an hour or so
- re-season, brighted with a hit of cognac
I had made this at the tail end of our winter here in California. I couldn't just toss the rest, but it really has become too warm here for me to want to eat the rest as soup. Thus, this "instant" sauce was born.
The sweetness from the long-cooked onions worked very well with the pork. Often pork sauces have more direct sugars in them (in the form of fruit), but this was much more subtle and not sweet enough to be annoying to me.
November 27, 2004
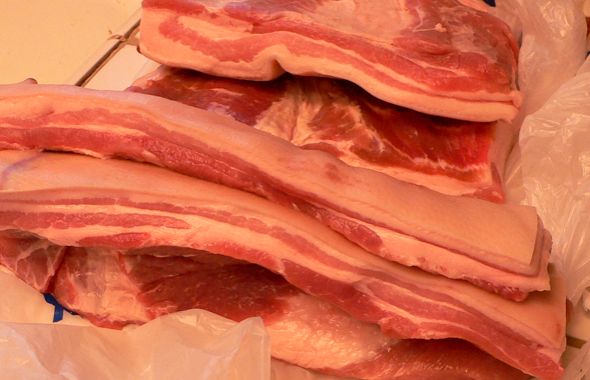
Live Bacon Cam
No, not Kevin. The food. As an aside, my friend has a "Bacon Number" of two.
First, you take raw pork bellies (in case you always wondered about them on the financial news), which are pretty easy to find in Asian markets, at least around here.
Then you coat them with a curing salt. I use "Tender Quick" but you can combine salt and TCM as an alternative.
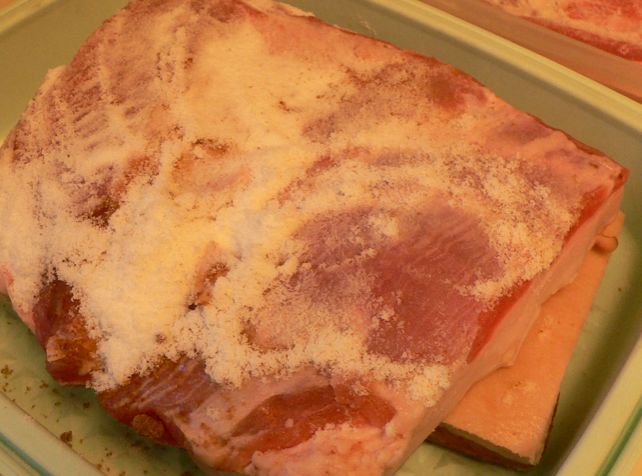
And then some sort of sugar type thing. I used brown sugar here.
You leave the bacon in the fridge with the temp between 36 and 40. I used the vegetable drawer. You need the cure to go for 7 days, and should "overhaul" or turn the bacon to make sure the cure is getting to all sides once or twice during the process.
The next weekend (because, of course, that's the only time you have to do things like this) you smoke the bacon. Less than 120 degrees, for about 8 hours. For the last two hours, you can remove the skin to get more smoke on the meat.
Here's the bacon at the start of the smoking process. I used a combination of plum and apricot wood for the smoking. A friend had to have two trees remove. Why a combination? Because I honestly can't really tell them apart.
After 8 hours, the bacon is starting to look pretty good! Right after this picture, the skins were sliced off so that the fat side could also get some color. Leaving the skins on before this point is helpful to keep the bacon from becoming too soft and possibly stretching off of the "bacon hooks" on which it is hanging.
Final bacon. One set fat side up, the other fat side down.
September 21, 2004
Explaining America
Nope, sorry not a political entry.
Apparently, the US government has decided that one bit of American Life we just have to help the rest of the world understand is BBQ.
September 16, 2004
Meat Salad
Lots of people ask me "What do you do with all of that BBQ?" It's a reasonable question, because you can't really fire up my massive BBQ rig without being in for something on the order of 10 pounds of meat. Maybe more.
One of my favorite ways of using left over brisket it to make what I (and my co-workers) call a "meat salad." The day before, I slice 1/3-1/2 pound of brisket to take to work. For example, today.
At lunch, I combine it with lettuce from the salad bar (and anything else that looks good). Tomatoes when in season. Cheese. Maybe some croutons. We pay by weight and lettuce is really light. Even when piling it on, I'm usually under $5. Even better, our salad bar/cafe has an excellent selection of condiments to select from. So I usually combine:
- catsup
- red wine vinegar
- olive oil
- mustard
- wochestershire sauce
- pepper
- hot sauce
- honey
in order to make a very loose BBQ sauce. I use this to dress the salad. Recently, they've even added a house made BBQ sauce of their own -- I still usually at least thin it out with some of the above.
When I make extra BBQ sausages, they also make a great addition to this salad. And no, I'm not on Atkins. Why do you ask?
June 15, 2004
Food amounts
Ran across this site on food amounts for BBQ on one of the newsgroups.
Sort of interesting, given that I'm currently planning a large BBQ myself. I'll probably go with my normal guesses, which have histortically been fairly accurate.
May 02, 2004
2nd day Indian
To "properly" make Chicken Tikka Masala, you need two day. At least, the way I make it, you probably need two days.
The basic idea is simple: chicken cooked in a tandorri style, then cut up and simmered in a cream-based sauce. There are lots of recipes for Chicken Tikka Masala and you can follow just about any of them -- but you are missing out if you don't do the initial cooking of the chicken over a real charcoal grill.
For for me, Tikka Masala has always been the utilimate Sunday leftover meal. I've made a tandorri chicken the previous day, and saved some of it. Cut it up and simmered it in the sauce. Comfort food in 48 hours -- not exactly the way most Americans approach the problem.
This weekend I cooked of the chicken on Saturday. Rather that yougurt (traditional in most tandorris) I used wine and some oil. I cooked the chicken over very very heavy smoke from tabasco chips -- quite acrid smoke from these. Fresh off the grill on naan bread, it was great. But part of me was Jonesing for the next day, when I knew I would put the remainder of the chicken to service.
For the sauce base, I usually use a fairly decent jarred paste from Patak's. Yeah yeah, I know, I should make it myself. I usually doctor up the sauce with additional flavors -- I tend to want more cumin, corridander, and fenugreek than most mixes have in them. But, boy, it is a wonder how easy these prepared pastes make it -- just add lots of heavy cream.
Once the sauce is made, I like to simmer the cut-up chicken for at least 30 minutes -- this way the flavors from the chicken (smokey) and those from the sauce (creamy) mingle much better.
Some fresh cillantro (from my own garden, I might add as a way of balancing my use of a jarred product) over a base of basmatti rice and you've got some good mid-afternoon Sunday eats.
March 27, 2004
Fire! Muffins are a-rising
With all due respect to The Cult, of course...
Messing about again with changes to some basic recipes. This time, southern cornbread muffins. I replaced the normal buttermilk that one finds in such a recipe with an equal amount of whole milk and then added 5-6 shots of Tabasco sauce. The vinegar in the sauce curdles the milk and provides the proper acid balance from the original recipe. Plus, Fire!
Topped each muffin with some very very sharp cheddar cheese. Baked as usual.
December 28, 2003
BBQ Sausage
One of the best tricks I learned on the BBQ is smoked sausage. It is easy, and if you have extra sausage on hand or extra room in the smoker, is worth doing. You can make your own, but just about any kind of purchased sausage comes out tasting much different than when it goes in to the smoker. Today, I had about a half dozen leftover storebought Italian sausage links. They were in danger of going bad in the fridge, so I decided to smoke them.
For normal grills (Webers, gas grills) you want to have a small fire on one side of the grill, and then add wood chunks or chips to produce a fairly heavy smoke. Smoke the sausages at a low to medium heat for between 1 and 2 hours. Add chips or chunks to keep the smoke going pretty strong. Ideally, I like to try to keep the heat pretty low and go for the top end on time. This gives you the most amount of smoke flavor in the meat with little to no shrinkage due to the fat cooking off.
If you have a larger smoker, sausage make a great addition to a BBQ, and you can eat them in advance of the main course when people are getting hungry. I usually stick them at the top/far end of the smoker and just let them take care of themselves. I've never had a batch turn out less than "pretty darn good" and some have been amazing.
I have to kick myself for all of the times I thought about adding sausages to the BBQ during a smoking run, but for some reason did not. Now, I almost always add at least half a dozen or so whenever I have the larger smoker going.
Leftover (or purpose made) smoked sausages make great ingredients in gumbo, stews, fried rice, and all other sorts of dishes where smoked sausage is welcome. Or you can simply slice and eat with mustard or BBQ sauce. The ones I made today will probably make an appearance in either a fedjuada (sp?) (A Brasilian Black Bean stew) or perhaps a jambalaya.
December 22, 2003
Burnin' down the house
I've sort of been meaning to get one of those turkey fryers for a while now. What's been holding me off is that I'm not sure if I'll enjoy the process enough to repeat it. But I managed to get a decent deal on a fairly complete set.
Whole Enchilada Professional Turkey Fryer
I figure that even if I decide that deep frying turkeys isn't really for me, I can always do shrimp or crab boils, or make enormous batches of chile, or the worlds largest pot of chicken stock.
When I break it in for the first time, I'll be sure to write it up. Or you can just watch the news for the report of my house burning down.
September 04, 2003
Strange orders
I've order some sausage making supplies, and the invoices sure look odd.
- Natural Sheep Casings - home pack
- Natural Hog Casings - home pack
- Fibrous Casings - 1 ea. 2.5x20 - Mahogany
- 16 oz Gelatin, Un-Flavored
- 16 oz Citric Acid, Crystals
- 32 oz Fermento
- 32 oz Dextrose
I'm getting ready to make some more cured sausages. I've only done it once, which was a 5 pound summer sausage that turned out quite well. It's pretty involved time-wise because you have to smoke the sausages at a fairly low and constant temperature. I told myself that next time I'd make more than one of them given the effort.
I can recommend Allied Kenco and The Ingredient Store if you are looking for online sources of sausage making or curing ingredients.
August 28, 2003
Tri Tip on the BBQ
I made a "Santa Maria"-style Tri-Tip over the weekend. It's a very flavorful BBQ somewhere between a true (tm) BBQ and a grilled meat item.
Tri Tip is pretty available here in California, but somewhat more difficult to find elsewhere. I also was never really sure what it actually was. The web to the rescue! From the Oregon Beef Council's web site:
"This flavorful beef cut has been one of the beef industry's best kept secrets. Tri-tip was seldom marketed when carcass beef or beef quarters were delivered to retail markets because there are only two tri-tips per carcass. This meant that there was not enough for a case display. Consequently, the butcher would grind or cube it. Today, most stores receive boneless boxed beef.
...
A beef tri-tip roast is a boneless cut of meat from the bottom sirloin. It also is called "triangular" roast because of its shape.
...
Tri-tip roasts will vary from 1 1/2 to 2 pounds and are about two inches thick."
I say "Santa Maria"-style because apparently there's actually an AOC (Appellation d'Origine Contrôlée) that refers to very specific cooking methods and even (geez!) serving it with specific side dishes!.
My method is to rub the tri-tip with a basic BBQ rub and let it sit for around an hour. I then grill it fat side down for 5 minutes, then place it offset in the cooker and cook for 30-45 minutes or until medium-rare. I use heavy smoke (pecan this time) since it isn't on the smoke for all that long. Rest for 20 minutes and slice thin.
I served it on toasted buns with a honey-hot BBQ sauce and cheese. The non-official side dish was a potato salad made with new potatoes, bacon, celery, mustard, and vinegar, thickened by a mayo made from bacon fat and an egg. Sort of half-way between an "American" and "German" style.
August 27, 2003
Great for your Heart!
I'm cleaning up the side-cabinet in the kitchen where I normally tape recipes and ideas that I'm working on. I didn't want to lose the details of my normal bean "recipe" even though by now I've pretty much memorized it. Originally from William.
4-6 lbs of beans, cooked in cans
-OR-
3 lbs uncooked beans (small white or pinto) soaked overnight
1 small yellow onion, minced
1/2 yellow, red, or green bell pepper, minced
1/2 C BBQ sauce
1/4 C maple syrup
1/4 C molasses
1/4 C dark brown sugar, packed
1.5 tsp dry mustard
1/8 tsp black pepper
1/8 tsp chili powder
2 tsp Frank's Hot Sauce
2 tsp Tapatio Hot Sauce
1) Mix up sauce
2) Sweat vegetables
3) Drain beans, if using canned reserve the liquid
4) Combine all in a large dutch oven
5) Add either reserved liquid or water to cover beans
6) If using canned, skip this step: Cook 2-3 hours at 250-325 (either in smoker or oven), covered until beans are tender
7) Place in smoker underneath BBQing meats, uncovered for 2-3 hours. Add more liquid if needed to keep beans slightly covered. However, allow the mixture to thicken/reduce. Stir every once in a while.
8) There will likely be a layer of grease on the top of the beans. Stir this in during cooking, but don't do so at the end. Lay several paper towels on the top of the beans to soak it up and remove. Stir one final time.
August 02, 2003
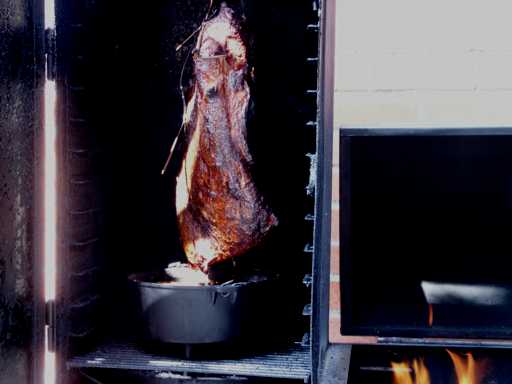
Brisket Experiment
Today I did a BBQ brisket. I'm tried a new method, hanging the brisket up in the smoker rather than laying it flat. I had seen this on some cooking show and am always looking for an excuse to try something new because it means I get to use the BBQ. Also, Michael has returned from his summer vacation, so Carol and I are having a BBQ in his honor.
Details on the prep in the extended entry
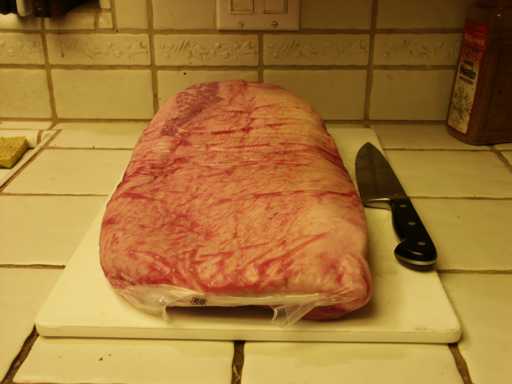 |
The brisket, as you'll find it in the store. It's either referred to as "untrimmed" or "packer cut" (as of this writing, $1.51 per lb). This brisket was 11.21 pounds. You can see a chef's knife with an 8 inch blade for size reference. Notice that the top of the brisket is almost entirely covered in a 1/4 to 1/2 inch layer of fat. 6 AM. |
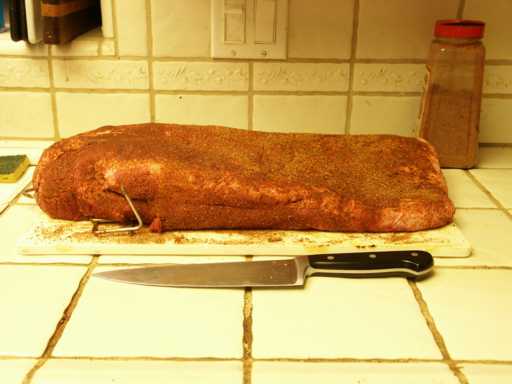 | Here's the brisket, rubbed with my standard BBQ rub and attached to a bacon hook. It's ready for the BBQ.
I've attached the bacon hook to the heavier end, which is known as the "point." The other portion is called the "flat." The point has a layer of fat dividing it in half. It tends to be more tender, but also, well, fattier. 6:15 AM |
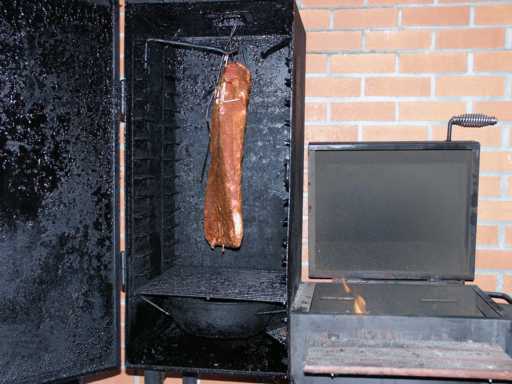 | Here's the smoker with the fire at "ready to cook" temperatures and the brisket in the smoker. As you can see, hanging a brisket has one huge disadvantage in that it takes up a good amount of the smoker. It does look like I could fit a total of four briskets in, however.
I'm also not entirely sure it is going to stay on the hook without falling off. 6:45 AM You can probably also just make out the two temperature probes. These run up and out the top vent of the smoker to a remote transmitter. I can check the temperatures while remaining in the house. 142 and 135 degrees in the middle and top of the smoke chamber. 7 AM. Put together the beans (which will go on the fire later), sauce, and Ceasar Salad dressing. Made croutons. 251 and 257 degrees -- trying to keep the temperature between 250 and 275. 8 AM. |
 | Internal meat temperature 140-150 on the flat. Smoke chamber 249 and 240. Restoked the fire and placed the beans in the smoker. I'm using a combination of mesquite lump charcoal and small split logs of almond wood. Note that during the cooking the firebox lid is shut -- I've just got it open to get the bed of coals re-started.
The meat has been cooking for just over 4 hours now. You may be able to tell how much it has shrunk already. Note that the juices and fat from the meat will be directly dripping into the bean pot. 11 AM. |
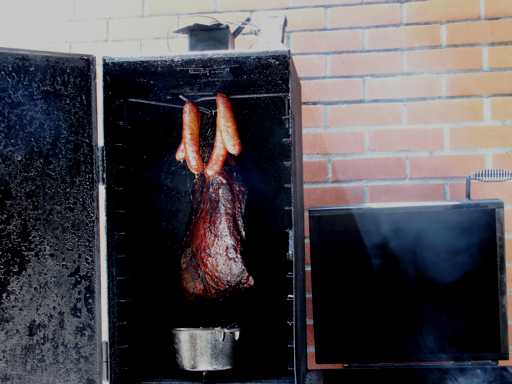 | Internal meat temperature 160 on the flat. Smoke chamber 250 and 255. I've got sausages hanging in the smoker now, they should be done in another hour or so. Meat's been smoking now for just over 7 hours. I expect another two hours or so before we can eat it. 2 PM. |
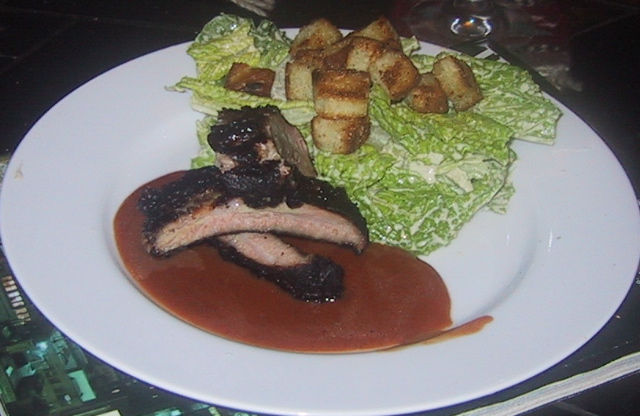
| Pulled the meat after 9 hours -- it had hit 170-180, which isn't really fully done for brisket. Let it rest for about half an hour and then carved it. Could have used more time, but we were all hungry. Did have a pretty good smoke ring on it (that's the red/pink you see on what is actually the outside of the meat), and it certainly tasted great. The experiment works! 5 PM. |
May 27, 2003
Experimental BBQ
The rainy weather finally let up in Northern California, and so I got my first chance in a long time to fire up my Bandera smoker for real. Gave it a good cleaning out first and coated the outside with a bit of oil -- you maintain a smoker like a cast iron skillet for the most part.
I tried a bunch of minor variations this time to get into the swing of things.
Instead of a whole packer-cut brisket I used a half or "point-off" one. These have the plus of going a bit quicker, but the minus of having less fat and therefore can dry out. They also tend toward the more expensive side. I smoked it as normal for four hours and then placed it in a quarter disposable hotel pan for the remaining time. So it was sort of smoked and then braised. Not true (tm) BBQ, but it did turn out quite well.
Instead of pork ribs, I did beef ribs. Smoked for four hours and then wrapped in foil (again, not something I do normally). I was mostly curious if doing this let me leave the ribs in the smoker while the brisket finished. It did, although the ribs were really well done. Next time, I'll probably also move them up away from the fire when doing this.
Both the brisket and the ribs had really major red smoke rings this time. I used a combination of black oak (which I don't care for, it's very dense and takes quite a bit of heat to get it to burn) and almond wood (which was great this time -- all rather smallish logs just perfect for the BBQ). Ran the smoker at between 240 and 270 for the whole time and it was fairly easy to keep it there. I think I'm improving at the entire fire management thing.
Another weird experiment was sticking the probe thermometers through potato halves to serve as a "base" for each one. It works out well, but I sort of wish I could come up with something a bit more reusable. Seems a shame to waste a perfectly good potato that way. Maybe balls of foil flattened out at the bottom. The world's first aluminum potato!
The final experiment was cooking pinto beans in the smoker. I've done beans lots of times before, but they are usually white beans. I'm happy to say that pintos also work out well. I put lots of cumin and coriander in the mix this time -- two flavors that I love and especially so with beans. The beans were in the smoker the entire time. About half of the time covered and half uncovered. They didn't overcook at all and could probably have even kept on cooking for even longer with no real downside to quality.
Total time for the "run" was just under eight hours.
May 23, 2003
Beer Can Chicken
A popular method of cooking chicken in recent years at BBQ competitions has been the so-called "beer can chicken" or (as I often call it) "up-the-butt" chicken. Lots of folks in the more traditional BBQ area will claim this method as more of a "stunt" than real (tm) BBQ, but I think it's an interesting tool to have on one's workbench -- particularly when it comes to weeknight or shorter time cookery.
The basic method is simple. An opened (and generally half-emptied) can of beer is placed within the cavity of a whole chicken and the bird is set upright on it -- the beer can forming one "leg" of a tripod and the two legs of the bird the remaining sides. The chicken is thus placed on the grill and offset cooked until done.
I usually face the breast side of the chicken away from the fire and use a fairly hot offset smoker. Usually a 4-5 pound bird is done in something around 60 minutes.
The basic idea is that the steam from the boiling-off beer (and yes, it does get quite hot) helps to both flavor and tenderize the meat. People often place various spices or flavorings within the beer. Some brine the chicken before hand. Some baste or otherwise coat the bird during cooking. All of these are modifications of the basic approach.
Honestly, I haven't found that there is a huge difference between various modifications. Tonight (for no particular reason) I brined the bird for two hours with some Mexican-oriented spices and used a can of Tecate as the beer. I used my Weber kettle and some cherry wood chunks as the smoking agent. But, for all that, I'm not sure the resulting product was much different than an unbrined chicken with a can of Budwiser and perhaps no actual wood used for smoking. The differences are certainly matters of degrees.
In any case, if you haven't tried this method before, it's worth checking out. I think that it adds a level of foolproofedness to the process (most likely the result of the constant steam from the beer). If all else fails, you get to tell your guests that you are serving "chicken up the butt." And, hey, who doesn't want to be able to do that?
May 15, 2003
Five Ways to Sunday
I had the kids and Carol over last night for some weeknight BBQ. Since a six to eight hour smoke was out of the question, I used baby-back ribs. I've been working on a recipe for them that I'm calling "Five Ways to Sunday Ribs." Thus:
1) brined the ribs in a salt and Tapatio (a Mexican brand hot sauce) mixture
2) rubbed the ribs with a basic rub that contains a fair amount of ancho chilli powder in it
3) Smoked the ribs using Tabasco barrel chips
4) Glazed at the end with a Honey Habenero finishing sauce
5) Served with a Jalapeno-Cillantro-Lime sauce at the table
A salad, some sourdough bread, and corn on the cob completed the meal. The ribs were spicy, but not overly so -- I think I've got the recipe just about where I want it to be.
The kids demolished a rack and a half between them, so that's a good sign!
April 23, 2003
Charcoal Review Site
I guess on the internet you can find everything. Just ran across a web site full of lump charcoal reviews. His site is pretty slow, but has useful information if you've never used "real" charcoal.
In other news, I finally bought a Weber Chimney Starter.
I guess these two things go together.
March 21, 2003
Fake Steak
Carol came over on Friday night, so I made two things from my childhood -- Fake Steak, and Long John Silvers Corn.
Fake Steak is what my father called either a chuck steak or London Broil that is doctored and grilled. I used a 3 lb London Broil for this one. But a 7-bone chuck steak can also be pretty good.
Combine lemon juice, steak sauce, BBQ sauce, spices, herbs, pepper, salt, meat tenderizer, and a bit of oil. I like to make sure it ends up pretty sweet and sour. Marinate the steak for at least half an hour. Grill over high heat for 5 minutes per side, then move off the direct heat, coat with additional marinate. Cover the grill and cook for another 5 minutes per side. Let rest, and slice very thin.
Long John Silvers Corn is not called that because Pirates Love Corn ("Arr, matey, pass the butter!") -- although I tried to convince Carol of that. It's called that because it's how corn is served at Long John Silvers Seafood Shoppes.
Basically, it's just corn boiled in a fairly small amount of water, a whole stick of butter, salt, pepper, and just a bit of sugar. I think at LJS, they let it boil for the better part of a day. I usually do it for 15 minutes or so -- which is much longer than I cook good corn in season. But I'm pretty sure that March doesn't count as "in season" even here in California.
Oh yeah, and you have to cut the corn in half to form "Cobbettes" -- otherwise it just isn't Pirate Corn. "Aye, matey, pass another Cobbette down this-a-ways."
February 18, 2003
Baby Back Ribs
or, alternately titled, fancy BBQ. I did enough things different from my typical all-day BBQ that I'm almost willing to call this one special.
I don't normally cook baby back ribs. In a long-slow smoke normal spare ribs almost end up the same, and cost about half as much. But, for shorter cooking times, or smaller groups of people (ie, two), baby backs can be a quick weeknight or half-day affair.
I used my Weber to smoke these, offset from the fire on one side, with a fair amount of smoke from hickory chips. I'd guess the fire was running around 275, or maybe 300 at times, and the ribs stayed on for four hours.
I skinned the ribs first, and rubbed with a basic rub. For the sauce, I made up a vinegar based sauce with standard spices. I then added about a quart of apple juice, 1 small can of tomato sauce, and some honey for sweetness. I kept out darker colored items like molasses, brown sugar, and worchestershire sauce that I normally add to sauces I use for BBQ beef. I let this cook down for about half an hour, and then removed a cup of it to use as a mop for the ribs. To the mop I added half a cup of salad oil. I mopped the ribs about every half an hour after the first hour.
I strained the sauce, returned it to the saucepan, and simmered it down to a medium thickness. Just before serving, I added a quarter of a pound of butter and mounted it in. It cut the sourness perfectly -- it was one of the better "from scratch" BBQ sauces I've made in a while.
As a side, I made a huge batch of Real Caesar Salad. The dressing is very simple:
- 1 egg, raw. Tradditionally supposed to be coddled, but I've found little difference unless making the dressing on the lettuce.
- 1 T worchestershire sauce, more to taste if you wish at the end.
- salt, pepper
- whisk or blend, adding in 1/2 olive oil and 1/2 salad oil until it has thickened a bit. I usually take it up to a light mayonaise consistancy.
- juice of two lemons, which thins it back out to dressing
Toss romain hearts with the dressing, parmasagn cheese, and fresh made garlic croutons. It's a great salad, and except for not tossing the dressing directly on the lettuce and building it up that way, it's "officially correct." Just about nobody makes Caesar Salad this way -- it most often has wine vinegar instead of lemon and omits the egg and/or worchestershire sauce, and adds who knows what else.
I don't mind other items in the salad (really great tomatoes from the garden, chicken, anchovies, thin strips of grilled steak, etc), but generally don't change what's in the dressing -- or if I do, I call it something else.
Picture in the extended entry...
here you can see the neat stack of ribs, the pile of salad (note: greater in size than the amount of meat), and the sauce.
February 06, 2003
Jerk Chicken
Apparently, I'm on a spicy food kick right now. I got some chicken the last time I was at the store and wasn't sure what to do with it. Now that it isn't raining every day, I guess doing something on the grill is starting to seem like what I wanted to do. Also, I had some Red Stripe beer in the fridge, so what else would one make?
- 1 chicken, cut up into pieces
Grind up:
- 4 thai bird chilies
- 1/2 onion
- 6 garlic cloves
- 2 T oregano
- 2 T basil
- 4-5 whole allspice berries
- salt, pepper
- lime juice
- 1 T oil
into as smooth of a paste as you can get. Marinade chicken in the mixture for at least an hour. Grill over medium heat until cooked to your liking.
December 26, 2002
"That's alot of bread, sir."
My secret BBQ shame is that I often enjoy the sandwiches that result from BBQ more than the BBQ itself. This is partially a result of how I grew up knowing BBQ. My family used to take vacation to Texas almost every summer, two kids in the back of an Impala driving 3 days across half the country.
Every year, shortly after crossing the Texas state line, my father would somehow direct the car off to a non-descript shack. I now know he probably used his nose to smell the wood smoke. It was always the same -- paper plates, white bread buns, and dark brown/red smoky shreds of beef. And, as always, it was the best meal one had ever eaten. So, to me, sandwiches are always what I think of first when I think of BBQ.
The other reason why the next day BBQ tastes better to me is simple. After 12 hours of running a smoker, I can't even smell the smoke in the meat. It's in my shirt, my hair, and even my skin. I know the food must taste wonderful (as indeed the next day shows) but for the life of me I can barely taste the smoke over my own Eau de Bois.
Today, I'm making hamburger buns in anticipation of tearing into my stash of brisket from Christmas Eve. It's one of those weird things about me. Most people would never think of making buns. Me, I'd never think of exiting the house on the day after Christmas and going to (of all places) a freakin' store!
Yeast, water, butter, salt, flour (in that order). Kneading it in the KitchenAid, rising it slowly so that the crumb of the bread is small and dense (the butter helps here, too). Punching it down and turning it halfway through the almost two hour rise. Forming into little round balls and pressing them down flat into a half-sheet pan. Rising it again, and finally baking it at 350 until they're done.
All very simple, but I do end up with close to two dozen buns. I mean, you don't even normally buy that many at once. My excuse is that they freeze. The reality is that I'll probably end up eating most of them in two days.
December 25, 2002
Meat & Bean Results
Overall, the BBQ yesterday was a success. The meat came out smokey, tender, and juicy. The beans worked out fantasic, and I'm thrilled to be able to save a step when making them in the future. The contents are:
- 1 lb white beans, soaked overnight
- 1/4 C brown sugar
- 1/4 C molasass
- 1/4 C tomato paste
- 4 C liquid (combination of the soaking liquid, stock, water, what have you)
- shot of hot sauce
- spices of your choice (I used cumin)
- salt and pepper
- 1 small onion, diced
- 1/2 red bell pepper, diced
You sweat the vegetables in a large dutch oven, then add in everything else but the beans, bring it to a boil, then add the beans. The dutch oven is placed in the smoker (or oven) at around 225, covered. It cooks until the beans are tender (which seemed to be around 4 hours), and later uncovered. This adds smoke flavor to the beans, along with cooking off any excess water. It also lets the flavorful grease from the meat drippings fall into the beans.
I pulled them off the BBQ after a total of 10 hours, toweled off any extra grease on top, and let rest covered until we were ready to eat. You can actually cook them any amount of additional time as long as you stir them every hour or so, and add liquid if things seem to be drying out too much. The reason you can add salt at the begining, and why you can cook them so long is the acid in the tomato and the sulfer in the molasass. I also normally make them a bit hotter than this time around -- but I know Carol's mom doesn't like food that too spicy.
The meat was interesting in that it got a very strange bi-level smoke ring on it. The "smoke ring" in BBQ is the red or pink color around the outside of the meat. It's formed when the nitrites/nitrates in the wood smoke combine with the myoglobin in the tissues of the meat. This same reaction is what causes sausages and hot dogs to be pink (although there, the chemical is placed in the meat rather than delivered via smoke).
The process of smoke ring formation halts when the meat reaches around 140 (with BBQ meats generally being pulled from the fire between 180 and 195 degrees) So generally, I start my rig at a lower temperature and gradually raise it throughout the day. Smoke rings don't add anything to the flavor, but there is a certain pride in getting a really nice one. It lets folks you you really did "low and slow" it. I probably had a temperature bump at some point during the day which gave me this really interesting pink-red-pink-red progression into the meat. My other theory is that the meat was a bit colder this time around than normal, which caused it to warm up in an odd pattern.
The "user group" for my particular BBQ rig (yes, there really is a user group!) would scoff at the above science. Lots of folks there say that thermometers (which I use) and science have no place in Real (tm) BBQ. Now I'm the first to love the art of BBQ -- and there certainly is one -- but why avoid the extra info on purpose? After all, these were the people that covered the outside of their firebox with styrofoam and then were surprised when it melted and caught fire!
December 24, 2002
Ho Ho Holy Smoke
Yes, nothing says Christmas like 18 pounds of smoked meat. Carol's parents are coming over for Christmas eve dinner, and so I'm making BBQ.
Got up around 7 AM today to start up the smoker. The long cooking meats were on before 8. I'm making a beef brisket, a pork shoulder, and 4 racks of baby back ribs (these won't go on until later, they only take 4-5 hours). I used my basic BBQ rub, which is
- salt
- pepper
- chili pepper
- oregano
- garlic powder
- onion powder
- paprika
- cumin
I'm running the BBQ at around 225-250 degrees today, so I should be able to leave the meat on until the guests arrive around 7 PM.
I've also got a pot of beans in the smoker and I'm trying something new with them. This time, I soaked the beans but didn't cook them before putting them into the smoker (in a huge cast iron dutch oven I use for this and only this purpose). We'll see how they come out -- it would be cool if this One Less Step approach works out. I'm cooking them covered for at least the first 6 hours or so. Towards the end I'll uncover them to let them soak up the smoke and drippings from the meat.
Later, I'm making Real (tm) Caesar Salad, and corn muffins with cillantro and cheese. Just so you all know it isn't 100% meat. Oh yeah, and the BBQ sauce is bubbling away on the stove as well.