May 30, 2005
Map of the ribs
My friend Derrick is fast becoming used to BBQ. When our friend Tim announces he's having a BBQ, Derrick is always quick to want to make it a "real BBQ" with some form of long cooked meat. Yesterday he wanted to make ribs (for, as far as I know, the first time). They turned out great, but prior to this he's asked for some tips. Below is the email that I sent him about ribs and trimming of same.
As an aside, while Tim may not have a "real BBQ" he does have an incredible flat gas grill for exactly that purpose. When I finally break down and get a gas grill, it's the kind I'm going to be getting.
Begin email:
I went back over some logs. 6-8 hours seems the norm for my smoker, at around 200-250. Cook the ribs meat side UP, rib side DOWN for the entire time. The ribs on the bottom protect the meat from the more direct heat. You can stack racks of ribs on top of one another to good effect. If you do this, swap them top to bottom every hour or so (more important in the first part of cooking, so that they all get good levels of smoke).
It's also possible that they don't fit in your smoker at all. If that is the case, I'd recommend cutting the slab in half so that you have two "half-racks" -- they'll cook just fine that way. Visualizing it in my head, I could imagine that they might just barely fit w/o cutting them. If that's the case, I'd say try to squeeze them in w/o cutting because they will shrink as they cook.
I suspect you are getting some kind of high-end ribs from a fancy butcher. If this is the case, they've probably been pretty well trimmed. However, if they are not, you may want to consider trimming them. You certainly can cook them untrimmed as well -- I started off doing that myself. As with all BBQ, there are lots of arguments about the right thing(s) to do and if you need to do them. The good news is they are all basically orthogonal to one another, so you and pick and choose what (if anything) to do.
These notes apply to Spare Ribs. Baby back ribs don't require any of the following, except for the skinning (step 3). A fully trimmed rack of spares will sometimes be called Saint Louis Cut Ribs or Kansas City Cut Ribs. I think that one of the two is more aggressively trimmed of the cartilage (step 5), but can never remember which is which.
So, How to Trim Spare Ribs. Maybe interesting reading even if you don't need to actually do it.
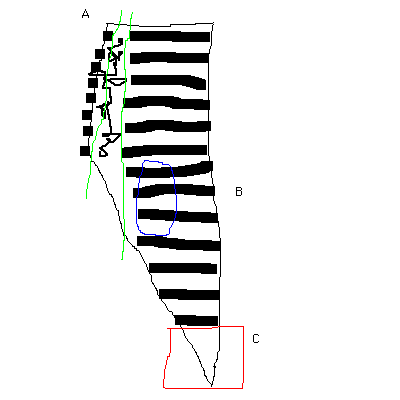
The enclosed picture is either the state of California, or an untrimmed rack of ribs. This is from the "underside" or "rib" side or "concave" side. Obviously if your rack is from the other side of the animal, it will look flipped. I'll list things I do to ribs in the order of decreasing ease.
1) Remove the "deckle" (I'm not sure that's anatomically the right name, but I keep hearing it called that in BBQ shows). This is a flap of meat located around the blue area B (central valley) in the picture. It's only an ounce or so of meat, is not particularly interesting to eat, and often gets in the way during cooking. You don't have to get all fancy about it, just pick up the flap (it really is a flap in that sense), and cut it off where it joins the main body of the ribs. Again, you aren't filleting a fish, so don't try to "get close to the bone" or anything like that, some left behind is OK, just try to get the worst of the "flappy bit" gone.
2) There's a tail end of the ribs (red area marked C, San Diego/Baja)) that don't have any ribs. Again, this is sort of annoying and tends to cook different. On *really* untrimmed ribs it's long enough to make it hard to fit into my smoker. I usually trim off the thinnest bit, but can't stand to completely whack it all off.
3) Skin the ribs. Even trimmed ribs usually still have the skin (note, I don't mean the pigs outer skin :-) ) on. Some BBQ folks say the skin is a protection during cooking. Others (and I agree) think that leaving it on makes for less enjoyable eating. The skin never tenderizes and cannot be chewed at all. To remove the skin easily, work a butter knife or screwdriver (I don't know why BBQ sites recommend the later, but they always do. I use a butter knife) under the skin at the point of the last rib (near C in the diagram). For this picture, go in from the right. The skin is right over the rib, there's no meat between the skin and bone. Since you are working over the bone, there's no danger you might poke into the meat or anything. Once you have the knife basically all the way under the skin (and along the bone), wiggle it back and forth and DOWN (towards C) until it comes out and tears the skin away. If you do this right, you hopefully end up with a "flap" of the skin. It may be a bit ragged, that's OK.
If it's REALLY ragged, you can repeat with the next rib up the chain. Sometimes the butchers will have nicked or cut the ribs as part of the trim or butchering process, so you may have to go up a rib or two to get to more solid skin. Basically, you want something you can grab onto easily. Take a paper towel, grab hold firmly of the flap of skin with one hand, and hold down the rib/meat below it with the other, now, just jerk the skin up and towards the top of the ribs. You've maybe done with the salmon before. Should all come up as one piece more or less. That's it!
The skin doesn't actually cover all of the ribs all of the way up, so don't be worried if it's not a rectangle when all done. If parts of it don't come up, I usually leave them rather than try to worry more bits of it out.
This sounds harder than it is. It's actually very easy, once you've done it once :-)
4) Remove chine-bone. Located near area A (Northern California Coast) in the diagram, on the left hand side, the large black squares are the chine-bone. This is identical to the chine-bone on a rack of lamb, which is most often removed by butchers or at a minimum cut, so that you can slice the rack of lamb without hitting solid bone.
On racks of ribs, you may find:
a) no chine-bone, completely trimmed away. In this case, nothing to do.
b) chine-bone, cut approximately into "squares". In this case, you can either leave it on or not, you'll be able to slice the ribs through the cuts more or less. Usually when they have done this "service" for you, they've also cut into the cartilage area as well, so I usually trim the cut area away. It's going to cook weird because it has all these darn slices in it.
c) chine-bone, uncut. In this case, you really probably should remove it, because service will be a pain. I know, I've tried.
If you decide to trim off the chine-bone, proceed to step 5 as there is no point in making two of these darn cuts if you can get away with one (after you read below, you'll understand why I say this).
5) Remove some of the cartilage section. The squiggly lines between the two green lines near area A are the cartilage. You can remove some, all, or none of this section. Trimmed ribs may be trimmed down all the way already, or not. For competition ribs, they usually trim very aggressively, leaving only the bone area. I think this is wasteful of the meat, but understand why they do it for the judges. The other reason to trim some of this is that this portion of the meat is much thicker, and will take longer to cook. By the time it is tender, the ribs area can be overdone and dry. If you trim this all in one piece, you can cook it separately for longer or (what I usually do) whack it up to make a browned pork stock out of it. The cartilage makes the stock very rich.
So, you can trim in a line along anyplace between the two green lines. You can take off just the chine-bone. Or you can cut waaaaay up near the ribs, or anyplace in between.
Place rack of ribs on a large cutting board, rib side up, long ways away from you (in the diagram, you could be standing in area C), but close to the edge so that you can easily reach up to the top. You do not want to work side-to-side -- the knife could slip, so you want NOTHING in the direction of travel. Get a large heavy knife. I use a meat cleaver. You want a knife with a heavy "heel" edge to it, and I recommend that you NOT use your best knife. You aren't cutting through any bone, but it's still some pretty heavy work.
Place the heel of the knife at the TOP of the line you'll be cutting down (ie, you are going to work from the top down, and will be cutting with the heel of the knife rather than the tip), overlap the ribs by maybe two or three inches. Hold the knife firmly, make sure all other body parts are well away from it, and any forward direction of travel. Press down HARD and slightly forward. The knife will slide forward and down, and hopefully you will hear a sickening "CRUNCH" as it goes through the cartilage. Repeat, moving down two or three inches each time, until you have cut all of the way down along the line you wanted. Depending upon the Force of Your Convictions and the heftiness of the knife, you may be able to make the cut in larger than two or three inches at a time, or you may need to take it one cartilage "lump" at a time.
Again, I probably make this sound harder than it is. It certainly was a bit nerve wracking the first time I did it. The cuts aren't more difficult than cutting through chicken bones/cartilage, but there's more of them in any one place. Try hard to resist the temptation to hold onto the meat near where the knife is. I've had a few close calls before I learned that.
Posted by dowdy at May 30, 2005 10:26 AM