May 31, 2005
Gyro Meat
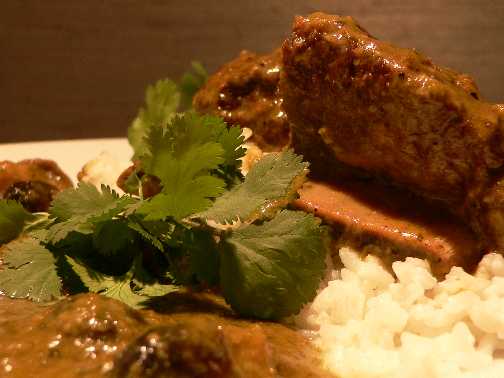
My contribution to the weekend's BBQ was Gyro Meat Roll. I based the basics on a show from Alton Brown.
Thanks to Melissa for the pictures! I was up to my arms in cooked lamb and didn't get to take as many as I would have liked.
The Magical Mystery Roll
Gyro meat is one of those things that "I never realized people actually made." (to quote someone at the BBQ). They're right. It seems like the roll appears out of nowhere pre-made. But obviously, the recipe comes from someplace, and it isn't a factory. Here's what I did (recipe makes a 6 lb gyro roll, which is enough for probably 20-30 medium sized servings. You can easily make this anywhere from 2-6 pounds in size. I've scaled the spices for 6 pounds, but hopefully obvious division can be done by the home reader):
- 4 lbs leg of lamb, trimmed of most fat (I think I should have left more of the fat on for moistness and flavor)
- 2 lbs beef trip tip (optional, you can use just lamb, but I happened to have this extra tri-tip around)
- 1 head garlic, minced -or- 3 tsp granulated garlic
- 3 T marjoram, dried
- 3 T rosemary, dried
- 3 T kosher salt
- 3 T black peppercorns
- 3 medium or 2 large onions
The night before:
- Cut the meat into 3/4-1 inch cubes (no need to be precise here)
- Place all remaining incredients except for the onions into a food processor, grind until peppercorns are, uh, ground and everything is a fine powder.
- toss spices over meat cubes, seal in a zip-top bag in the fridge
- Grind onions in food processor (no need to clean from previous spice blend) until a complete mush/paste
- Place onions in a towel/cheesecloth, twist the top, and squeeze very hard until as much of the water comes out as possible (these two steps will leave you in tears if you are sensitive to onions -- I'm not due to contact lenses and even I was having some trouble here)
- Seal up onions in zip-top bag and place in the fridge as well.
The next day:
- Toss meat and the ground onions in a bowl.
- Working in batches, grind meat cubes in food processor until course grind
- Toss meat again to make sure well distributed
- Working in batches, re-grind meat to form a paste (yes, it will look over ground)
- Return meat to bowl and layer back in the batches, trying not to get any large air pockets between them. Press/form into a roll.
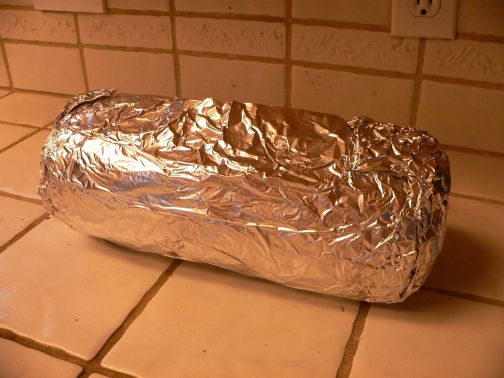
Alton in his show used either a rotisserie grill, or baked it in the oven. I chose a different method that seems to work pretty well. After grinding, the meat is wrapped very tightly in several layers of heavy foil. You pull the foil tight like when making compound butter to keep it in a nice round log shape. Stash in the fridge for a few hours to make sure it firms up.
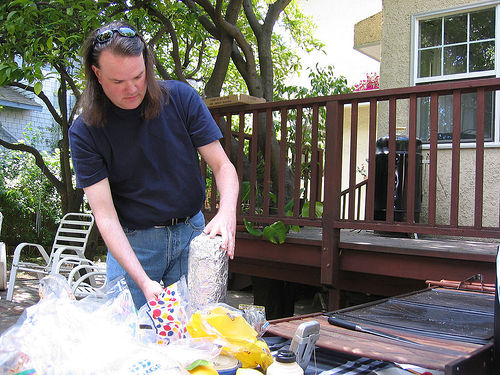
Starting to Grill
Since this was a gas grill, I cooked the meat over a low-ish heat with a large foil pan on top of it (I'm not sure that last part was needed). Every 15 minutes or so, I rotated the roll about 90 degrees to make sure that cooking took place from all sides. A probe thermometer inserted into the end of the meat monitored the temperature.
It took about an hour and a half to bring the internal temp up to 165. I probably could have stopped short of that. The final product is more well cooked than most lamb dishes on purpose. You certainly want it to be mostly cooked before removing from the foil -- otherwise it will far appart during final grilling.
If you use a Weber type grill (as I did the first time I tried this), you can keep the meat offset to one side and only need to turn it once or twice.
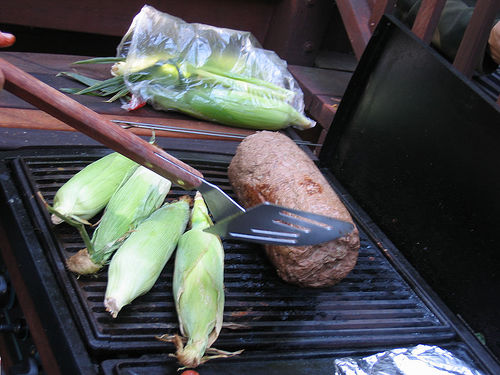
Browning the gryo
After unwrapping the meat, it will look a bit "wane". Ignore the comments of your guests concerning what the long steaming log looks like. Return to the grill over direct heat and cook until nicely browned on the outside. It should be pretty firm and hold together while you are cooking it.
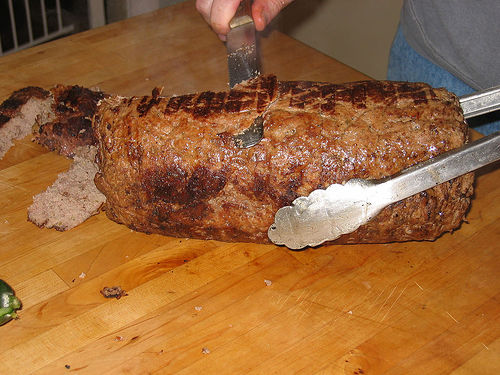
Carving Slices
Slice long thin strips from the outside, moving around the roll after each slice. Slice from each end until all of the brown bits have been removed. You can also make slices from the non-brown parts within, but they obviously don't look as nice.
You can return the roll to the grill to re-brown another layer and slice off more slices. Or, you can cool and wrap the roll to make leftovers the next day. Re-heating can be done either by re-browning on the grill, or by making cold slices and then frying in a pan until browned.
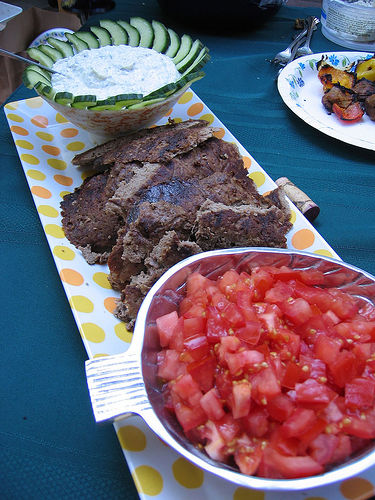
Gyro Service Platter
Here's the classic service, with Tzatziki Sauce and Diced Tomatoes. Not really in season yet, ah well. I cheated on the bread and used a Middle Eastern Flatbread that I purchased from Trader Joe's. It's perfectly exceptable -- but maybe next time I'll also make the bread, because it was the only thing that I'd actually bought.
May 30, 2005
Map of the ribs
My friend Derrick is fast becoming used to BBQ. When our friend Tim announces he's having a BBQ, Derrick is always quick to want to make it a "real BBQ" with some form of long cooked meat. Yesterday he wanted to make ribs (for, as far as I know, the first time). They turned out great, but prior to this he's asked for some tips. Below is the email that I sent him about ribs and trimming of same.
As an aside, while Tim may not have a "real BBQ" he does have an incredible flat gas grill for exactly that purpose. When I finally break down and get a gas grill, it's the kind I'm going to be getting.
Begin email:
I went back over some logs. 6-8 hours seems the norm for my smoker, at around 200-250. Cook the ribs meat side UP, rib side DOWN for the entire time. The ribs on the bottom protect the meat from the more direct heat. You can stack racks of ribs on top of one another to good effect. If you do this, swap them top to bottom every hour or so (more important in the first part of cooking, so that they all get good levels of smoke).
It's also possible that they don't fit in your smoker at all. If that is the case, I'd recommend cutting the slab in half so that you have two "half-racks" -- they'll cook just fine that way. Visualizing it in my head, I could imagine that they might just barely fit w/o cutting them. If that's the case, I'd say try to squeeze them in w/o cutting because they will shrink as they cook.
I suspect you are getting some kind of high-end ribs from a fancy butcher. If this is the case, they've probably been pretty well trimmed. However, if they are not, you may want to consider trimming them. You certainly can cook them untrimmed as well -- I started off doing that myself. As with all BBQ, there are lots of arguments about the right thing(s) to do and if you need to do them. The good news is they are all basically orthogonal to one another, so you and pick and choose what (if anything) to do.
These notes apply to Spare Ribs. Baby back ribs don't require any of the following, except for the skinning (step 3). A fully trimmed rack of spares will sometimes be called Saint Louis Cut Ribs or Kansas City Cut Ribs. I think that one of the two is more aggressively trimmed of the cartilage (step 5), but can never remember which is which.
So, How to Trim Spare Ribs. Maybe interesting reading even if you don't need to actually do it.
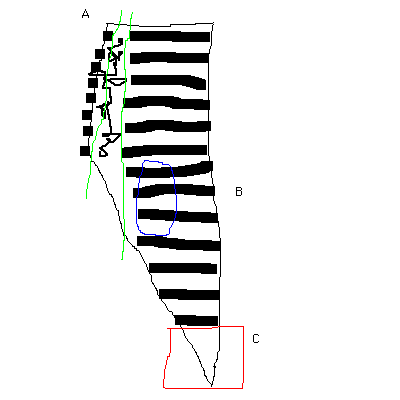
The enclosed picture is either the state of California, or an untrimmed rack of ribs. This is from the "underside" or "rib" side or "concave" side. Obviously if your rack is from the other side of the animal, it will look flipped. I'll list things I do to ribs in the order of decreasing ease.
1) Remove the "deckle" (I'm not sure that's anatomically the right name, but I keep hearing it called that in BBQ shows). This is a flap of meat located around the blue area B (central valley) in the picture. It's only an ounce or so of meat, is not particularly interesting to eat, and often gets in the way during cooking. You don't have to get all fancy about it, just pick up the flap (it really is a flap in that sense), and cut it off where it joins the main body of the ribs. Again, you aren't filleting a fish, so don't try to "get close to the bone" or anything like that, some left behind is OK, just try to get the worst of the "flappy bit" gone.
2) There's a tail end of the ribs (red area marked C, San Diego/Baja)) that don't have any ribs. Again, this is sort of annoying and tends to cook different. On *really* untrimmed ribs it's long enough to make it hard to fit into my smoker. I usually trim off the thinnest bit, but can't stand to completely whack it all off.
3) Skin the ribs. Even trimmed ribs usually still have the skin (note, I don't mean the pigs outer skin :-) ) on. Some BBQ folks say the skin is a protection during cooking. Others (and I agree) think that leaving it on makes for less enjoyable eating. The skin never tenderizes and cannot be chewed at all. To remove the skin easily, work a butter knife or screwdriver (I don't know why BBQ sites recommend the later, but they always do. I use a butter knife) under the skin at the point of the last rib (near C in the diagram). For this picture, go in from the right. The skin is right over the rib, there's no meat between the skin and bone. Since you are working over the bone, there's no danger you might poke into the meat or anything. Once you have the knife basically all the way under the skin (and along the bone), wiggle it back and forth and DOWN (towards C) until it comes out and tears the skin away. If you do this right, you hopefully end up with a "flap" of the skin. It may be a bit ragged, that's OK.
If it's REALLY ragged, you can repeat with the next rib up the chain. Sometimes the butchers will have nicked or cut the ribs as part of the trim or butchering process, so you may have to go up a rib or two to get to more solid skin. Basically, you want something you can grab onto easily. Take a paper towel, grab hold firmly of the flap of skin with one hand, and hold down the rib/meat below it with the other, now, just jerk the skin up and towards the top of the ribs. You've maybe done with the salmon before. Should all come up as one piece more or less. That's it!
The skin doesn't actually cover all of the ribs all of the way up, so don't be worried if it's not a rectangle when all done. If parts of it don't come up, I usually leave them rather than try to worry more bits of it out.
This sounds harder than it is. It's actually very easy, once you've done it once :-)
4) Remove chine-bone. Located near area A (Northern California Coast) in the diagram, on the left hand side, the large black squares are the chine-bone. This is identical to the chine-bone on a rack of lamb, which is most often removed by butchers or at a minimum cut, so that you can slice the rack of lamb without hitting solid bone.
On racks of ribs, you may find:
a) no chine-bone, completely trimmed away. In this case, nothing to do.
b) chine-bone, cut approximately into "squares". In this case, you can either leave it on or not, you'll be able to slice the ribs through the cuts more or less. Usually when they have done this "service" for you, they've also cut into the cartilage area as well, so I usually trim the cut area away. It's going to cook weird because it has all these darn slices in it.
c) chine-bone, uncut. In this case, you really probably should remove it, because service will be a pain. I know, I've tried.
If you decide to trim off the chine-bone, proceed to step 5 as there is no point in making two of these darn cuts if you can get away with one (after you read below, you'll understand why I say this).
5) Remove some of the cartilage section. The squiggly lines between the two green lines near area A are the cartilage. You can remove some, all, or none of this section. Trimmed ribs may be trimmed down all the way already, or not. For competition ribs, they usually trim very aggressively, leaving only the bone area. I think this is wasteful of the meat, but understand why they do it for the judges. The other reason to trim some of this is that this portion of the meat is much thicker, and will take longer to cook. By the time it is tender, the ribs area can be overdone and dry. If you trim this all in one piece, you can cook it separately for longer or (what I usually do) whack it up to make a browned pork stock out of it. The cartilage makes the stock very rich.
So, you can trim in a line along anyplace between the two green lines. You can take off just the chine-bone. Or you can cut waaaaay up near the ribs, or anyplace in between.
Place rack of ribs on a large cutting board, rib side up, long ways away from you (in the diagram, you could be standing in area C), but close to the edge so that you can easily reach up to the top. You do not want to work side-to-side -- the knife could slip, so you want NOTHING in the direction of travel. Get a large heavy knife. I use a meat cleaver. You want a knife with a heavy "heel" edge to it, and I recommend that you NOT use your best knife. You aren't cutting through any bone, but it's still some pretty heavy work.
Place the heel of the knife at the TOP of the line you'll be cutting down (ie, you are going to work from the top down, and will be cutting with the heel of the knife rather than the tip), overlap the ribs by maybe two or three inches. Hold the knife firmly, make sure all other body parts are well away from it, and any forward direction of travel. Press down HARD and slightly forward. The knife will slide forward and down, and hopefully you will hear a sickening "CRUNCH" as it goes through the cartilage. Repeat, moving down two or three inches each time, until you have cut all of the way down along the line you wanted. Depending upon the Force of Your Convictions and the heftiness of the knife, you may be able to make the cut in larger than two or three inches at a time, or you may need to take it one cartilage "lump" at a time.
Again, I probably make this sound harder than it is. It certainly was a bit nerve wracking the first time I did it. The cuts aren't more difficult than cutting through chicken bones/cartilage, but there's more of them in any one place. Try hard to resist the temptation to hold onto the meat near where the knife is. I've had a few close calls before I learned that.
May 23, 2005
Tri Tip Slices
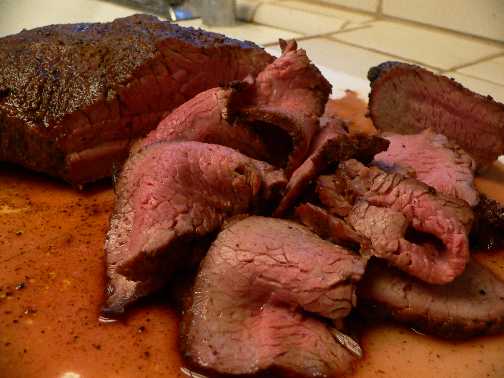
Tri Tip
Again with the offset smoke/roasting. Today's entry: tri tip.
Rubbed with a basic BBQ seasoning, offset smoked for 45 minutes (turning/flipping halfway through) until an internal temperature of 140. Carried over up to about 147.
Didn't do anything super exciting with this, except pile it high on some crusty rolls and eat. "What is it with you and the sandwiches, kid?"
May 22, 2005
Quicker BBQ
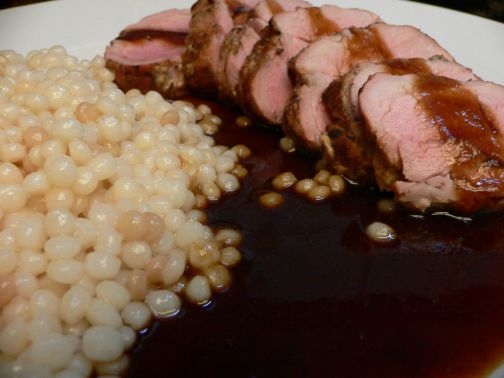
Smoked Pork Tenderloin, Carmelized Onion Sauce
I've been experimenting with faster forms of "BBQ" or smoking for use with more tender cuts of meat (ie, chicken breasts, pork tenderloin, loin steaks, etc). These cuts don't contain enough fat within the meat itself to cook at the low temeratures for the extended periods of time that "real BBQ" requires. But they sometimes do taste good with a smoke flavor.
Today I used a pork tenderloin, treated simply with salt and pepper and a light brush with a French mustard. I cooked it offset from the fire in a Weber grill, well away from the heat. Two large chunks of pecan wood provided the smoke. This method ends up being like roasting in an oven with the additional flavoring of the wood.
Total cooking time was just over 20 minutes, and I took the meat up to just a few degrees shy of a target of 140 F. A small piece of meat like this will have minimal carry-over (I wasn't watching during the resting, but I think this peaked at 143 or so), especially if you aren't cooking it directly over the flame. This temperature may be too rare for some of you, but I find that you can very easily overcook pork, so I prefer mine a bit less cooked than some. In any case, cook to the temperature that you prefer.
The sauce sounds impressive and is either easy or hard depending upon how you look at it. I took about a pint of left over French Onion Soup, strained the onions from it, and reduced over low heat until a syrup/sauce was reached. Really can't get much simpler than this, however, the input might not be something people have on hand:
- carmelize onions until very brown
- deglaze with white wine
- add 1/2 chicken stock, 1/2 oxtail stock
- S&P to taste
- thyme
- simmer for an hour or so
- re-season, brighted with a hit of cognac
I had made this at the tail end of our winter here in California. I couldn't just toss the rest, but it really has become too warm here for me to want to eat the rest as soup. Thus, this "instant" sauce was born.
The sweetness from the long-cooked onions worked very well with the pork. Often pork sauces have more direct sugars in them (in the form of fruit), but this was much more subtle and not sweet enough to be annoying to me.
May 16, 2005
Hot & Cold
Short Ribs in Green Curry Paste
The weather was strange here over the weekend (a mixture of warm in the day with cold and sometimes rainy nights). I decided to do a strange mixture of a dish to go along with that.
Braised Short Ribs (traditionally a winter dish) in a Spicy Thai Green Curry Paste (a dish I personally enjoy during the summer months).
- 6 short ribs, trimmed of all fat. Salt and Pepper, Brown well on all sides.
- Add curry paste (see below), water to just come to the tops of the ribs, cover and simmer slowly until tender (2-3 hours). Uncover and (if needed) reduce liquid until desired thickness is reached.
- Add vegetables (I used baby canned corn and straw mushrooms, just because that's what I usually do). Cook another 10 minutes.
- (Optional) Add 1 can coconut milk. Cook until warmed and reduced as needed.
Green Curry Paste
- 2 serrano or thai bird chilies, deseeded
- 4 anahiem chilies, deseeded
- 1 bunch green onions
- 1 T minced ginger
- 1 T minced garlic
- 1 T commerical curry powder
- 1 T ground cumin
- Juice of 1 lime
- 1-2 T fish sauce
- 1/2 bunch cillantro
Grind in a food processor until very smooth. I add the ingredients in the order listed and try to get a good chop before adding the liquid ingredients. I add the cillantro at the end to avoid completely destroying it.
May 03, 2005
My ears are burning
Well, a little birdy told me that there has been some discussion in the food blogging world about me. The query was "Do you think that guy from butterpig has any formal training?"
I spent three months at the CIA in upstate New York. It was one of the most amazing experiences of my life. Based upon the above prompting, I dug around and pulled up this entry. It's probably the best I can write up about what it's like to be at the CIA. It still doesn't express it all, but what can I say. I'm an engineer, not a chef, and not a writer.
May 02, 2005
Odd Todd
The folks at America's Test Kitchen have gotten a new person to do their "food science" section. Odd Todd is best known for his Flash animations about being laid off. The first one was about flambe and was funny as well as informative. "No, you cannot flambe with beer."
Pretty interesting choice for someone as stuffy as Mr. Kimball. I only wish that they (or Todd himself) had the animations online.